Making flying geese one at a time is a straightforward method that ensures precision and ease, perfect for beginners and seasoned quilters alike. Flying geese blocks are a staple in the quilting world, known for their versatility and ability to add dynamic movement to your quilt designs.
These are quite popular in modern quilt designs.
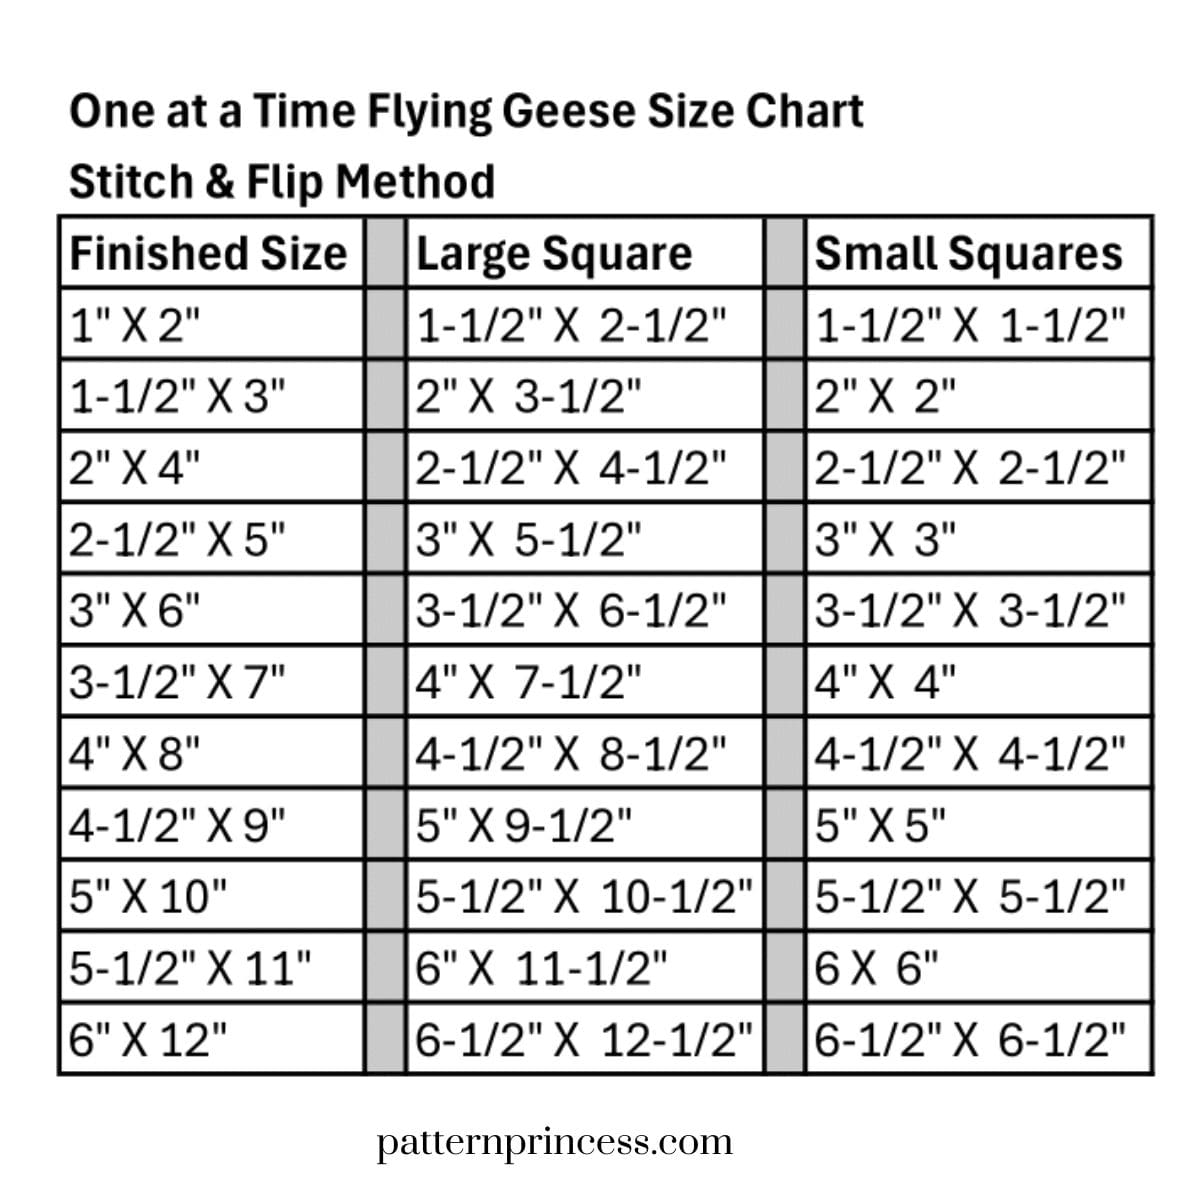
Size Chart. Near the bottom of this tutorial, you’ll find a block size chart for making different sizes.
Now My Favorite Method
I Was Always Frustrated. For quite a while now, I have avoided making just one or two flying geese units. Why? Because they never turned out right. The point was lost and when sewn into my project, it created a rounded rather than pointed units in the blocks.
Making four at a time I had no issues with, for some reason, it was making them one at a time that gave me the trouble. Even when I tried following many tutorials. Often, I would swap out the flying geese unit in patterns for half square triangles.
Finally, I decided to ask a friend who has been quilting for years. Why I waited so long is beyond me. Within a few minutes, I was on my way happily making flying geese one at a time. She gave me a few tips that were a game changer and I realize why the patterns I had tried still turned out wonky. It all has to do with the small squares…
I also figured out that this method has a name. The stitch and flip method of making flying geese is most commonly used. I see this technique used in patterns and magazines frequently. The advantage of this method is that you have more control over directional fabric and it’s simple. It also works if you are trying to use up scrap fabric as you don’t need to start with such a large square as you would in the four at a time no waste method.
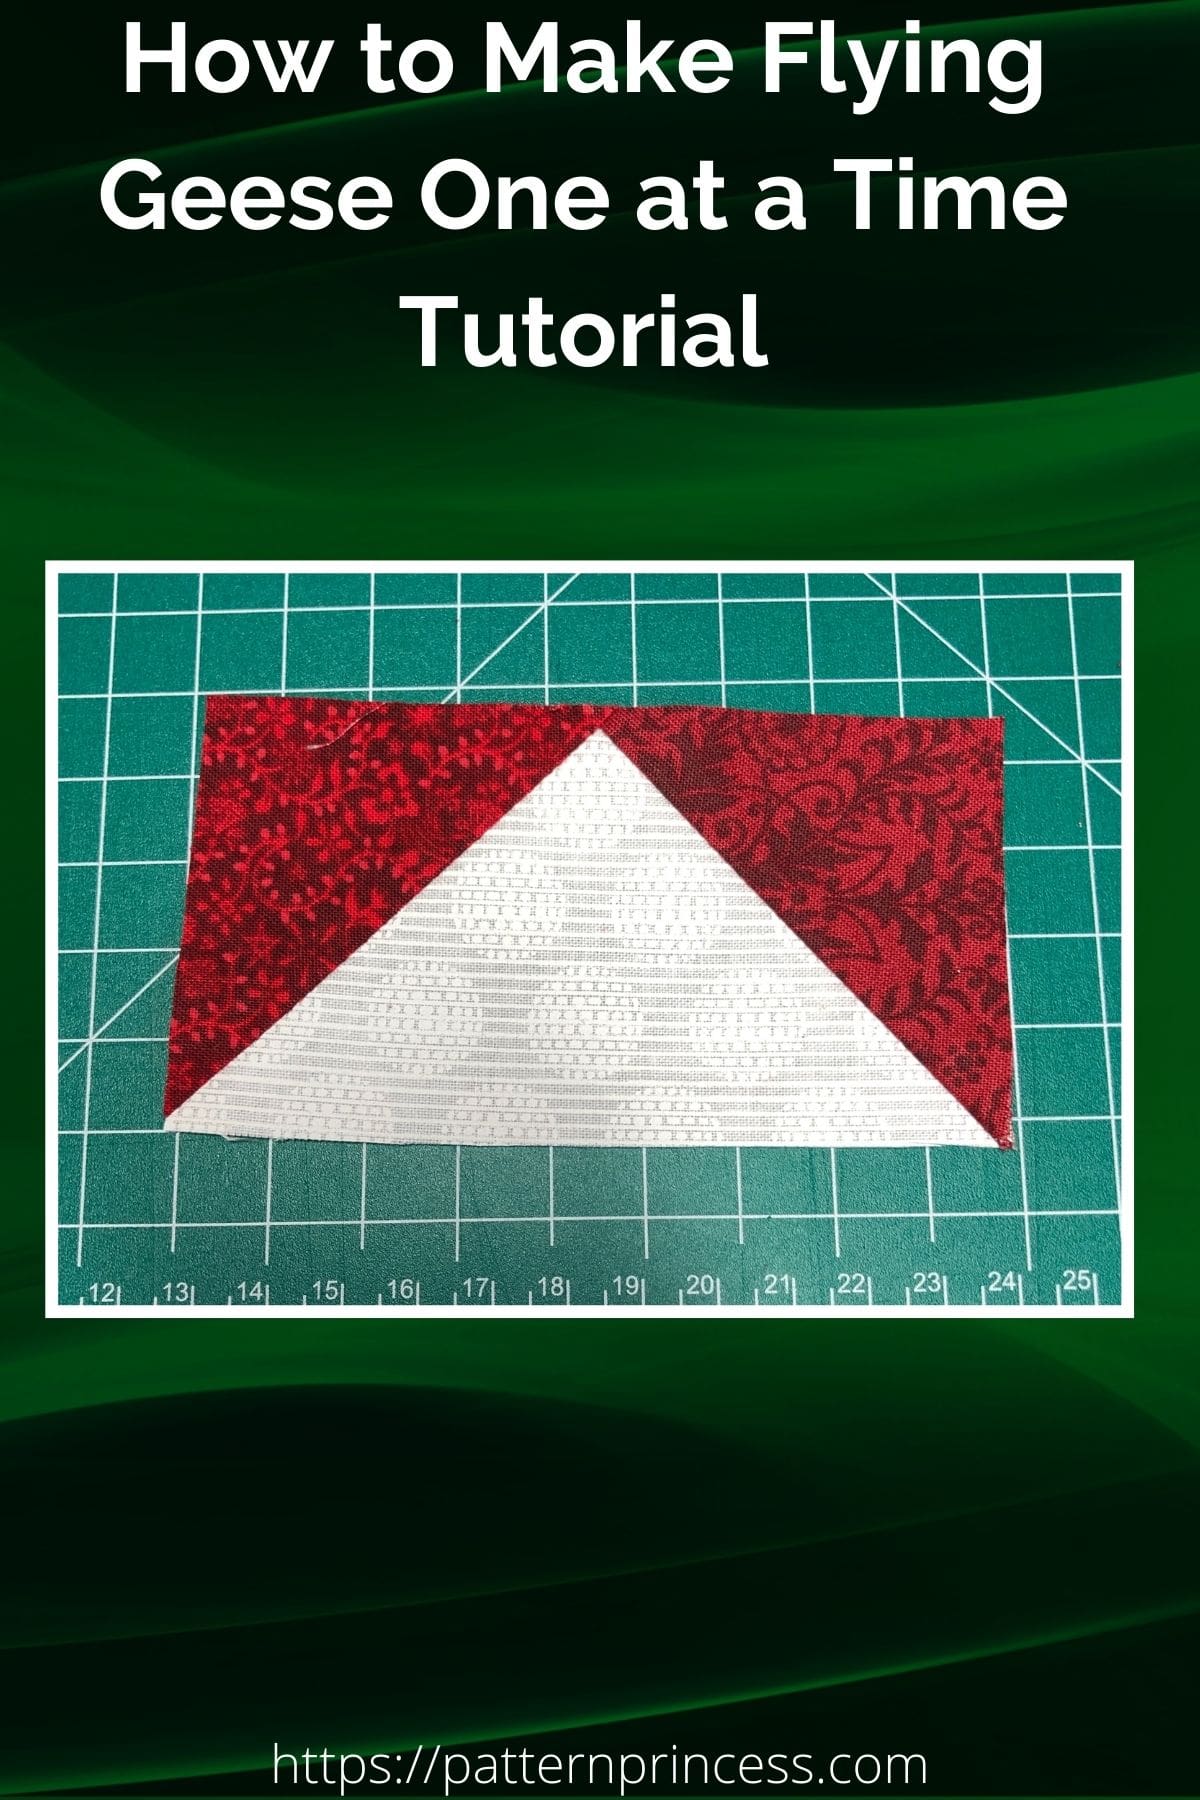
Super Easy Flying Geese Tutorial
In this tutorial, we’ll guide you through each step of creating these charming blocks, making it easy to incorporate them into your next project. This is by far my favorite method as I get beautiful results every time now.
Step 4 is the different method from all the other tutorials for the flying geese quilt blocks, and it really helps create a beautiful unit.
The pattern for today will create a 1-2” X 4” finished size. To figure out dimensions for larger or smaller units, simply add ½” when cutting to the desired size.
Directions: How to Make Flying Geese One at a Time Tutorial
Skill Level
Beginner
Materials Needed
To get started, gather the following materials:
- Fabric for the geese: Choose your desired color and pattern. Each goose will require a rectangular piece of fabric.
- Fabric for the background: This fabric should contrast with your goose fabric. You’ll need squares of this fabric.
- Rotary cutter and mat
- Quilting ruler
- Sewing machine
- Iron and ironing board
- Quilting pins or clips to hold pieces in place.
Pattern Notes
Sew fabrics together using ¼” seam allowances.
Sew fabric with the right sides together.
Step 1: Cutting Fabric
Begin by cutting your fabric pieces. For each flying geese block, you will need:
- One rectangle of the goose fabric 2.5 inches by 4.5 inches.
- Two smaller squares of the background fabric 2.5 inches by 2.5 inches.
Ensure your cuts are precise for the best results. Using a rotary cutter and a quilting ruler will help you achieve clean, straight edges.
Step 2: Marking Guidelines
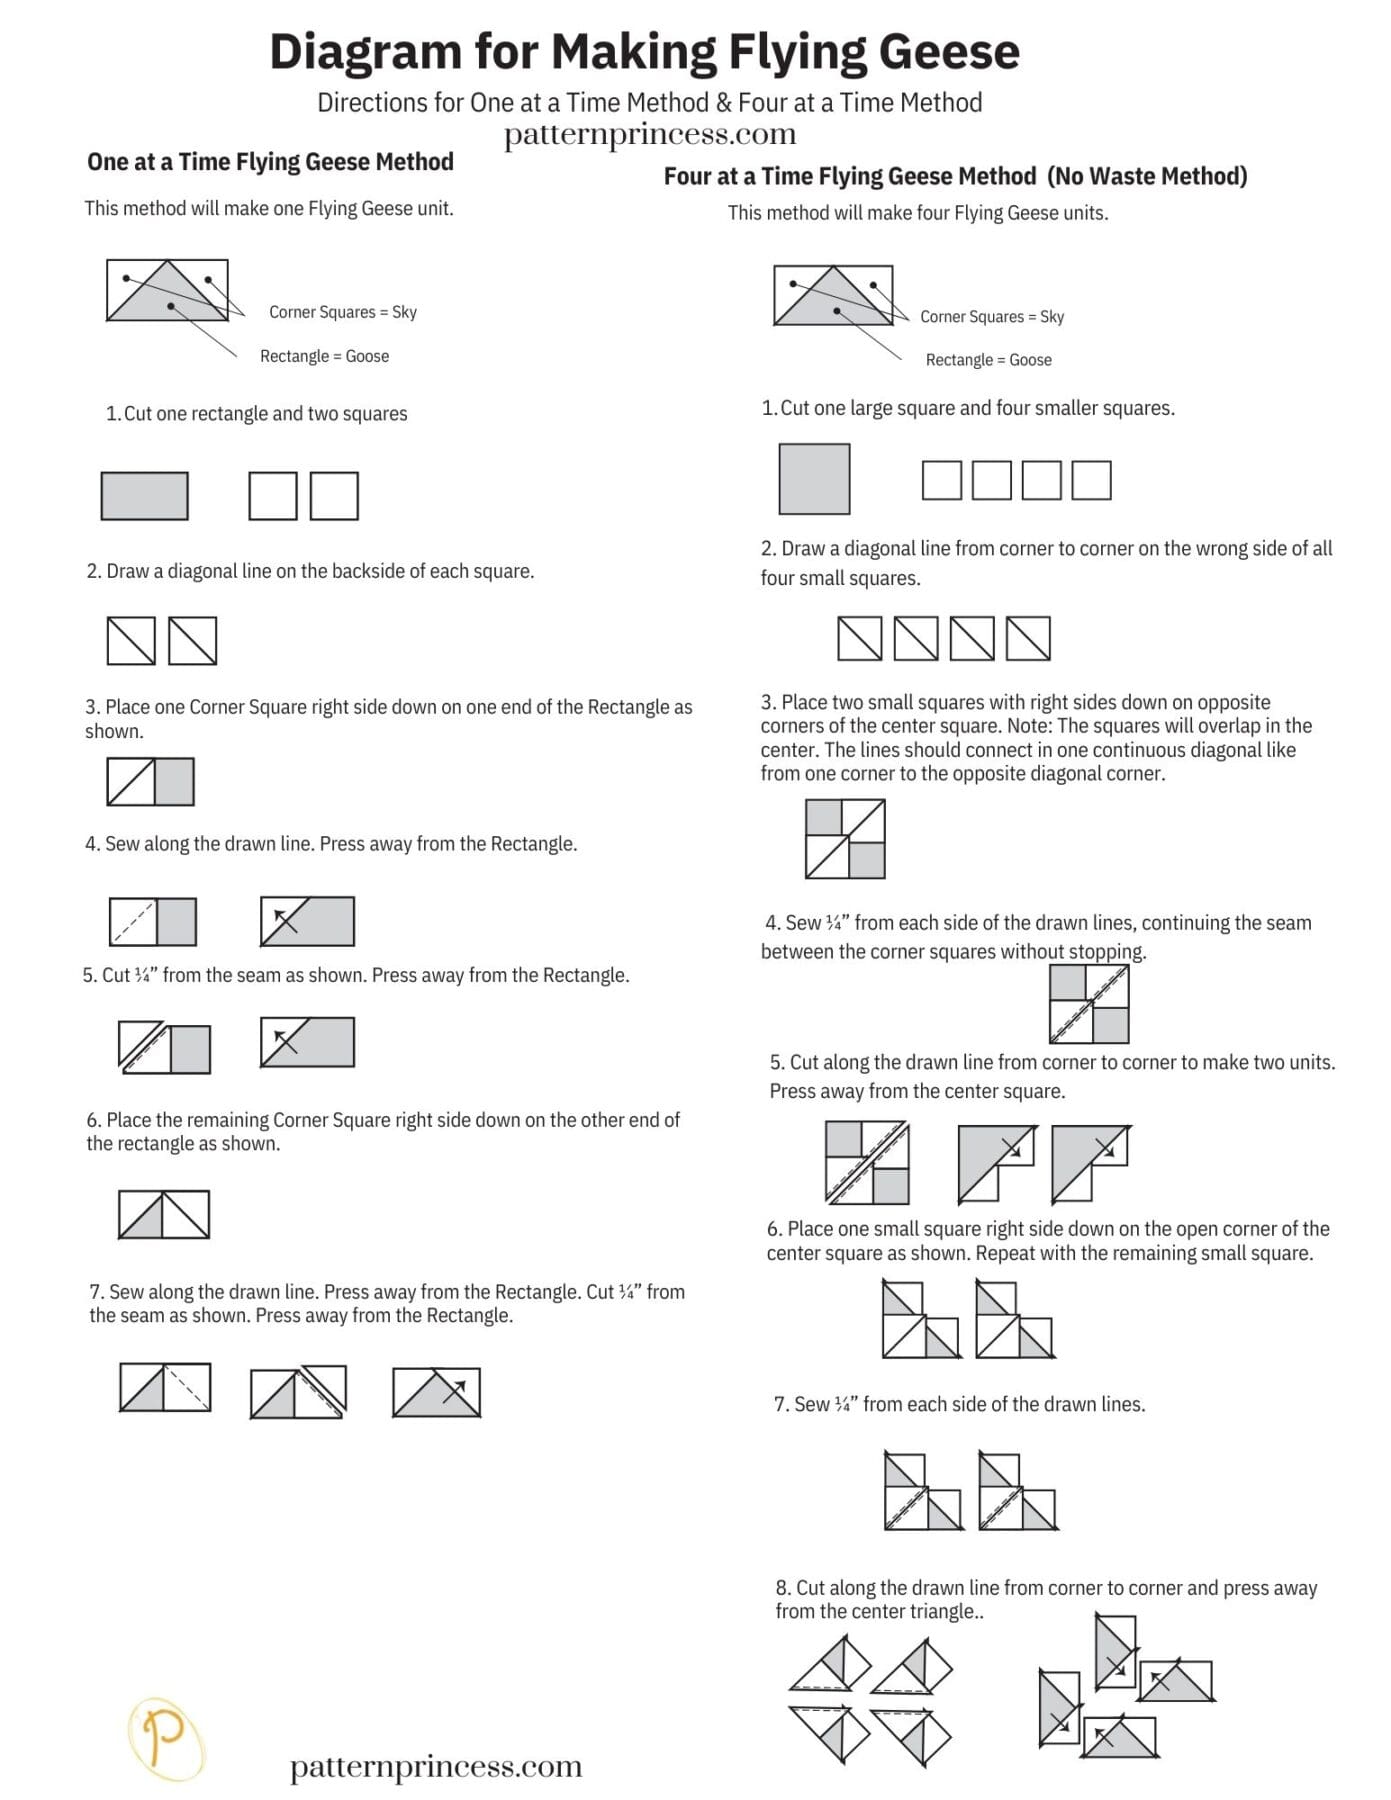
Use the two small squares and a fabric marking pen or pencil. Draw a diagonal straight line from one corner to the opposite corner on the wrong side of each small square. This line will serve as your sewing guide.
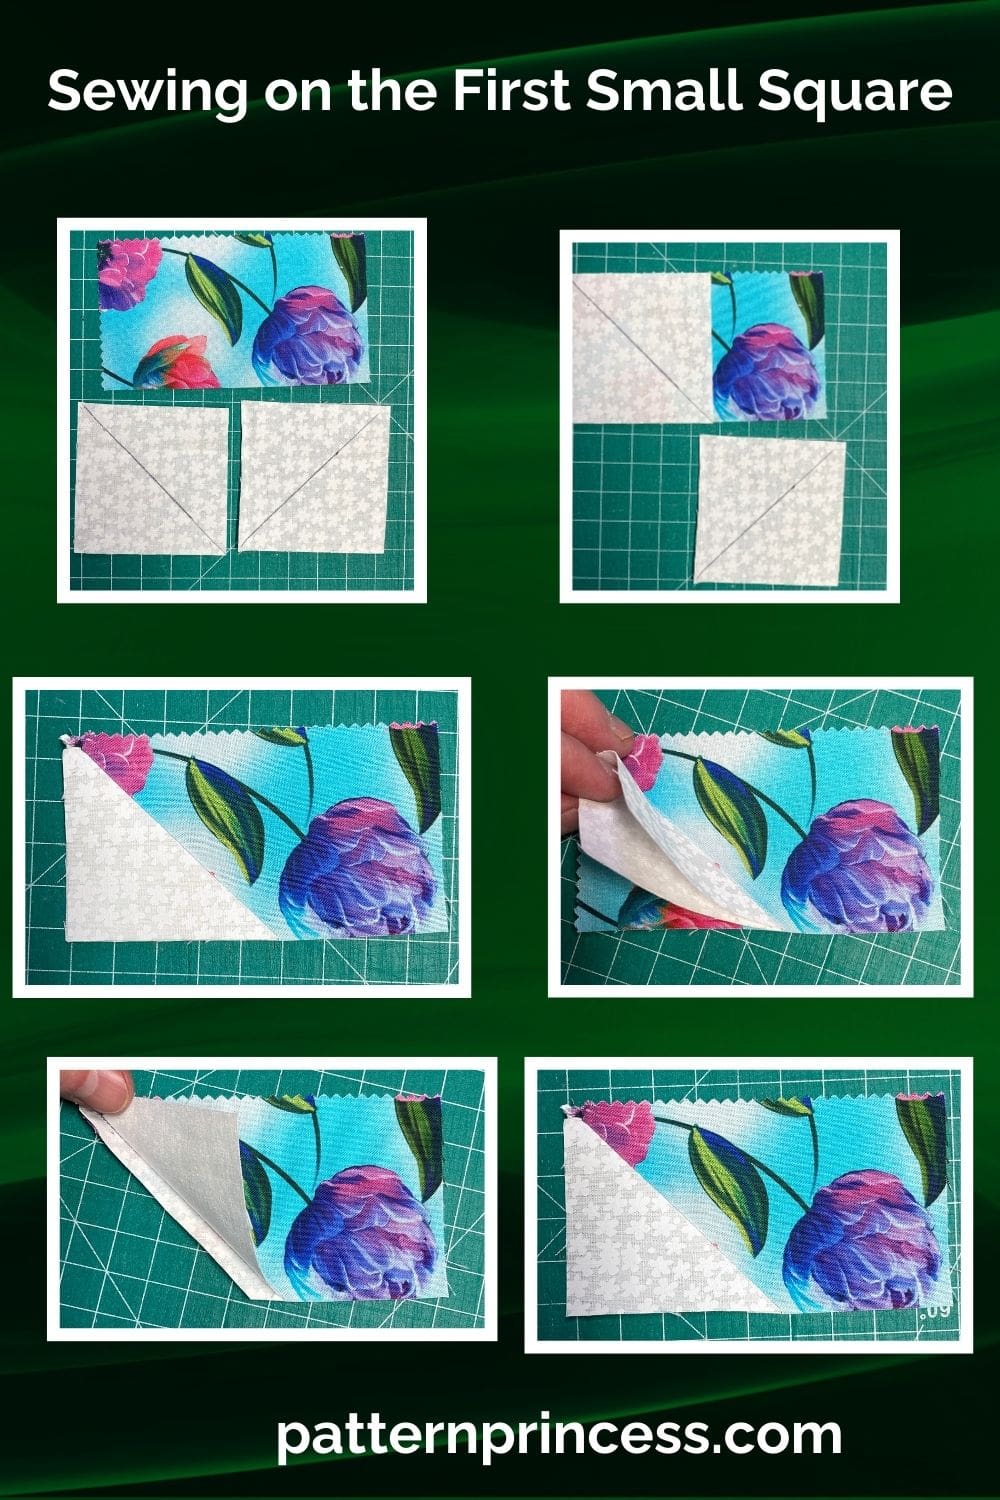
Step 3: Placing Pieces
Place the marked background square on top of the goose rectangle, right sides together, aligning the edges. Ensure the marked diagonal line runs from one corner of the rectangle to the opposite edge, forming a triangle shape.
Step 4: Sewing Seam Lines
With your sewing machine, stitch directly on the marked diagonal line.
At this point, most patterns will tell you to trim the excess at ¼” and then press. Do This Instead: Fold the square open and align both points on the square with the point on the rectangle, then press. Now you can open the square back up and trim the excess fabric from the seam allowance leaving a quarter-inch seam. Once trimmed, fold back out before repeating the steps for the square on the other side.
Repeat the process with the second background square on the other side of the goose rectangle. Align the edges, sew along the marked line, fold the square out aligning the edges and pressing, then trimming the excess fabric, and pressing the seam again.
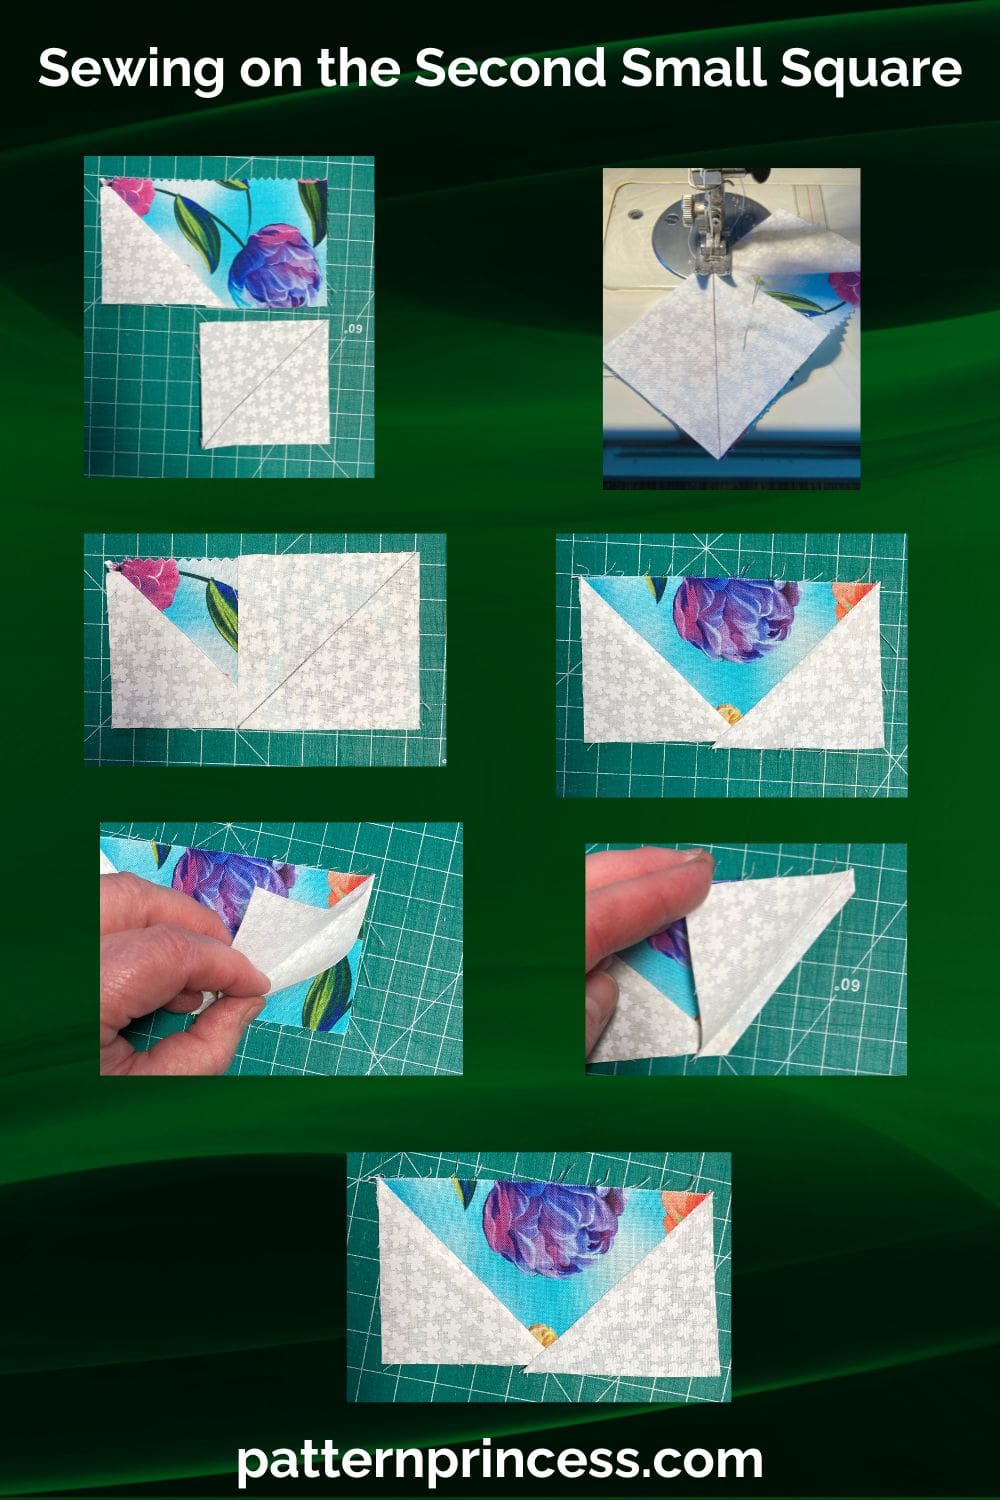
You now have one completed flying geese block!
Continue making additional flying geese blocks as needed for your project. Once you have the desired number, you can assemble them into rows or patterns according to your quilt design. The blocks can be arranged in various ways to create stunning visual effects.
Tips and Variations
- Precision is Key: Ensure your fabric pieces are cut accurately and your seam allowances are consistent to achieve perfect flying geese blocks.
- Chain Piecing: A great way to save time. Try chain piecing multiple flying geese blocks by sewing one after another without cutting the thread between blocks.
- Color Play: Use contrasting or complementary colors for the goose and background fabrics to add interest and depth to your quilt.
Making flying geese one at a time is a simple yet effective method for adding beautiful geometric elements to your quilts. With this easy way, you’ll be creating flying geese blocks with confidence in no time.
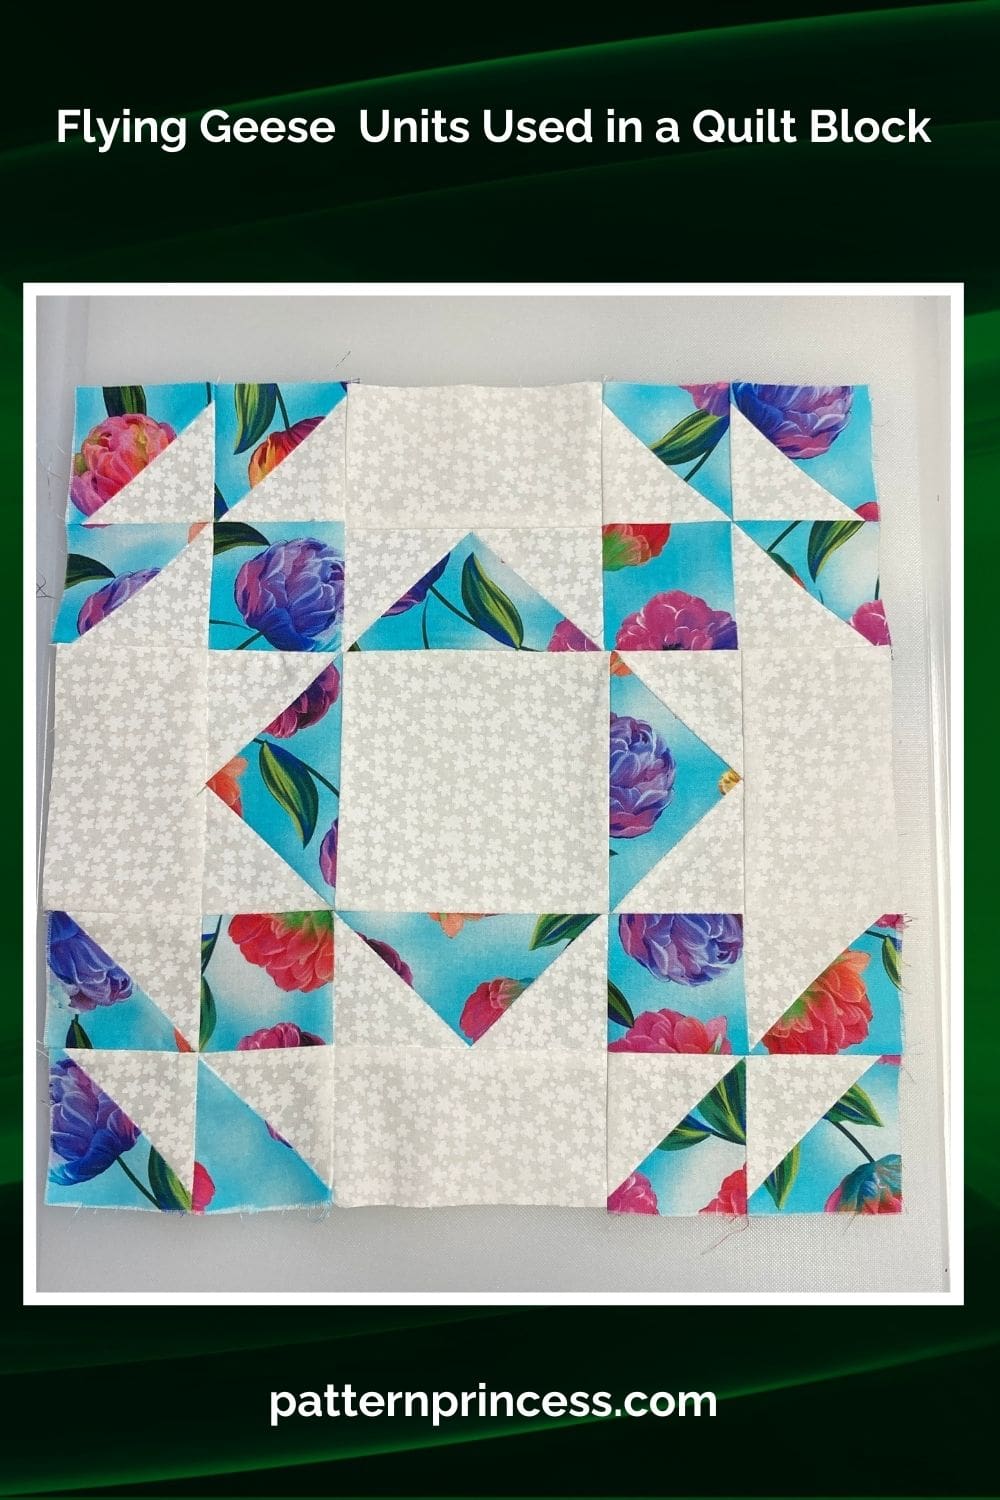
What Quilt Blocks Use the Flying Geese?
Flying geese blocks are incredibly versatile and can be used in a variety of modern quilt patterns and designs. Here are some common types of blocks and quilt patterns that feature flying geese:
1. Star Blocks
Flying geese are often used to create the points of star blocks. Popular star block patterns include:
- Sawtooth Star: This block uses flying geese to form the points of an eight-pointed star.
- Ohio Star: Combining flying geese with square and quarter-square triangles, this block creates a classic star design.
2. Chevron and Zigzag Patterns
Arranging flying geese blocks in a row can create striking chevron or zigzag patterns. These designs add a sense of movement and modern flair to quilts.
3. Medallion Quilts
Flying geese can be used as borders or frames in medallion quilts, enhancing the central motif and adding intricate detailing around the edges.
4. Dutchman’s Puzzle
This traditional block consists of multiple flying geese arranged in a pinwheel-like pattern, creating a dynamic and intricate design.
5. Pineapple Block Variations
Flying geese can be integrated into pineapple block variations to add complexity and texture to the quilt design.
6. Log Cabin Variations
In some log cabin variations, flying geese can be used to add directional movement and contrast within the traditional log cabin layout.
7. Flying Geese Borders and Sashing
Flying geese are commonly used as borders or sashing between blocks in a quilt, providing a cohesive and decorative frame for the quilt top.
8. Arrowhead Blocks
Arranging flying geese in a way that they point in one direction creates arrowhead blocks, which can add a sense of direction and focus to the quilt.
9. Churn Dash Variations
Flying geese can be incorporated into churn dash block variations, adding interest and complexity to this classic block.
10. Row-by-Row Quilts
In row-by-row quilts, use them in rows, adding a geometric and structured element to the overall design.
Example Quilt Patterns Featuring Flying Geese:
- Flying Geese Quilt: A quilt composed entirely of flying geese blocks arranged in various patterns.
- North Star Quilt: Uses flying geese to form the points of large star motifs.
- Carpenter’s Star: This intricate block often incorporates flying geese in its design.
Enhance the overall design by incorporating these various quilt patterns. Add a touch of traditional charm or modern elegance, depending on the arrangement and color choices.
It’s my favorite way to make just a few flying geese blocks just one at a time. I hope you give this method a try the next time. I now have perfect points every time.
How to Make Flying Geese One at a Time Tutorial
Equipment
- Rotary cutter and mat
- Quilting Ruler
- Sewing Machine
- Iron and ironing board
- Quilting pins or clips to hold pieces in place.
Materials
- Fabric for the geese: Choose your desired color and pattern. Each goose will require a rectangular piece of fabric.
- Fabric for the background: This fabric should contrast with your goose fabric. You’ll need squares of this fabric.
Instructions
Step 1: Cutting Fabric
- Begin by cutting your fabric pieces. For each flying geese block, you will need:
- One rectangle of the goose fabric 2.5 inches by 4.5 inches.
- Two smaller squares of the background fabric 2.5 inches by 2.5 inches.
- Ensure your cuts are precise for the best results. Using a rotary cutter and a quilting ruler will help you achieve clean, straight edges.
Step 2: Marking Guidelines
- Use the two small squares and a fabric marking pen or pencil. Draw a diagonal straight line from one corner to the opposite corner on the wrong side of each small square. This line will serve as your sewing guide.
Step 3: Placing Pieces
- Place the marked background square on top of the goose rectangle, right sides together, aligning the edges. Ensure the marked diagonal line runs from one corner of the rectangle to the opposite edge, forming a triangle shape.
Step 4: Sewing Seam Lines
- With your sewing machine, stitch directly on the marked diagonal line.
- At this point, most patterns will tell you to trim the excess at ¼” and then press. Do This Instead: Fold the square open and align both points on the square with the point on the rectangle, then press. Now you can open the square back up and trim the excess fabric from the seam allowance leaving a quarter-inch seam. Once trimmed, fold back out before repeating the steps for the square on the other side.
- Repeat the process with the second background square on the other side of the goose rectangle. Align the edges, sew along the marked line, fold the square out aligning the edges and pressing, then trimming the excess fabric, and pressing the seam again.
- You now have one completed flying geese block!
Notes
We hope that you have enjoyed this lovely flying geese quilt block pattern.

You can find Victoria crocheting, quilting, and creating recipes. She has cooked in restaurants for over 20 years, including many larger parties. She learned to crochet when she was just 11 years old and has been crocheting ever since; over 50 years now. Over 40 years ago, she loved her first class in sewing and continues to hone her skills in quilting. Many have enjoyed the handmade gifts over the years. In her professional career, she has worked in management in a wide variety of businesses including higher education as a dean of a division. All the while attending college part-time to achieve her doctorate in higher education with an emphasis in e-learning.

Thanks for the tip on pressing before trimming.