Last updated on July 4th, 2024 at 11:28 pm
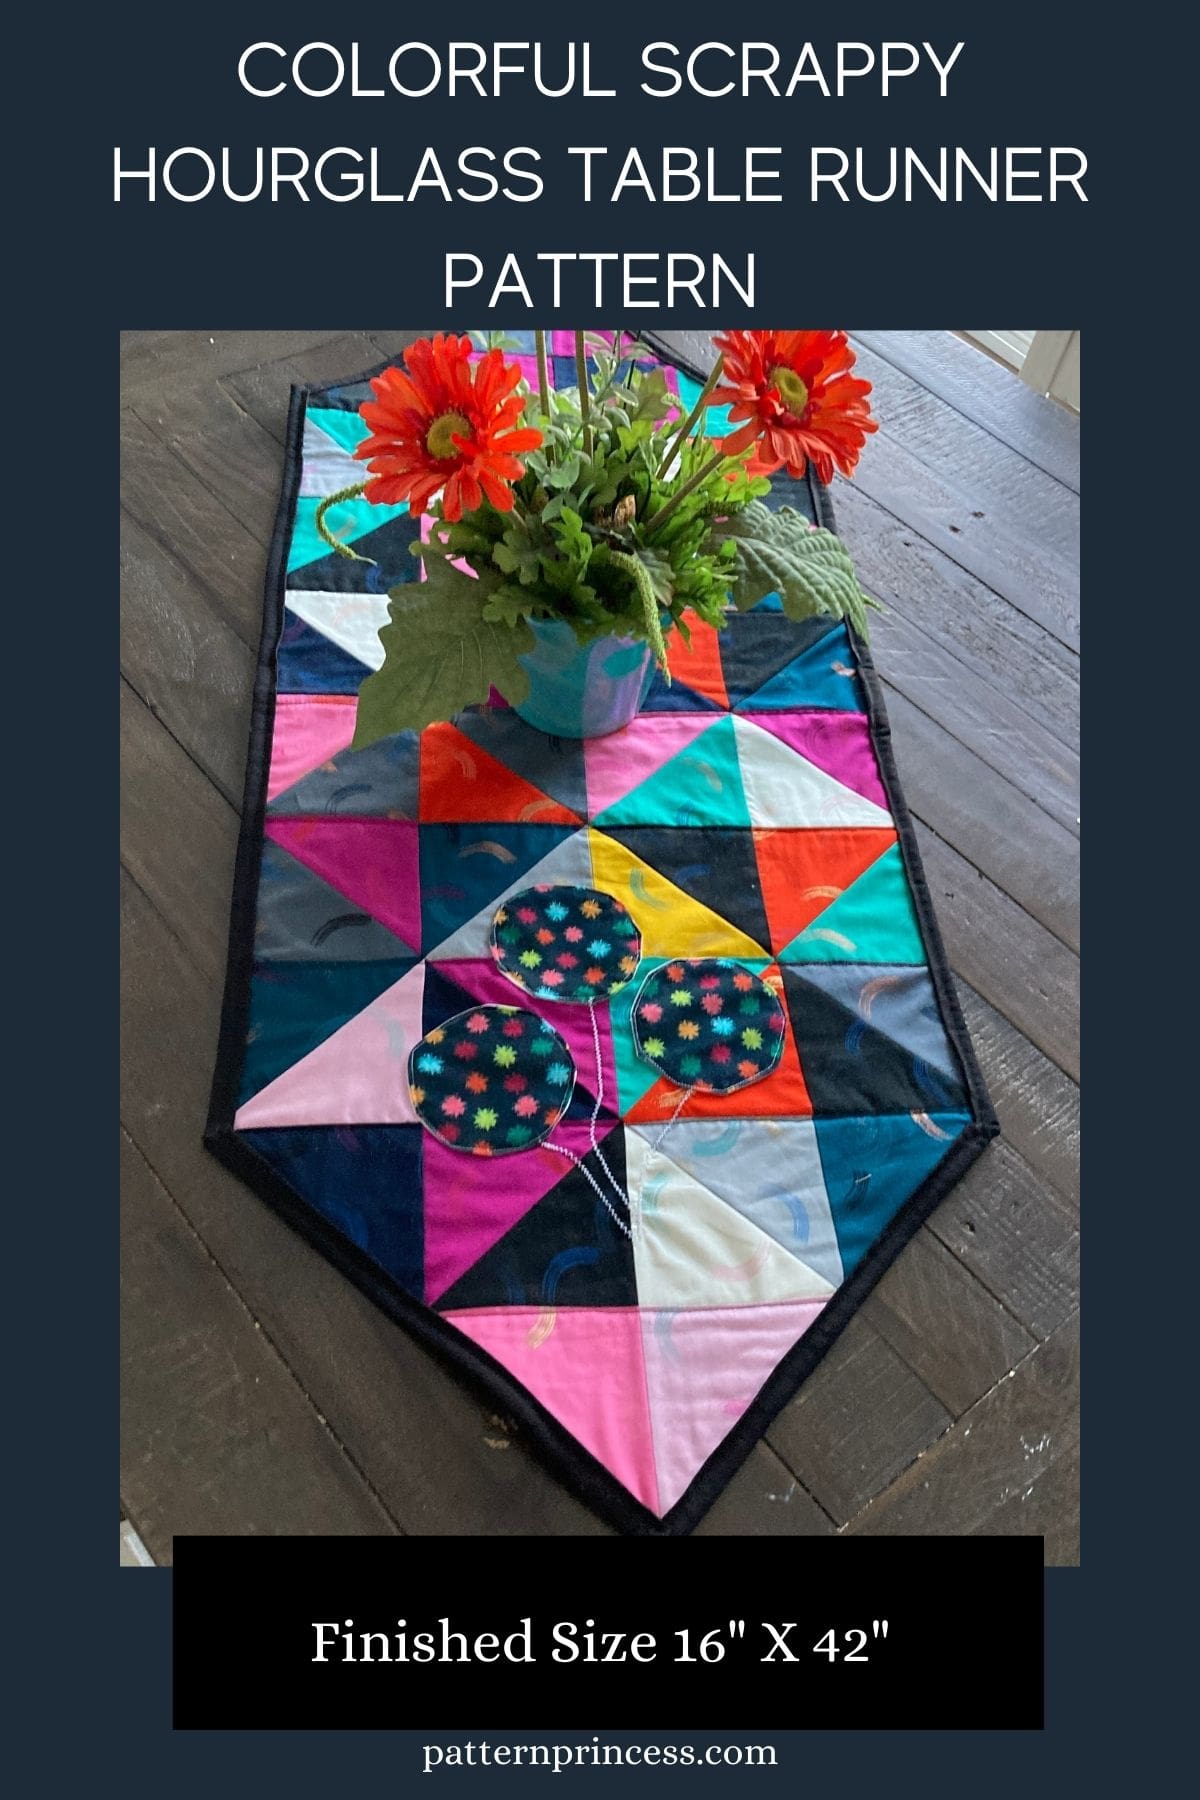
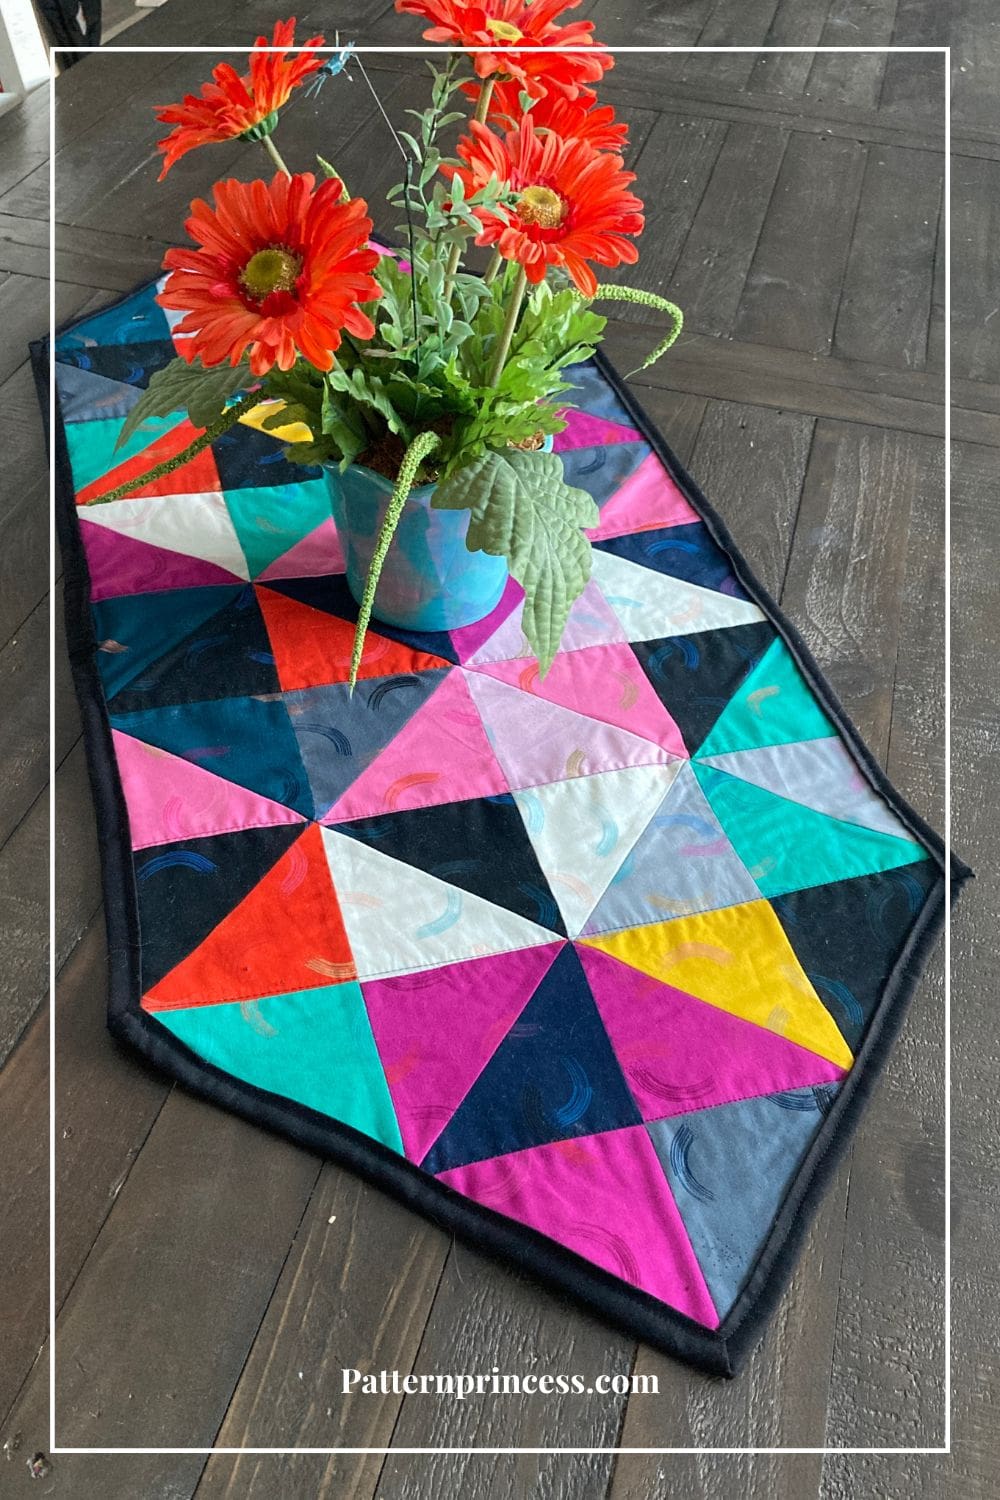
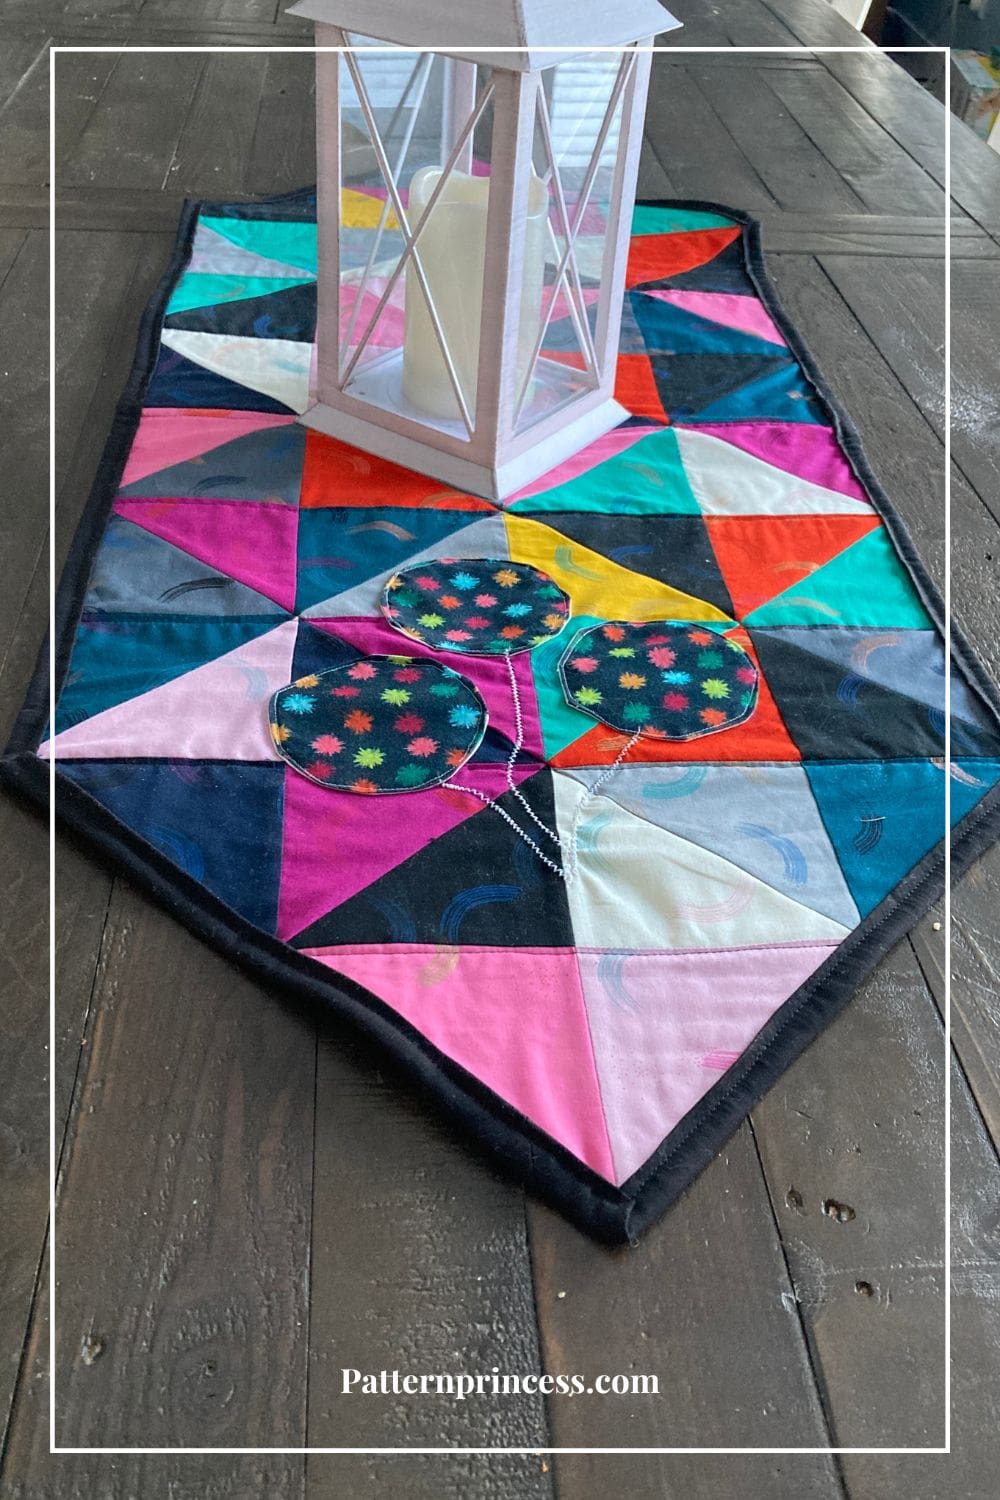
This colorful scrappy hourglass table runner adds a touch of sass as an easy home decoration. If you’re a fan of playful designs, bold hues, and a touch of whimsy in your decor, you’re in for a treat.
This charming table runner combines the timeless elegance of hourglass quilt blocks with the creative freedom of scrappy fabric selection. But what sets this pattern apart is its unique construction method.
Rather than laboriously piecing each hourglass block individually, we’ll be employing a clever “4 at a time” technique, making the process both efficient and enjoyable.
There is a quilt challenge from Project Quilting that prompted this colorful scrappy hourglass table runner with the applique balloons. It’s the hourglass quilt challenge and it must include patchwork, appliqué, and have 3 layers stitched together. We have one week from start to finish and this is my submission for the challenge.
Post contains affiliate links, and we earn commissions if you shop through the links on this page. For more information, please read the disclosure section under the About Us page.
Charm Pack Mini Quilt Pattern
Make this entire tablecloth top measuring 16 X 42-inches using just one charm pack. Using curated precut fabrics took all the guesswork out of this sewing project.
Setting Quilt Blocks on Point
Setting a quilt block on point refers to arranging the blocks diagonally rather than horizontally or vertically. Instead of aligning the edges of each block in straight rows, the blocks are rotated so that their corners point towards the corners of the quilt, creating a diamond-shaped layout.
This technique adds visual interest and complexity to the quilt design, as well as allowing for more intricate secondary patterns to emerge.
Overall, setting quilt blocks on point can elevate the aesthetic appeal of a quilt and add a dynamic dimension to its design. It’s a versatile technique that allows quilters to explore different arrangements and create stunning quilts with unique visual impact.
March is National Craft Month!
We have partnered with favecrafts and included this pretty baby blanket in their free crafts celebration.
Celebrate National Craft Month 2024 and visit favecrafts to discover a new tutorial every day this month!
Directions: Colorful Scrappy Hourglass Table Runner Pattern
Skill Level
Confident Beginner
Size
16 X 42-inches in a hexagon shape
Pattern Notes
All seams are ¼ inch unless otherwise noted.
This pattern uses the method of sewing 4 hourglass quilt blocks at once.
Materials Needed
Quilt Top uses 40 charm squares 5 X 5-inches each. Fabric scraps work well for this.
Backing Fabric 18 X 44 inches or 1 ¼ yards.
Batting 18 X 44 inches or 1 ¼ yards.
Applique
Top fabric (3), 6-inch squares.
Bottom fabric (3), 6-inch squares.
Equipment / Tools
- Pencil
- Scissors
- Quilting Ruler
- Rotary Cutter
- Straight pins
- Iron
- Ironing board with a pad
- Sewing Machine
- My Favorite Quilting Supplies
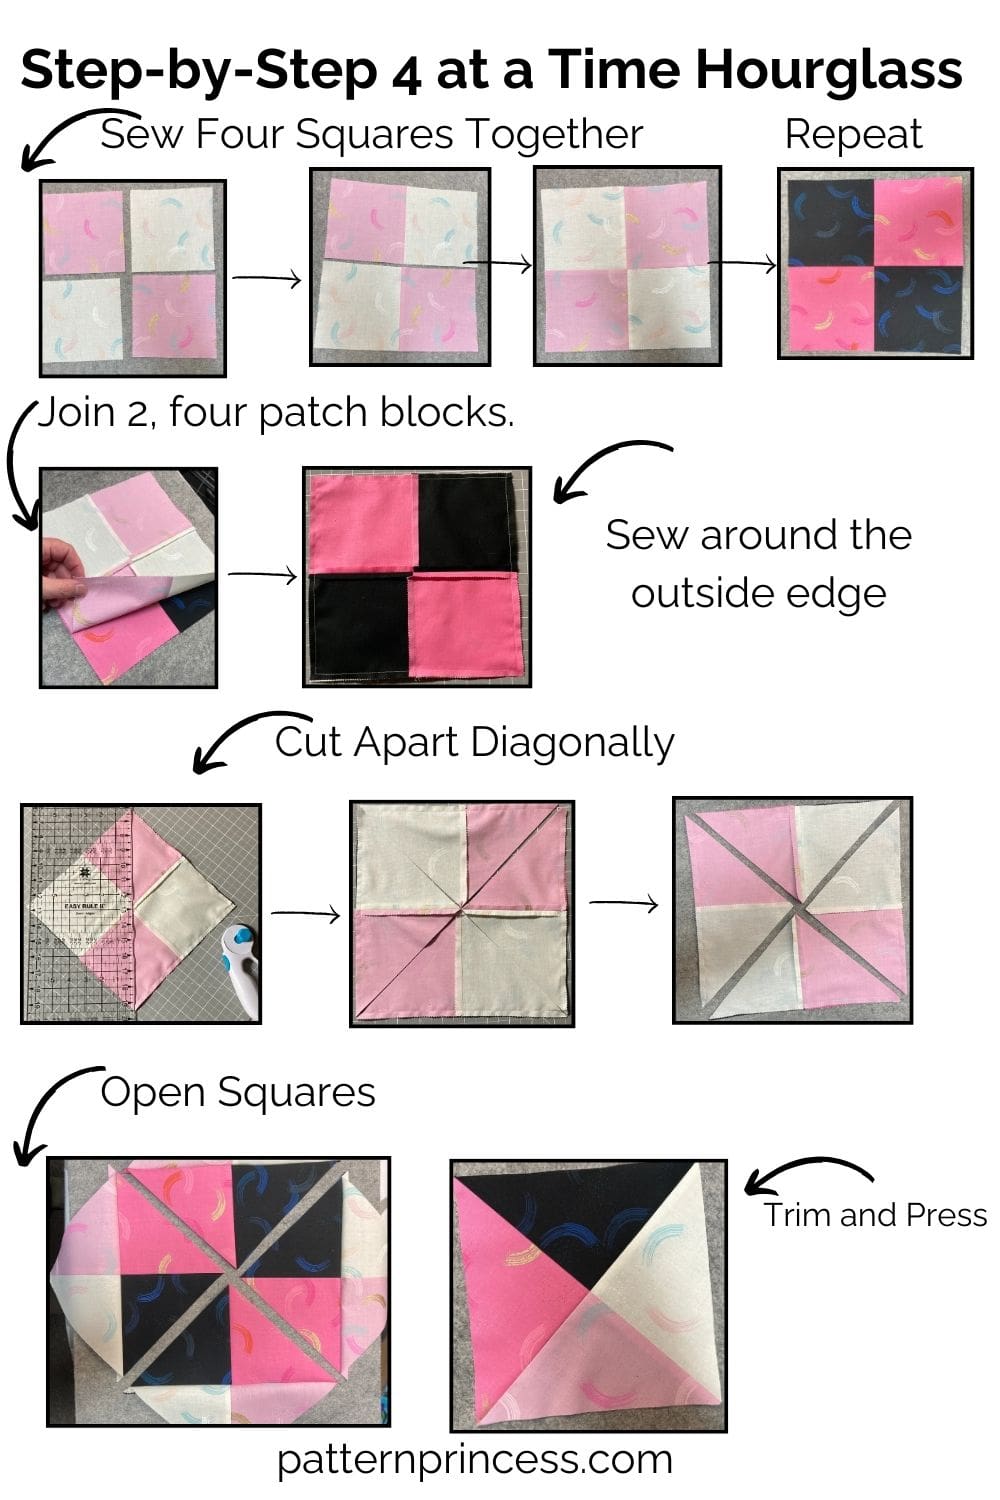
Begin by Making Four Patch Quilt Blocks
Lay out four squares. It is best to have at least two light and two dark squares or all four squares a different color or printed fabric.
To make the four patch, begin by placing the top two squares together with the right sides together. Sew the two squares together using ¼ inch seam allowance. Press the seams to the right. Repeat this process for the other two squares pressing the seams to the left.
Next, place the two top and bottom rows together with the right sides together and the seams nested. Pin in place where the seams align. Using ¼ inch seam allowance, sew the top and bottom rows.
Press seams to one side or open. You have just completed making one four patch quilt square.
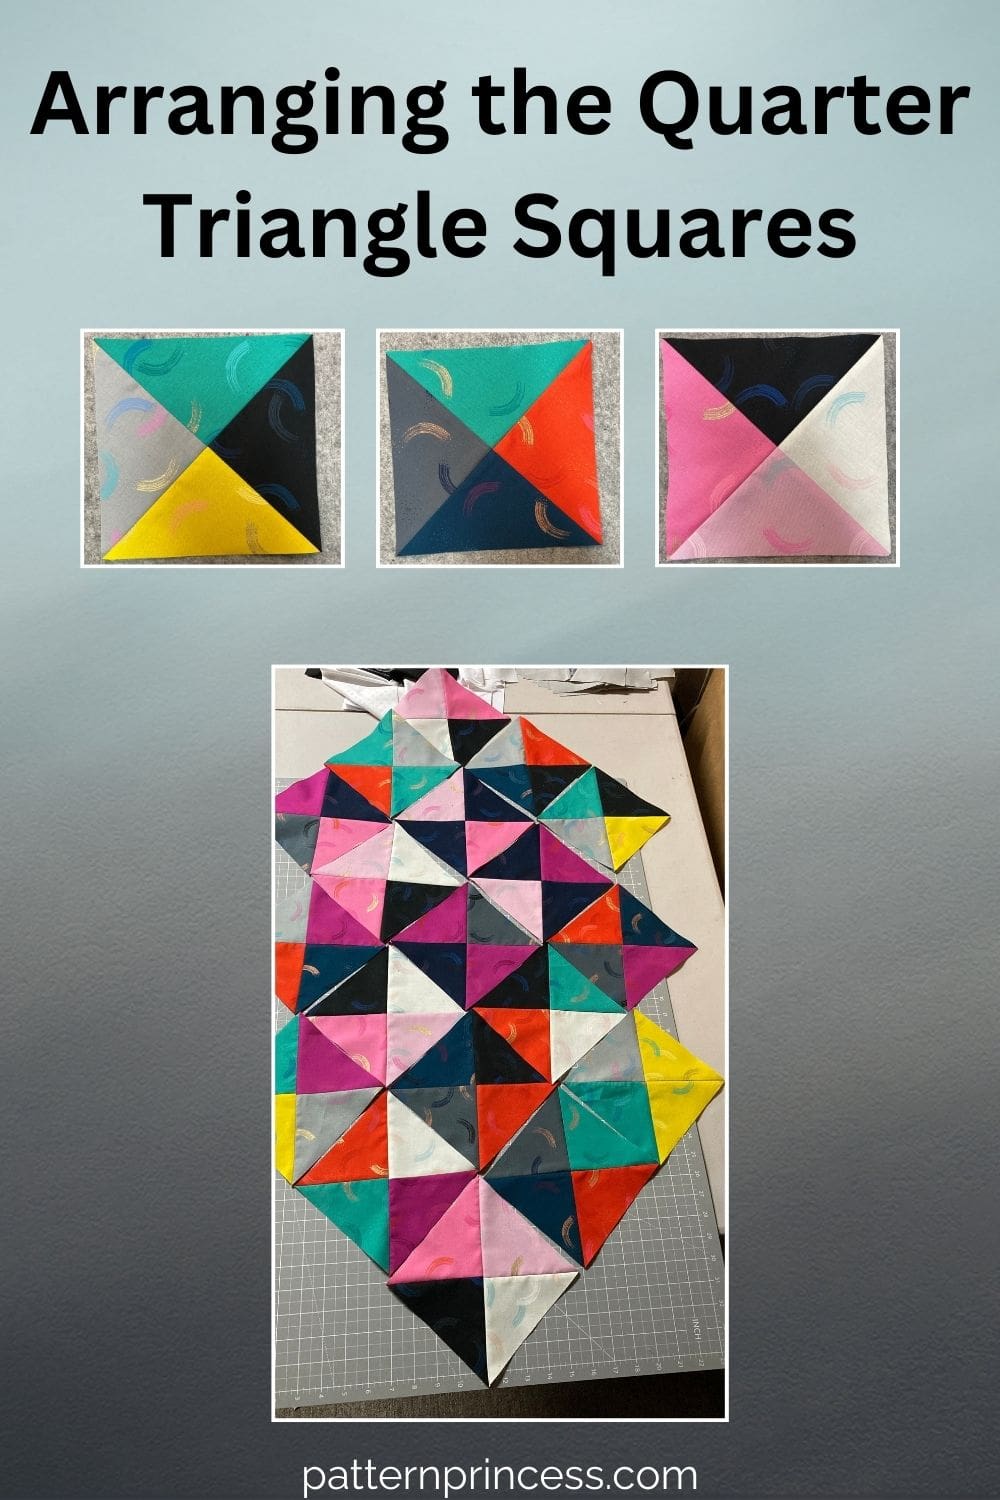
Make the Hourglass Quilt Blocks
Using the two four patch quilt blocks you just made, place one on top of the other with the right sides together. Align the blocks and nest seams all the way around using a pin to hold in place. (Don’t place the same colors on top of each other. It is best to switch up light and darker fabrics).
Then using ¼ inch seam allowance, sew all the way around the square through both quilt blocks.
Cutting the blocks apart
Now that the four patches are sewn together, it’s time to cut them diagonally in both directions. Use a ruler to span the whole distance of the four patch blocks. Align the ruler from one corner to the other on a diagonal. (It’s important to align the ruler in the center and points of the blocks).
Use your rotary cutter to cut through both layers. The center of the block is a bit thicker, so you may have to press a little harder to make sure you’ve cut all the way through the layers.
Leave the blocks on the cutting mat making sure not to move them and align the ruler diagonally from corner to corner the other way and cut through the layers.
Open the four hourglass quilt blocks. Press the seams open. Trim any fabric ears on the corners.
That’s it, you now have four hourglass quilt blocks ready to sew into your project.
Repeat this process 4 more times.
We have more detail on making the hourglass unit if needed.
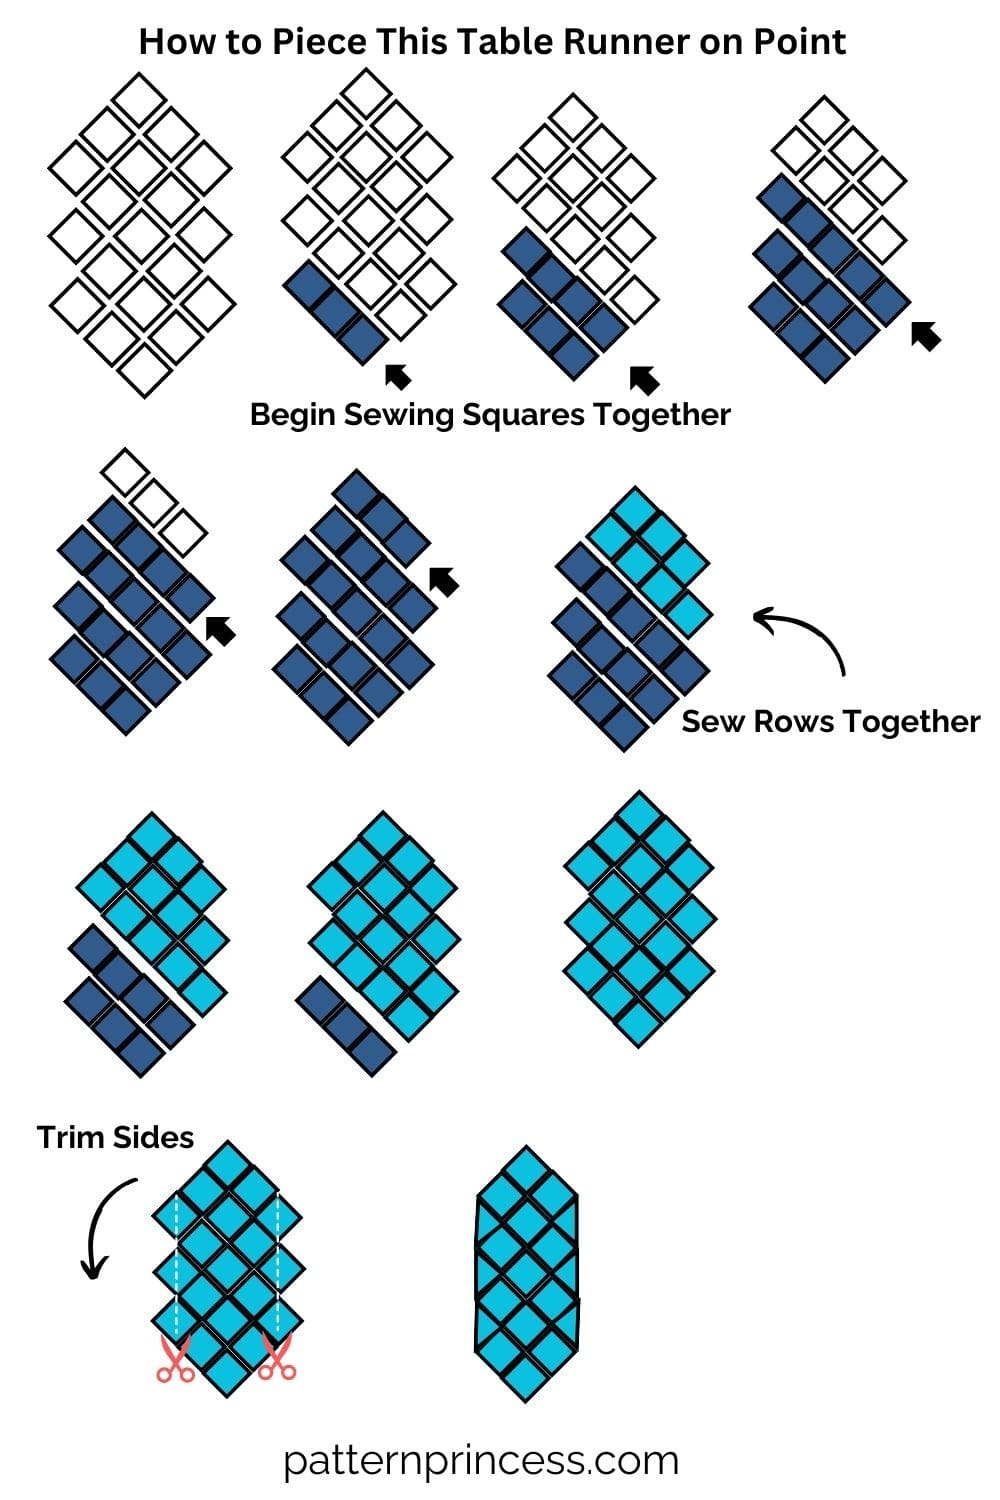
How to Piece the Table Runner on Point
This table runner is in the shape of a hexagon. With the sides straight and each end formed into a point.
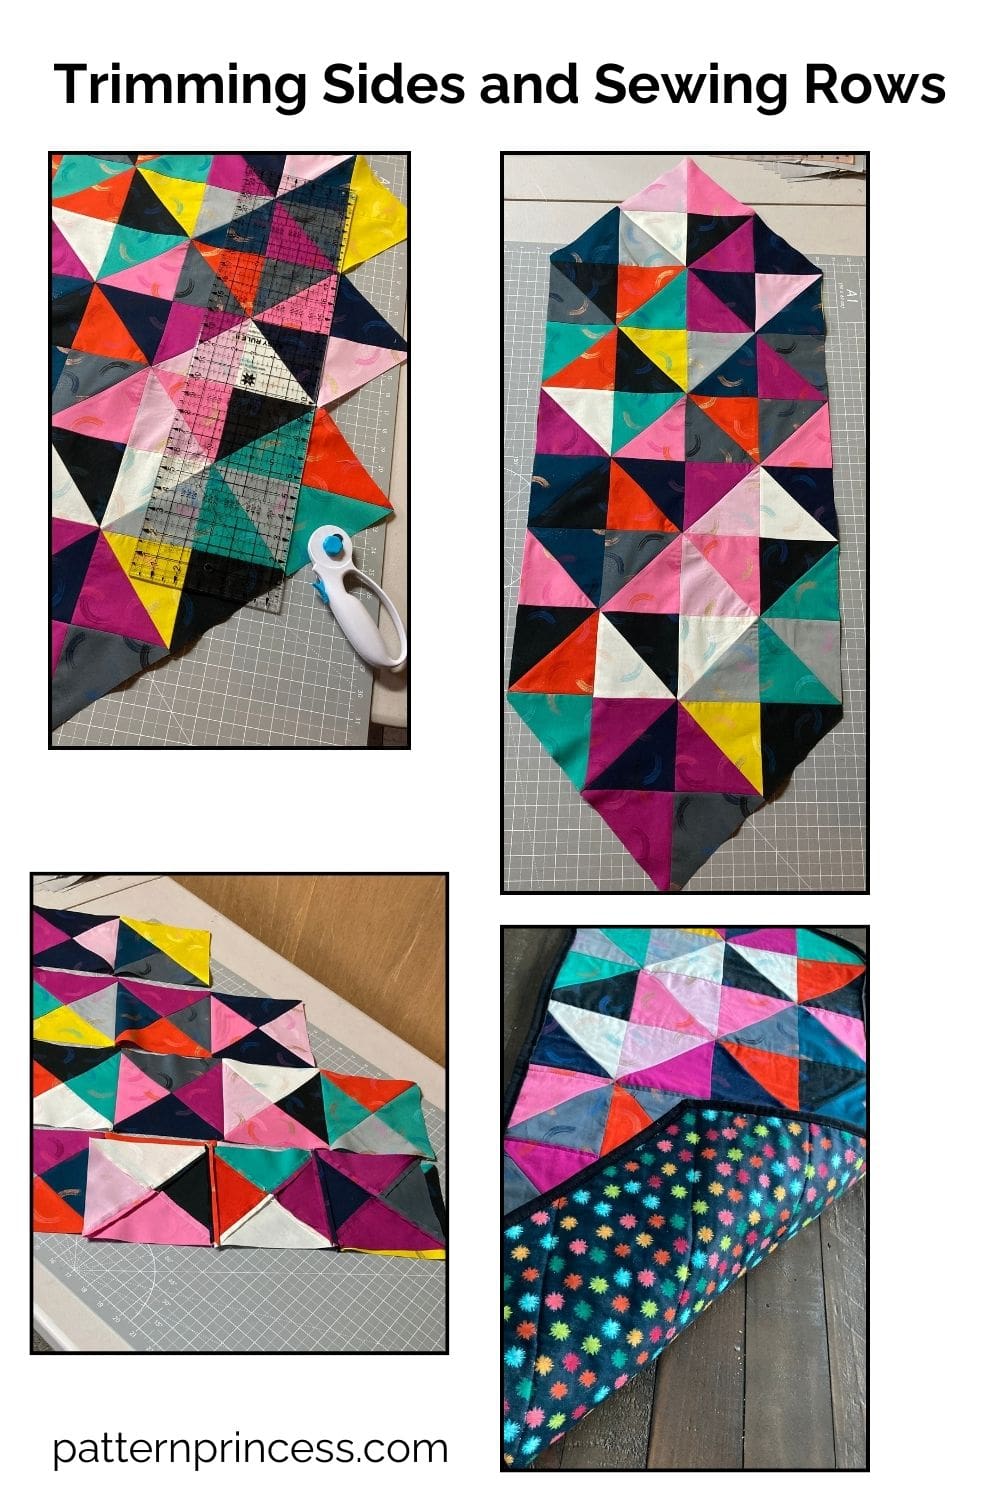
For this mini quilt, to keep things simple, I arranged the blocks, sewed the rows together and trimmed the sides. No special math is required to determine the triangle side on the edges. (It took a few variations to get the colors spread throughout. Arrange the squares to your liking).
Normally, for a quilt, you would arrange the quilt blocks and set the triangles in diagonal rows, with the blocks alternating with the setting triangles.
I chose to use six of the quarter square quilt blocks to tuck between the diagonal rows. Three on each side. When all the squares were stitched together, I just trimmed the excess triangles off with a ruler and rotary cutter.
When sewing the rows, rather than sewing horizontally and vertically, the rows are stitched together in diagonal rows.
Once all the diagonal rows are pieced together, join them together to complete the mini quilt top.
Here is a visual on how to piece this table runner on point.
You sew it diagonally in rows, like this.
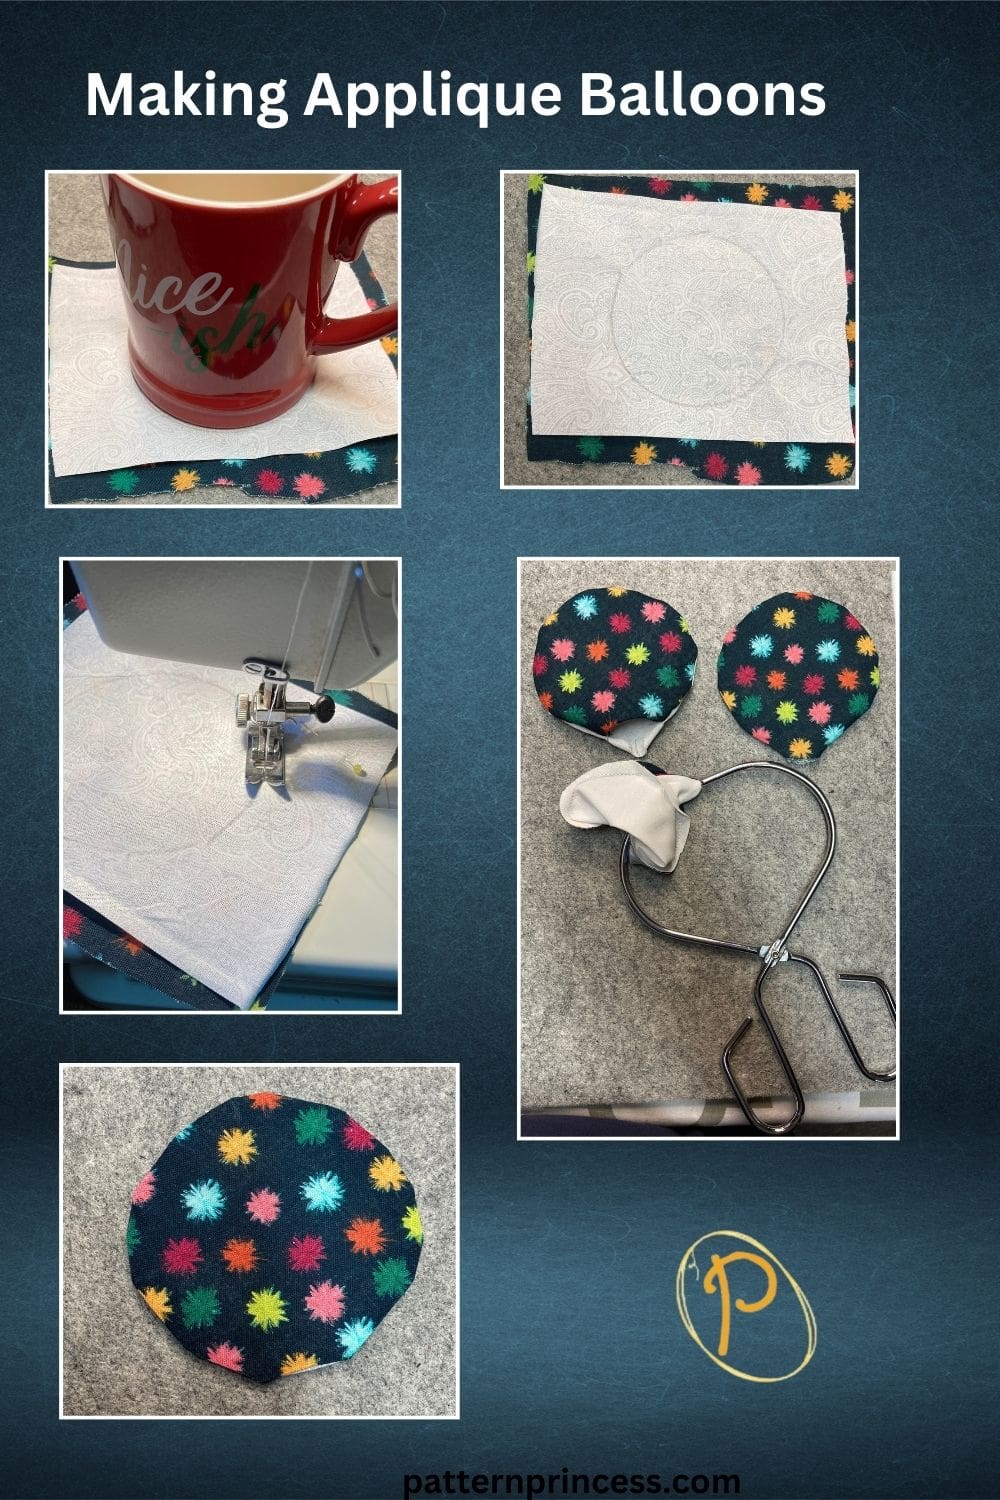
Applique Balloons
For this applique, I didn’t want to have any raw edges and it had to hold up well to multiple washings. Therefore, I decided to use some scrap white fabric for the backing.
I placed the right side of the top fabric and the right side of the white fabric together. Then to get a round circle, I used a pencil to trace around my coffee cup. It was about 4-inches round. Pin the fabrics together to hold them in place while you sew.
Next, I sewed the two pieces together using the drawn line as a guide. Leave about a 1-inch opening. This will be used to turn the piece inside out. Before you turn it inside out, trim the fabrics close to the stitching. About ¼-inch. This will reduce the bulk.
Once turned, use something that you can use to help push out the inside without poking through the fabrics. Press the circle.
It’s ready to use on your quilting project.
Sewing the Applique Pieces on the Table Runner Top
Pin the balloons in place. I placed mine on one end in a grouping of three with one a little higher than the other two. Use the straight stitch, zig zag stitch, or other decorative stitch to secure all the way around. For the balloon strings, I used the zig zag stitch in a white thread.
Trim the Side Triangles
Once all the rows are sewn together, it’s time to trim the sides. On each side there are three triangles that need to be trimmed off. Use a ruler and rotary cutter to trim off the three triangles sticking out.
Quilting the Layers Together
Prepare your backing and batting by cutting them to 18 X 44 inches. Working on a flat surface, lay your backing fabric face down with the batting on top, then the quilt top face up on top of the batting. Smooth out any wrinkles. Using safety pins, pin the layers together every 5 or 6 inches or so to hold the layers in place. Alternatively, you can use basting glue spray to baste the layers together. Tip. The backing fabric and batting should be larger than the top of the table runner; about two inches on all sides.
Sew the Layers Together
I use a walking foot on your sewing machine to sew through all three layers. For this mini quilt, I sewed along one side of each row of squares. I did not sew over the appliqued balloons.
The next step is trimming away the excess backing and batting.
To trim the backing and batting, use a large cutting mat, a longer ruler, and a rotary cutter. Lay the table runner quilt flat. Place the ruler along the edge of the quilt top and use it as a guide to run your rotary cutter against it to trim the batting and backing fabric to the size of the top fabric. Do this on all four sides.
Binding the table runner
You will need a binding strip 2 ½ X 143 inches.
You can make your own binding strip by joining 4 white jelly roll strips. Fold in half with the wrong sides together lengthwise and press with the iron. Set this aside.
How to Make Your Own Quilt Binding Tutorial
Sewing on the Binding
Pin the raw edge of the binding onto raw edge of the quilt back. Start in the middle of a side leaving approximately a 3” tail hanging. The hanging part will be used to sew to the other end of the binding strip when you have finished sewing all six sides of the binding onto the quilt. When you come to the corners and the points, miter then as usual.
Joining the Binding
When you come near the beginning tail of the binding, stop, and cut the binding so that they overlap about 3 inches. With the beginning end opened and flat fold the end over about an inch. Then refold in half. Next, tuck the ending tail into the beginning tail. Make sure it lies straight and flat. Pin in place.
Continue stitching until you reach the beginning stitches.
Sew the binding strip onto the front of the quilt. Fold the binding over the edge to the front using clips or pins to hold in place. Sew along the edge to secure the binding on the quilt top making sure to miter the corners.
Once all the sides and corners are stitched, you are done with your Colorful Scrappy Hourglass Table Runner Pattern.
We hope you liked this free pattern. Here are a few other free table runner patterns and quilts for you to explore.

You can find Victoria crocheting, quilting, and creating recipes. She has cooked in restaurants for over 20 years, including many larger parties. She learned to crochet when she was just 11 years old and has been crocheting ever since; over 50 years now. Over 40 years ago, she loved her first class in sewing and continues to hone her skills in quilting. Many have enjoyed the handmade gifts over the years. In her professional career, she has worked in management in a wide variety of businesses including higher education as a dean of a division. All the while attending college part-time to achieve her doctorate in higher education with an emphasis in e-learning.
Love it! It’s gorgeous 🙂
Thank you so much. It was my first time participating in the project quilting challenge.
Vicky