Last updated on July 4th, 2024 at 11:28 pm
A surprisingly simple way to create: the 4 At a Time Easy Hourglass Quilt Block. The hourglass quilt block is a classic quilt block design characterized by its distinctive hourglass shape, formed by two triangles of fabric joined together.
This block is a versatile building block for a table runner, baby blanket, throw quilt, or larger quilt size. Often used to create intricate patterns and visually appealing designs. Here is a simple way to make four at a time hourglass quilt blocks, also known as Quarter Square triangles. It is amazing how fast these work up and it’s a wonderful project for using charm packs for a fun scrappy look.

This simple block is a great way to use up your scrap fabric. It is a versatile block that can be arranged in a variety of ways. Use this same method for any size blocks, from charm packs with 5” X 5” squares, to a layer cake with 10” X 10” squares. I first saw this method on YouTube. Thank you, Jenny Doan of Missouri Star Quilt Company, for such a great tutorial.
Post contains affiliate links, and we earn commissions if you shop through the links on this page. For more information, please read the disclosure section under the About Us page.
Use Four Patches
This method starts with four patches to create the hourglass design. When starting with a charm pack, separate the squares by different fabrics. By laying out the squares by color, it is easier to balance the colors by choosing light, medium, and dark fabric.
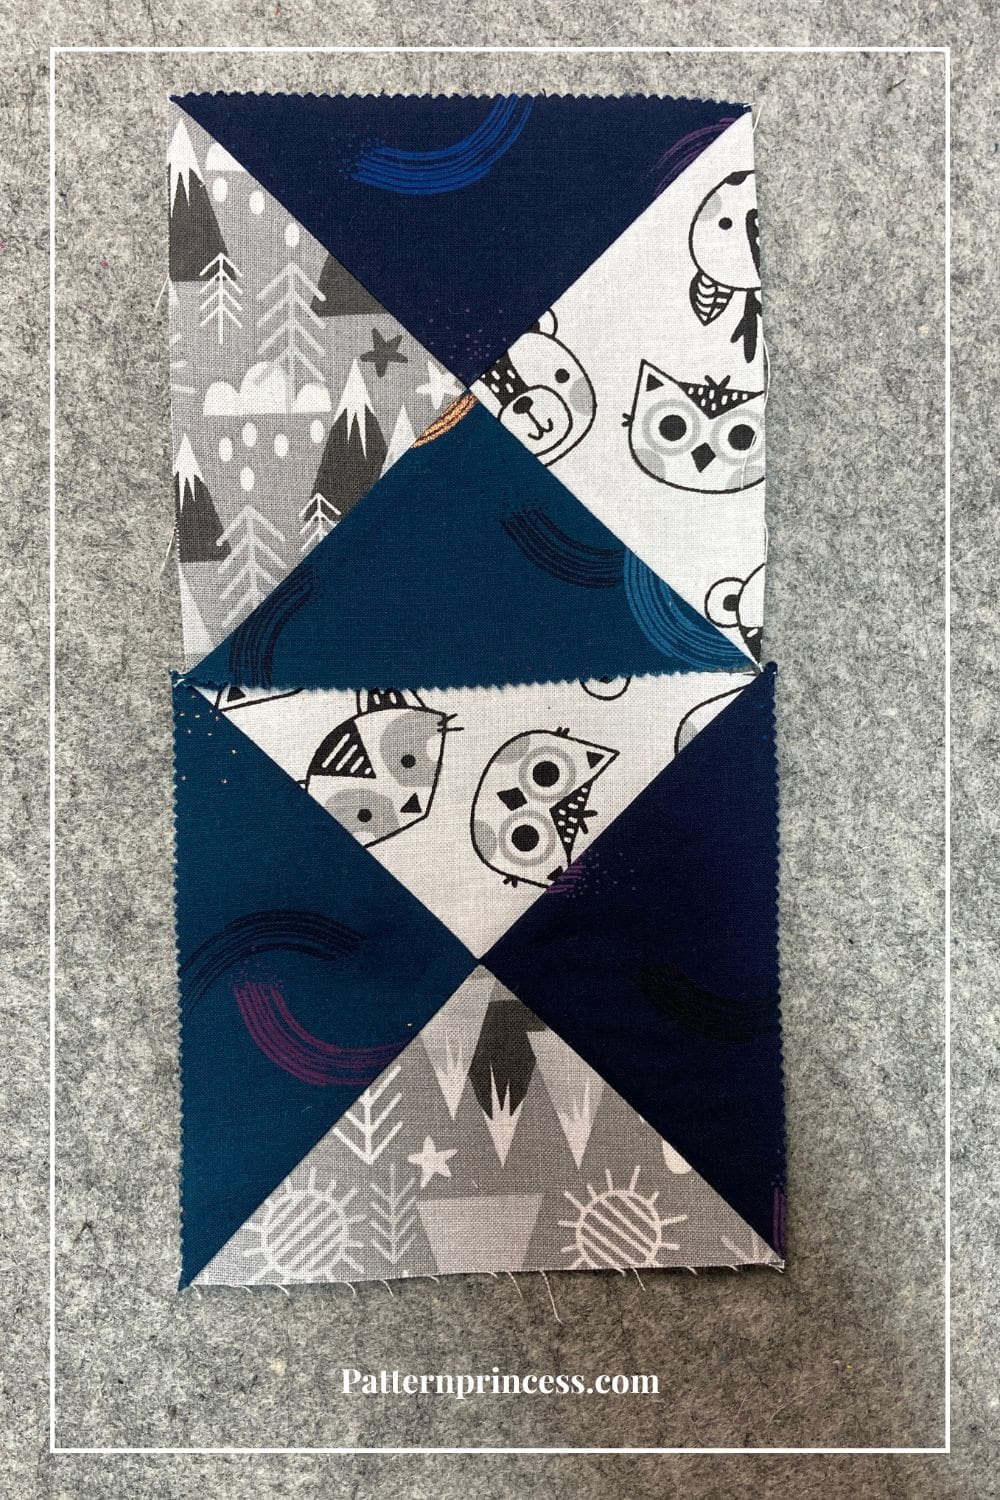
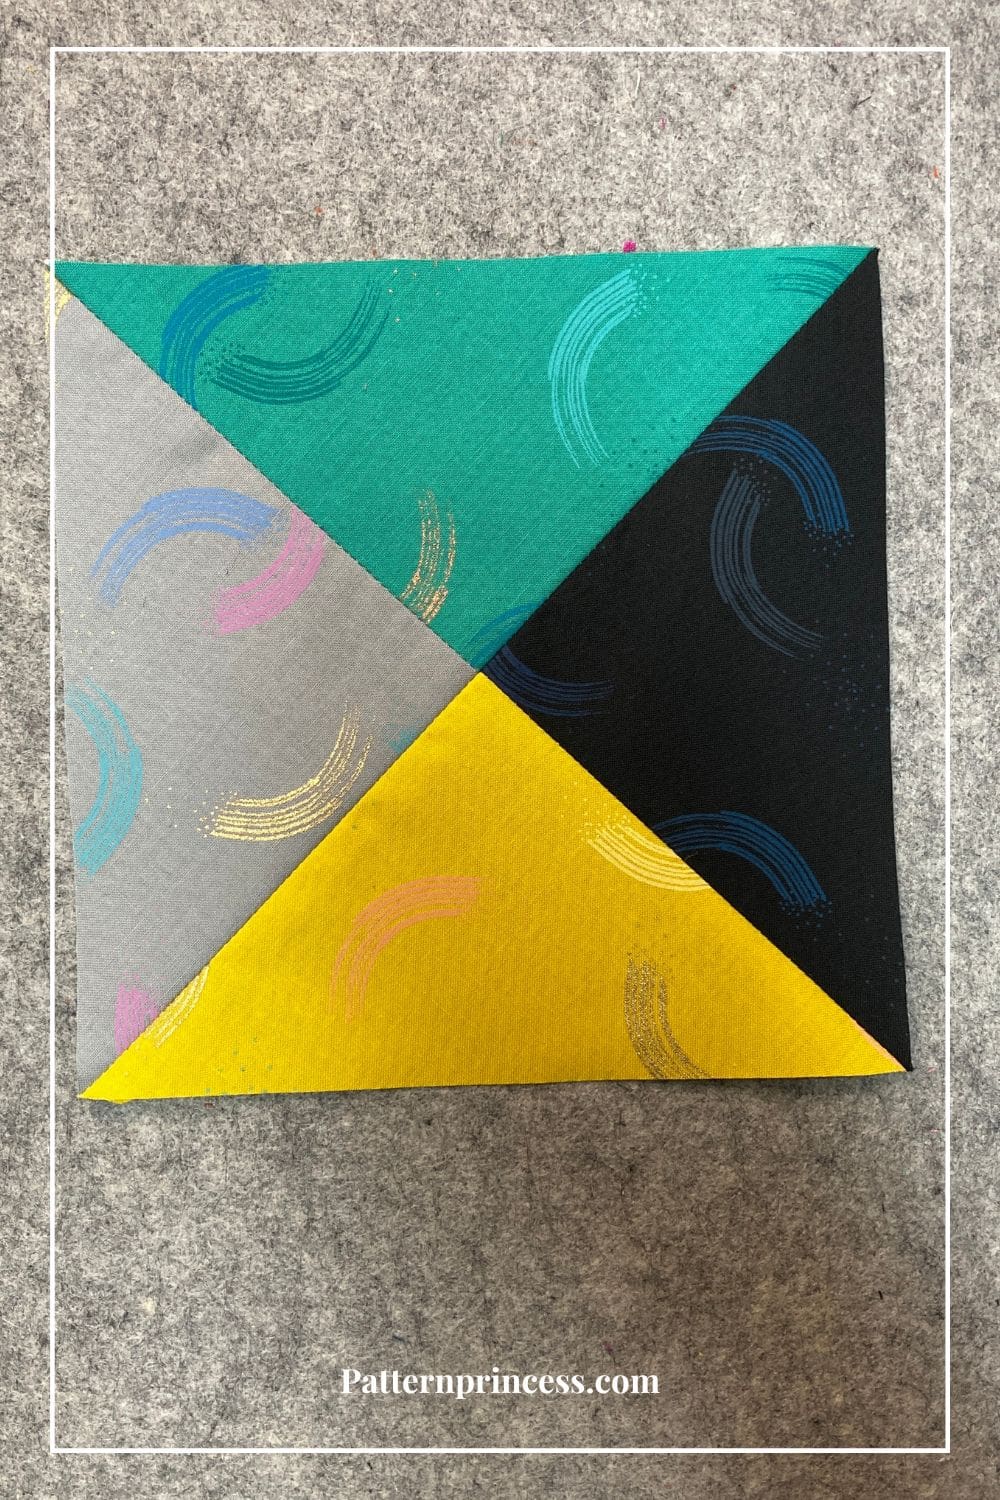
Mix and Match Design
You get a surprise in the end result when you save time and create four at a time hourglass quilt blocks. If you have a specific color placement in mind for each quilt block, then you may want to use the traditional method of sewing an hourglass square. We have those instructions for you too below the fast 4 at a time method.
Creating hourglass quilt blocks four at a time is a fantastic time-saving technique. Here’s a step-by-step tutorial on how to make them:
Directions: 4 At a Time Easy Hourglass Quilt Block
Skill Level
Confident Beginner
Size
When starting with 5 X 5-inch squares, the hourglass blocks will be approximately 6 ½” unfinished and 6” finished.
Therefore, plan on whatever block you start with, that the finished quilt square will be about 1” larger.
Pattern Notes
All seams are ¼ inch unless otherwise noted.
This pattern includes instructions for sewing 4 hourglass quilt blocks at once, as well as, the traditional method of sewing hourglass quilt blocks.
With the traditional method, you can place the fabrics in a specific design. Whereas, I have not figured out how to do that with the four at a time hourglass method yet.
Equipment / Tools
- Pencil
- Scissors
- Quilting Ruler
- Rotary Cutter
- Straight pins
- Iron
- Ironing board with a pad
- Sewing Machine
- My Favorite Quilting Supplies
Materials Needed
For this tutorial, we will be using 8 charm squares 5 X 5-inches.
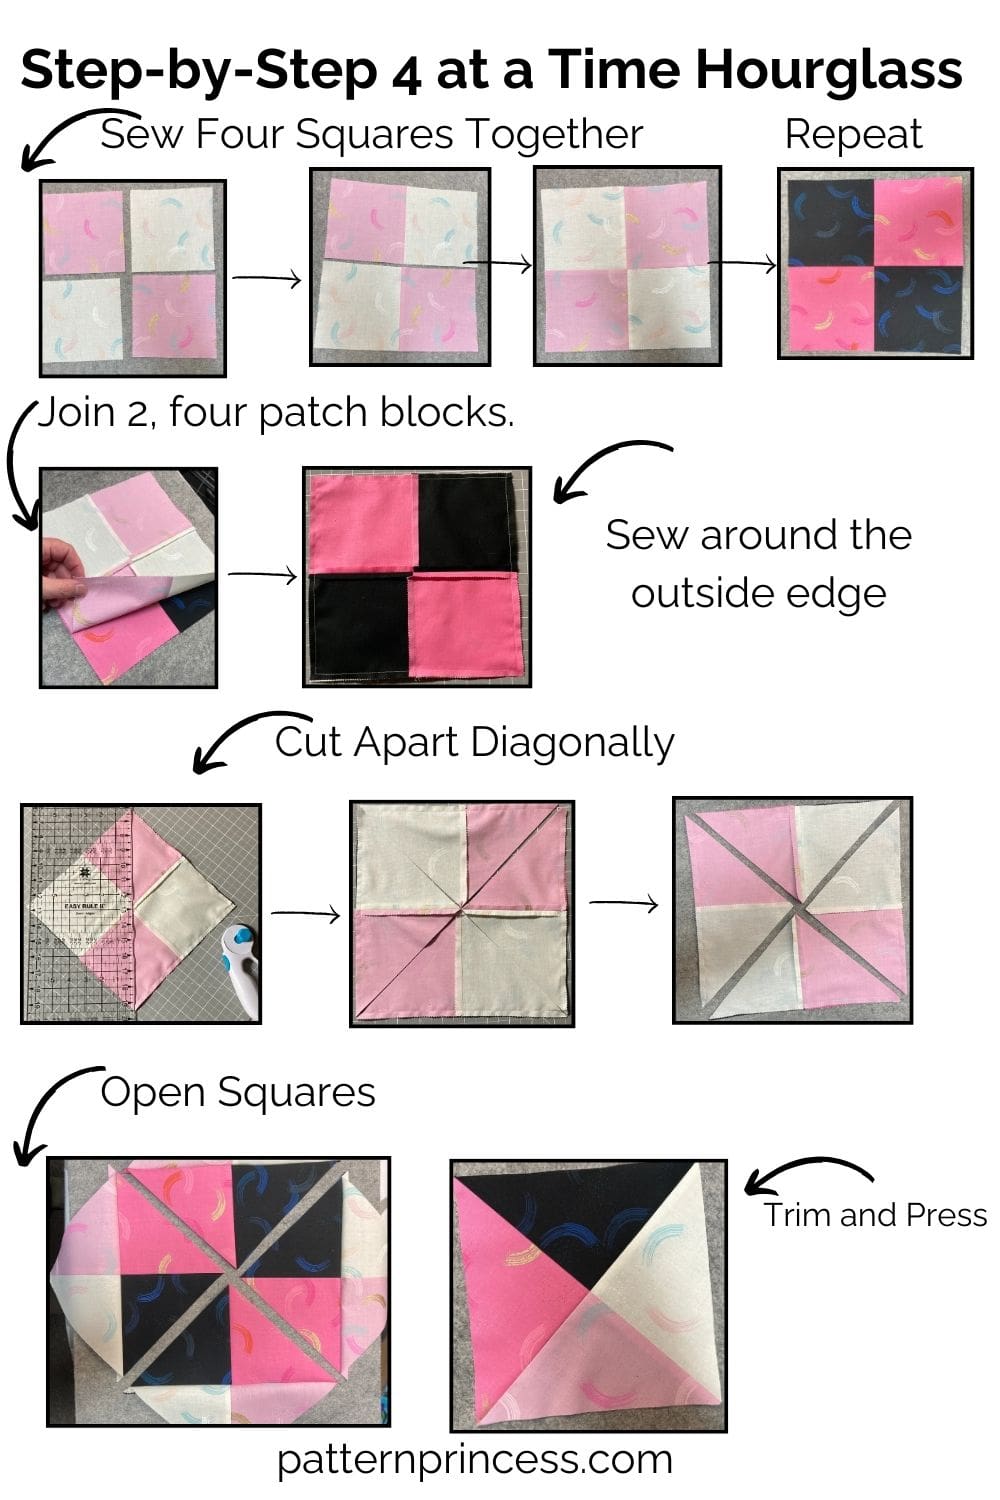
Begin by Making Four Patch Quilt Blocks
Lay out four squares. It is best to have at least two light and two dark squares or all four squares a different color or printed fabric.
To make the four patch, begin by placing the top two squares together with the right sides together. Sew the two squares together using ¼ inch seam allowance. Press the seams to the right. Repeat this process for the other two squares pressing the seams to the left.
Next, place the two top and bottom rows together with the right sides together and the seams nested. Pin in place where the seams align. Using ¼ inch seam allowance, sew the top and bottom rows.
Press seams to one side or open. You have just completed making one four patch quilt square.
Repeat this process and make another four-patch quilt block.
Make the Hourglass Quilt Blocks
Using the two four patch quilt blocks you just made, place one on top of the other with the right sides together. Align the blocks and nest seams all the way around using a pin to hold in place.
Then using ¼ inch seam allowance, sew all the way around the square through both quilt blocks.
Cutting the blocks apart
Now that the four patches are sewn together, it’s time to cut them diagonally in both directions. Use a ruler to span the whole distance of the four patch blocks. Align the ruler from one corner to the other on a diagonal. (It’s important to align the ruler in the center and points of the blocks).
Use your rotary cutter to cut through both layers. The center of the block is a bit thicker, so you may have to press a little harder to make sure you’ve cut all the way through the layers.
Leave the blocks on the cutting mat making sure not to move them and align the ruler diagonally from corner to corner the other way and cut through the layers.
Open the four hourglass quilt blocks. Press the seams open. Trim any fabric ears on the corners.
That’s it, you now have four hourglass quilt blocks ready to sew into your project.
Four At a Time Hourglass Quilt Block Size Chart
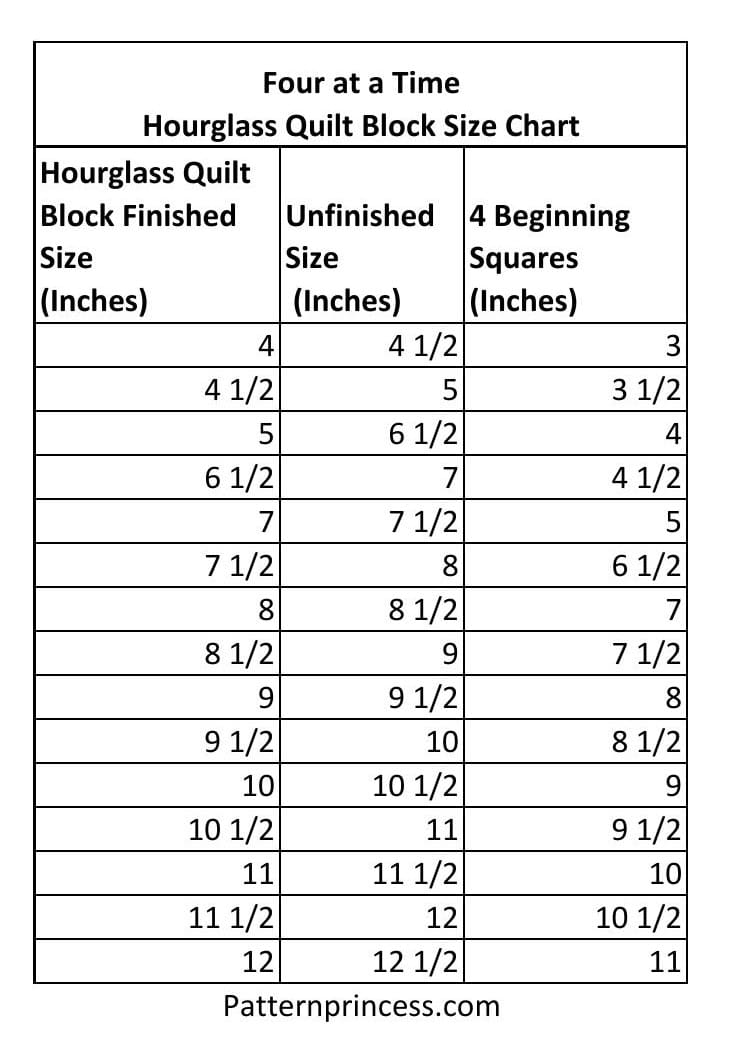
For this tutorial, we used 8 charm squares 5 X 5-inches. Here is a chart to help you create this easy quilt block using other sizes.
If you need to have fabric colors in a specific layout for your hourglass quilt blocks, then you may want to make your using the classic method.
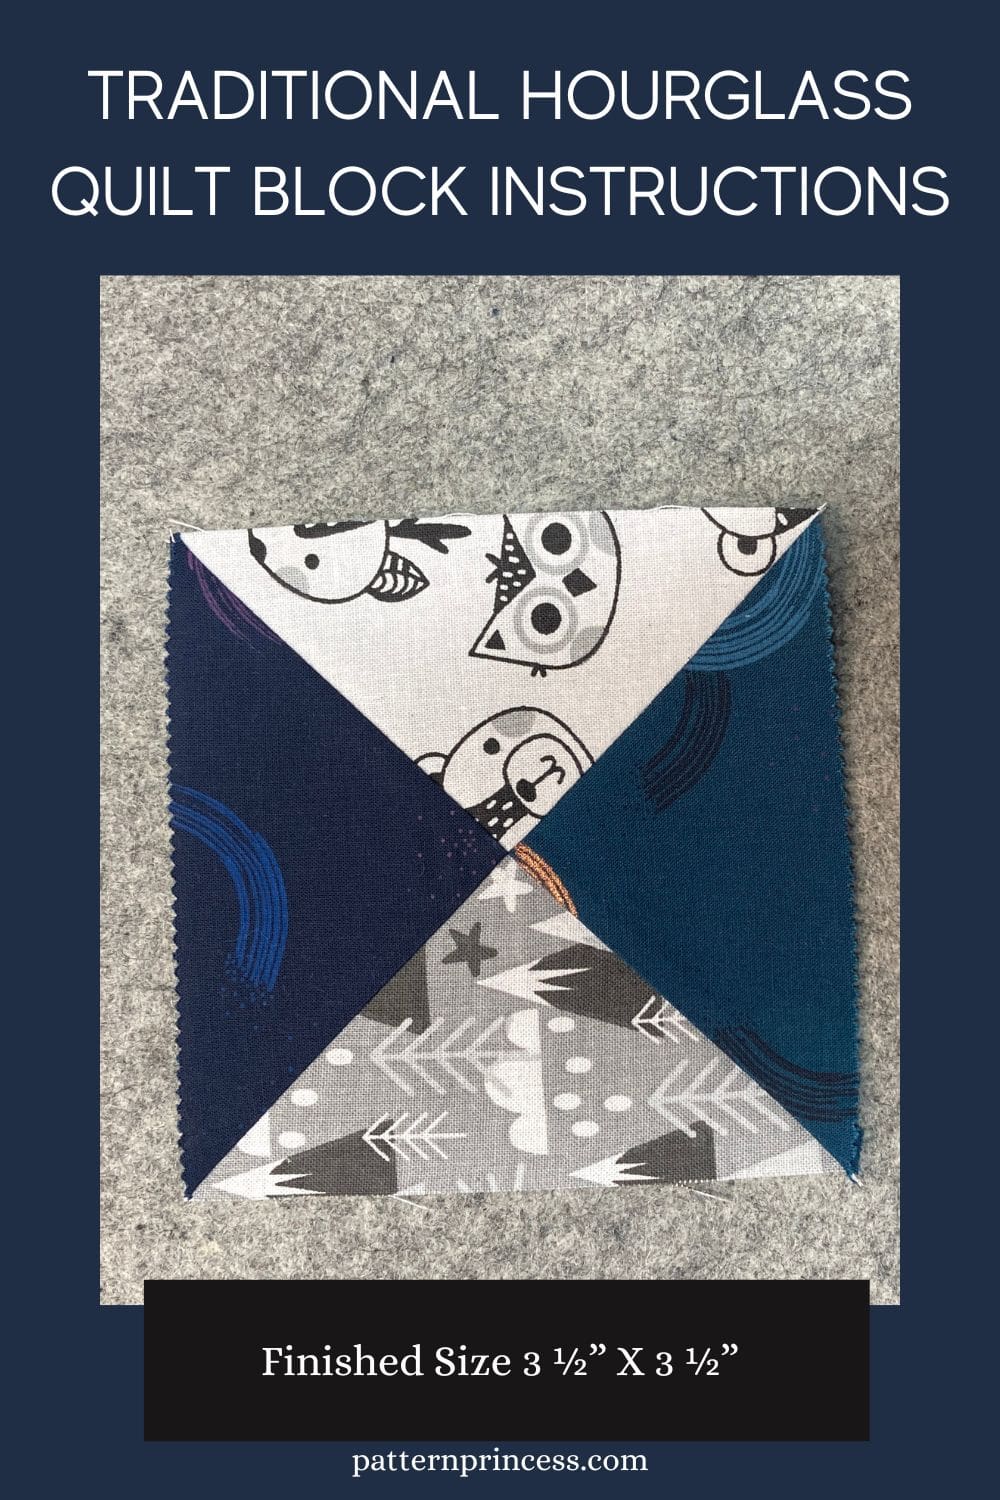
Traditional Hourglass Quilt Block Instructions
This project starts with two squares. You can use any size square you want, depending on what size you want your hour-glass block to be. If you start with 5″ squares, a perfect project for Charm Packs, you will end up with up with a 3 ½″ (finished) block. So, the finished hour-glass block will be about an inch and a half smaller than your original square.
Finished Size
3 ½” X 3 ½” finished size. (4” X 4” unfinished).
Materials Needed
Two squares of fabric, each in a different color or pattern, cut to the desired size for your finished hourglass block (for example, if you want a 6-inch finished block, start with two 7 1/2-inch squares to allow for seam allowances).
Today, I started with 5-inch squares.
Begin by selecting two squares of fabric for your hourglass blocks. These squares should be cut to the same size and can be of contrasting colors or coordinating patterns for a striking effect.
Mark the Center
Use a pencil and ruler to draw a diagonal line from one corner to corner on the wrong side of the lighter fabric square.
Next, place one fabric square right side up and one fabric square right side down on top of it. Pin in place.
Stitch along both sides of the drawn line with a ¼-inch seam.
Using a rotary cutter and ruler, cut the squares apart on the marked diagonal line.
At this point, you now have two half square triangle units.
Press the seams to the darker fabric.
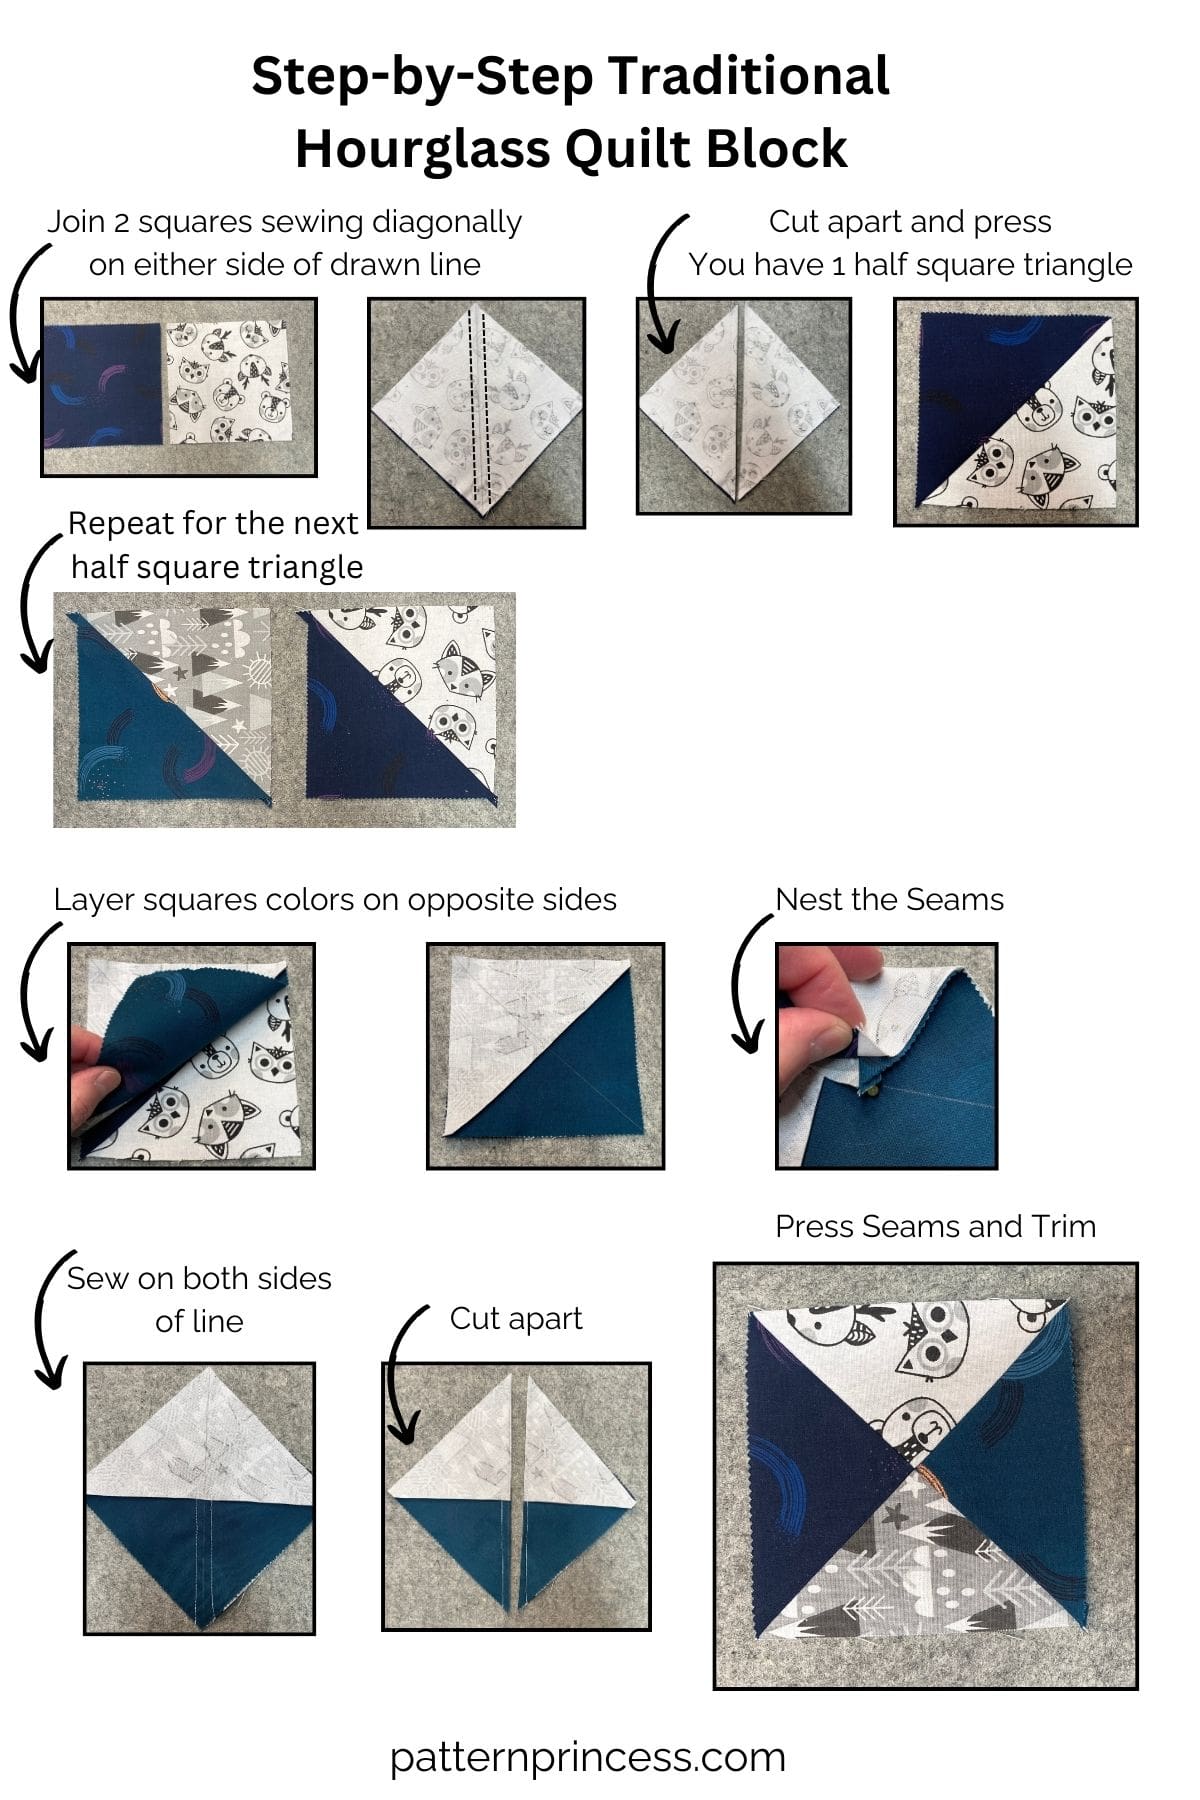
Marking and Stitching the Half Square Triangles
Trim the dog ears (the small triangles at the corners) from each of the half square triangle units.
Next on one of the half square triangles, use a pencil and ruler to draw a diagonal line that is perpendicular to the seam. Draw the line from one corner to corner on the wrong side fabric.
Next, place one fabric square right side up and one fabric square right side down on top of it. Align one half square triangle on top of the other. The fabric should be on opposite sides with the light on top of the dark side and the dark on top of the light side. Refer to the diagram. Nesting the seams. Pin in place.
Stitch along both sides of the marked line with a ¼-inch seam.
Using a rotary cutter and ruler, cut the squares apart on the marked diagonal line.
At this point, you now have two hourglass units.
Press the final seam open or to one side, depending on your preference.
Trim and Square Up
Once the block is complete, trim it to the desired size, ensuring that it’s square and all edges are straight.
Repeat these steps to create as many four at a time hourglass quilt blocks as needed for your project. These blocks are perfect for creating stunning quilts with intricate designs while saving time and effort in the process.
Classic Hourglass Quilt Block Size Chart

For this tutorial, we used 8 charm squares 5 X 5-inches. Here is a chart to help you create this easy quilt block using other sizes.
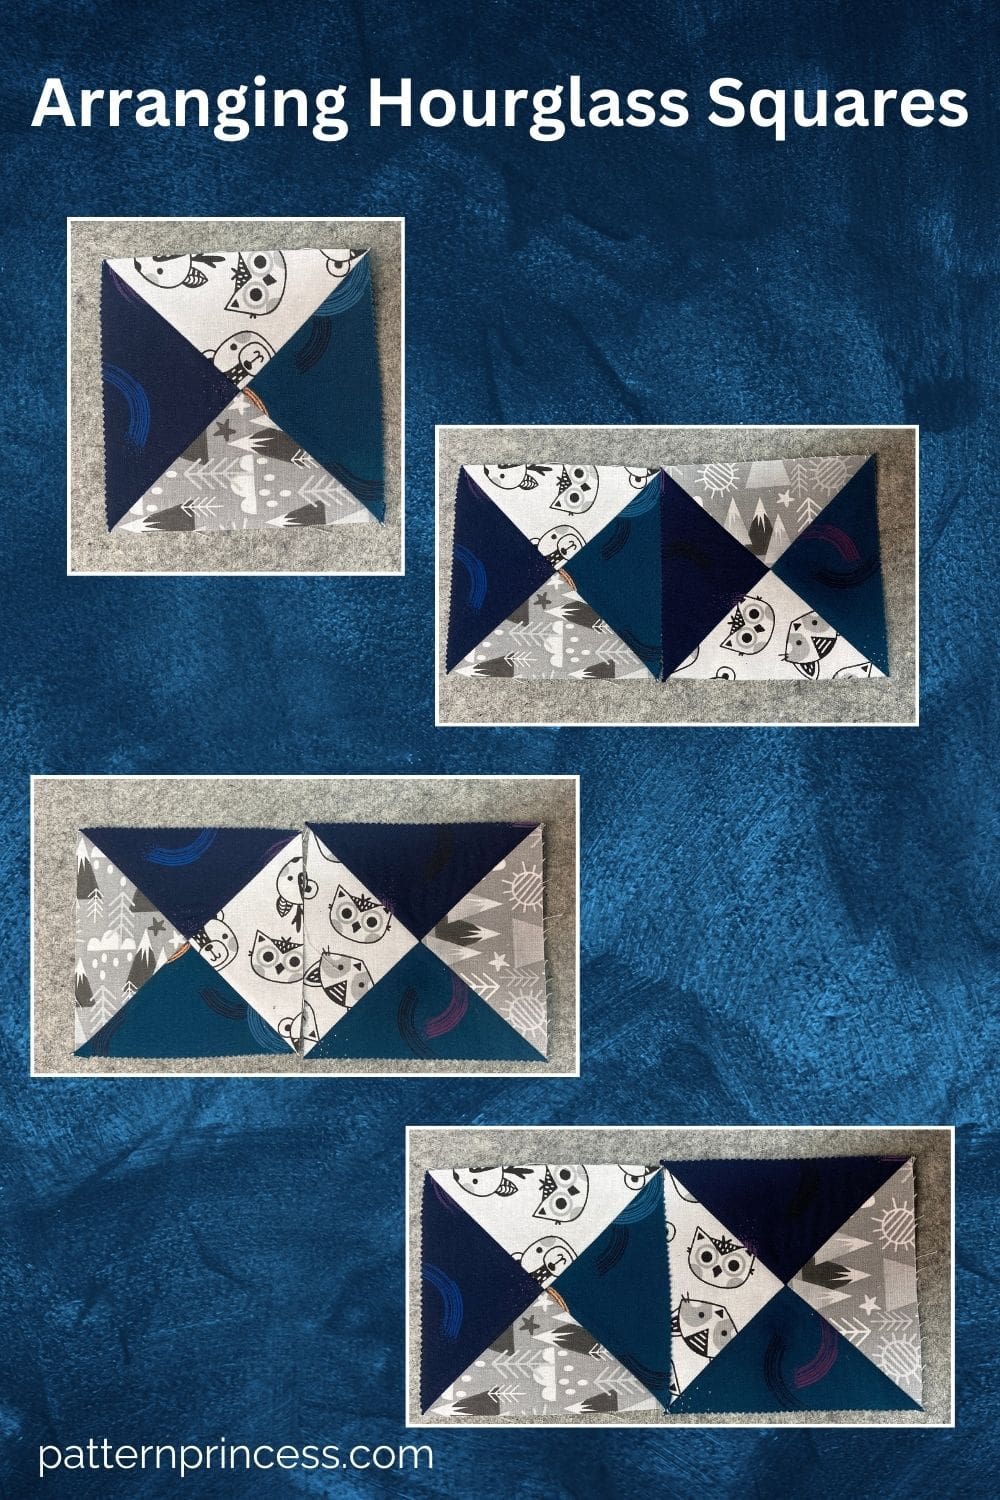
There are so many ways these squares can be arranged. We have a few pictures to help you with ideas.
Enjoy the creative journey!
We hope you enjoyed this hour glass quilt block. Here are a few other free quilt tutorials for you to explore.

You can find Victoria crocheting, quilting, and creating recipes. She has cooked in restaurants for over 20 years, including many larger parties. She learned to crochet when she was just 11 years old and has been crocheting ever since; over 50 years now. Over 40 years ago, she loved her first class in sewing and continues to hone her skills in quilting. Many have enjoyed the handmade gifts over the years. In her professional career, she has worked in management in a wide variety of businesses including higher education as a dean of a division. All the while attending college part-time to achieve her doctorate in higher education with an emphasis in e-learning.
Well done…. ty
Aw, thank you Cynthia. Glad you enjoyed this one.
Vicky