Last updated on July 4th, 2024 at 11:28 pm
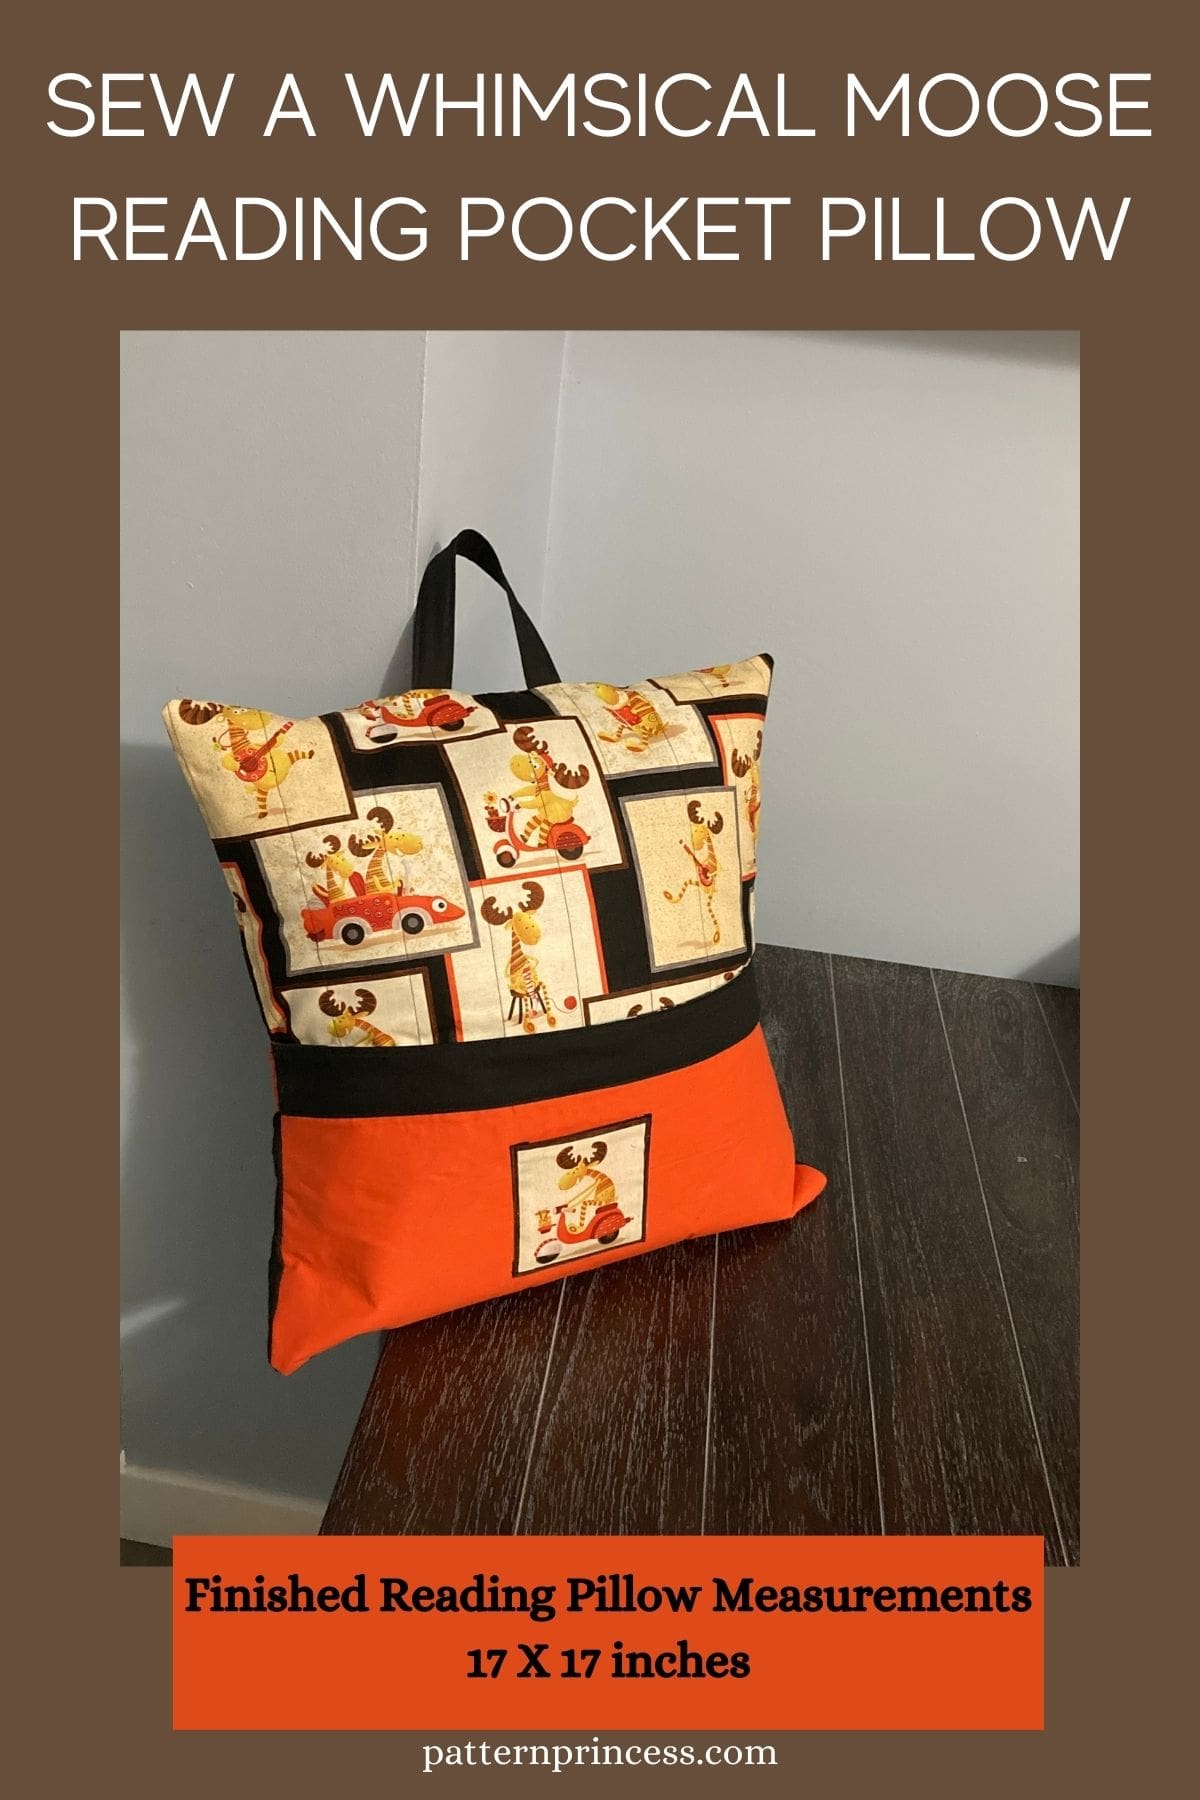
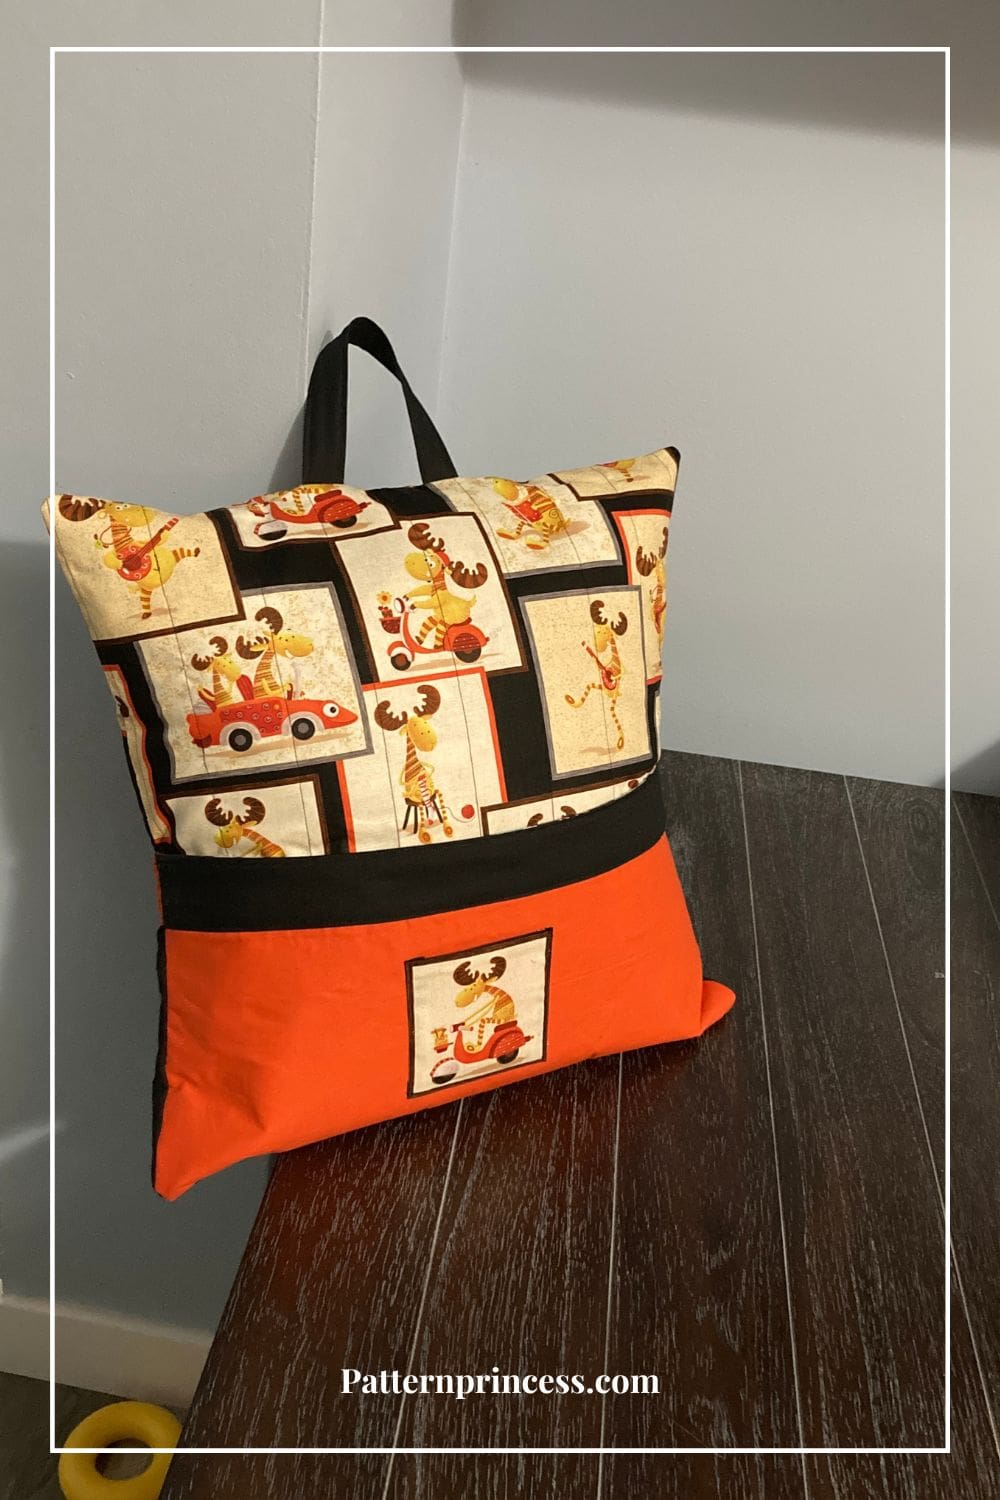
Sew a charming Moose Reading Pocket Pillow. Today, we’re diving into a delightful DIY project that’s bound to add a touch of whimsy to your reading nook.
Welcome to our creative corner where imagination meets fabric and sewing stitches weave tales of comfort and coziness. There’s something enchanting about snuggling up with a good book, but what if your reading experience could be elevated with a hint of playfulness?
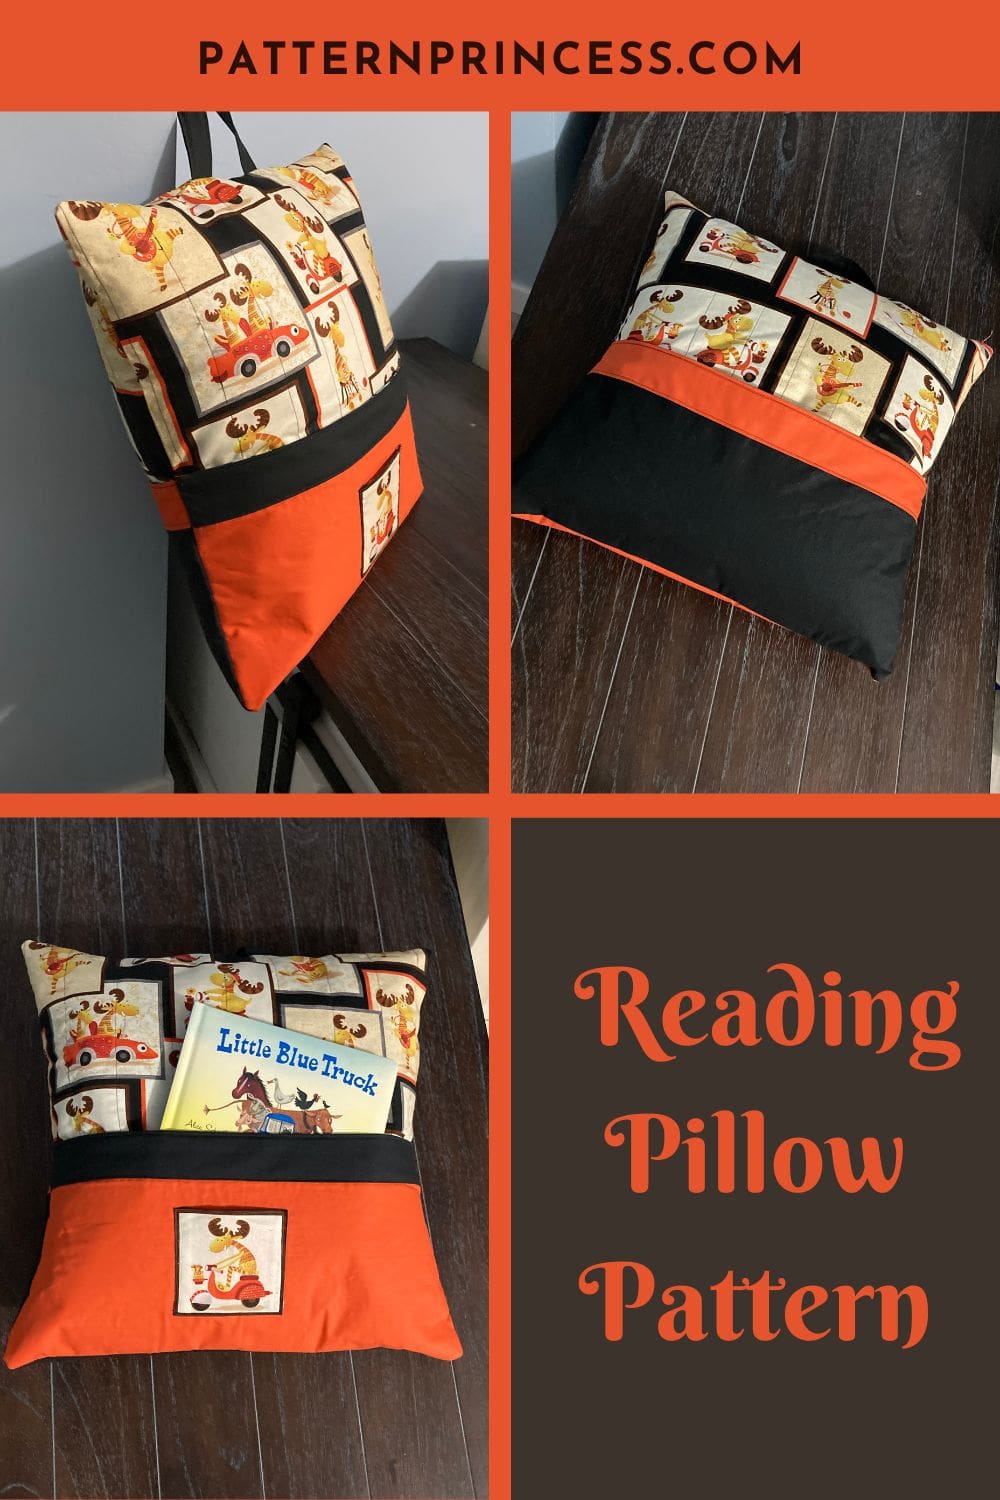
That’s where our Moose-themed reading pillow comes in. Imagine sinking into a plush pillow adorned with playful moose motifs, while conveniently tucking away your favorite book or e-reader in a handy pocket. It’s the perfect blend of functionality and fun.
This project promises to spark joy and add a dash of personality to your reading space. So, grab your sewing kit and let’s bring this whimsical Moose Reading Pocket Pillow to life.

Quilting Blog Hop
This pattern is part of a quilting blog hop hosted by Just Let Me Quilt and Moosestash Quilting. You can find all the patterns by the featured quilt designers on the It Moose be Love Blog Hop Challenge. There are so many creative ideas for quilted designs and sewing projects.
Post contains affiliate links, and we earn commissions if you shop through the links on this page. For more information, please read the disclosure section under the About Us page.
Check out our free PDF printables page often, we have free pattern downloads. However, to access them, you will need to sign up for the newsletter.
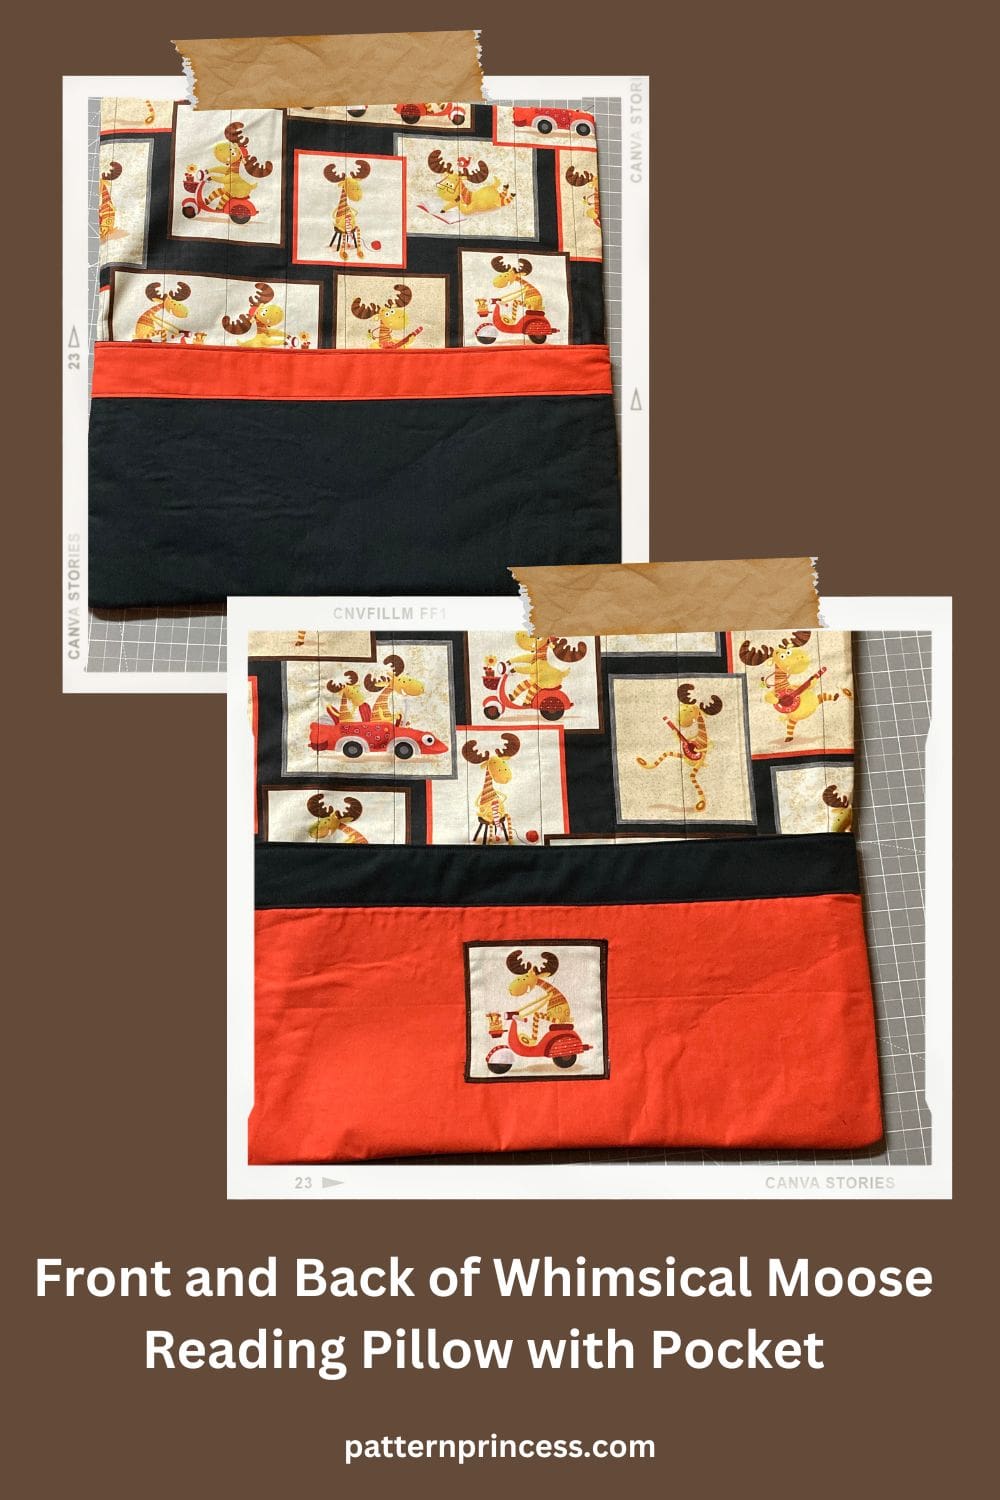
This challenge caused me to have a bit of fun with my daughter as we shopped for fabrics. We found this playful fabric with animated moose reading, riding bicycle, riding in a car, and playing musical instruments.
Well, we had the fabric now what?
It was so cute, we hated cutting it up into smaller pieces for a quilt. A few weeks went by, then it came to me. A reading pillow for a toddler!
I already had the orange and black fabric leftover from another sewing project. So, a reading pillow with a pocket was meant to be. We are in love with how it turned out.
Fill the front pocket with a books, pen and journal, or travel size blanket.
Get Your Ad Free Printable PDF in our Etsy Shop
Directions: Sew a Whimsical Moose Reading Pocket Pillow
Skill Level
Advanced Beginner Sewer
While this pattern is straight forward, yet it can be difficult to sew through so many layers making sure placement of all layers are correct.
Finished Reading Pillow Measurements
17 X 17 inches
Fabric Requirements
Printed Fabric 1 ¼ yards for Pillow front, back, and small pocket.
Black Fabric ½ yard for lower back panel, the trim on the pillow pocket on the front, and the handle.
Orange Fabric ½ yard for pillow pocket on front, and the trim on the lower back panel.
Fleece 1 ¼ yards
Thread. I used black thread throughout this sewing project.
Equipment and Tools
- Rotary Cutter
- Quilting Ruler
- Cutting Mat
- Rotating Cutting Mat
- Iron
- Ironing Board or Pressing Mat
- Pins
- Clips
- Basting Spray
- Sewing Machine
- Disappearing fabric marker
- My Favorite Quilting Supplies
Whimsical Moose Reading Pocket Pillow Notes
Sew fabric with right sides together using seam allowance indicated.
Pin or clip your pieces together for easy sewing.
The directions for this pocket pillow cover are for rotary cutting, and machine sewing.
Trim any overhanging edges as needed throughout project.
If using directional fabric, make sure to layout fabric before you begin sewing the sections together to make sure that everything is facing the correct way.
Fabric Cutting Instructions
Pillow Front
- 18” X 18” square of the printed fabric. Cut (1)
- 18” X 18” square of the fleece. Cut (1)
Front Pocket
- 9” X 18” rectangle of the orange fabric. Cut (1)
- 9 ½” X 18” rectangle of the fleece. Cut (1)
- 4” X 18” of the black fabric. Cut (1)
Small Front Pocket
Cut (1) 5” X 5” Small square out of the printed fabric. I found one of the squares on the print and cut out the entire square.
Upper Backing
Cut (1) 13” X 18” printed fabric.
(Cut (1) 12 ½” X 18” fleece.
Lower Backing
- 9” X 18” rectangle of the black fabric. Cut (1)
- 9 ½” X 18” rectangle of the fleece. Cut (1)
- 4” X 18” rectangle of the orange fabric. Cut (1)
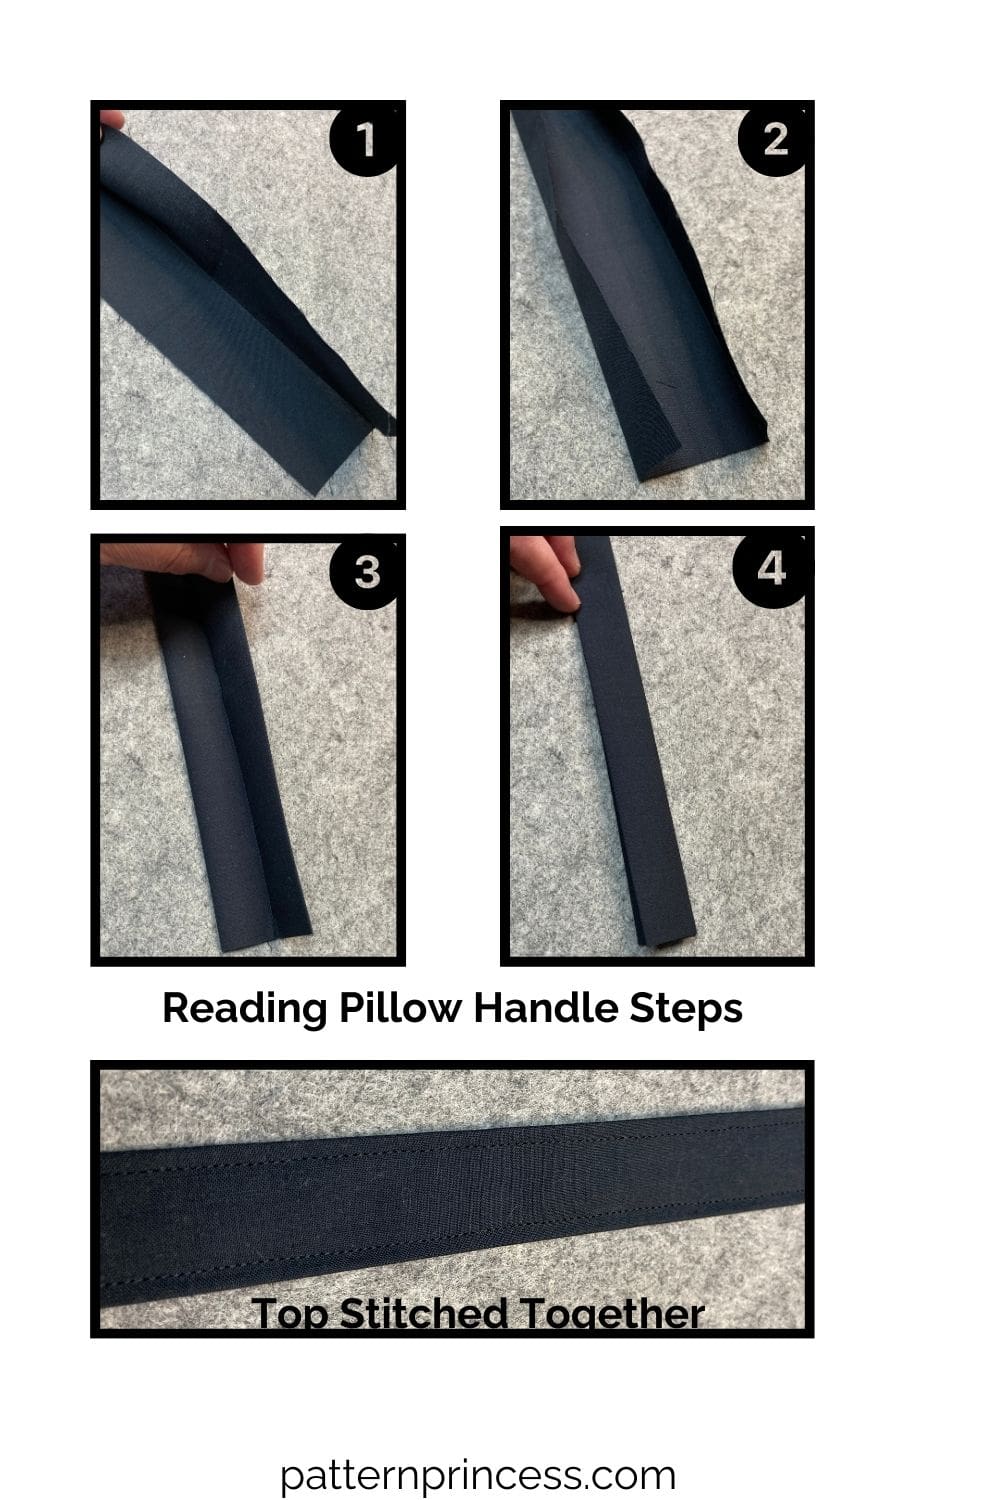
Handle
Cut (1) 4” X 9” rectangle of the black fabric.
Sewing Instructions
Handle
For this step, you will need (1) 4” X 9” rectangle of the black fabric.
Beginning with the handle, fold the fabric lengthwise to 2” X 9” with the wrong sides together and press. Next, open the strip and fold the raw edges to the center crease (lengthwise). Fold in half to make a strip 1” X 9”. The raw edges should be concealed in the center of the folds. Top stitch along both sides the length of the strip.
Set the handle aside.
Option. If you prefer a handle that is a bit stiffer, you can cut a piece of fusible webbing and fuse that to the wrong side of the fabric before starting the steps outlined above.
Quilt Pillow Front
For this step, you will need (1) 18” X 18” square of the printed fabric and (1) 18” X 18” square of the fleece.
Beginning with the printed fabric. Either fold the fabric in half to find the center point or use a measuring tape to find the center. Starting with a line in the center of the printed fabric, right side up. Use a temporary marking pen to mark a sewing line from the top to the bottom every 2 inches apart. On either side of the center line.
Next place the printed fabric right side down. Place the fleece on top of the printed fabric right side up. Pin in place.
Sew through both layers along the marked lines.
Set it aside.
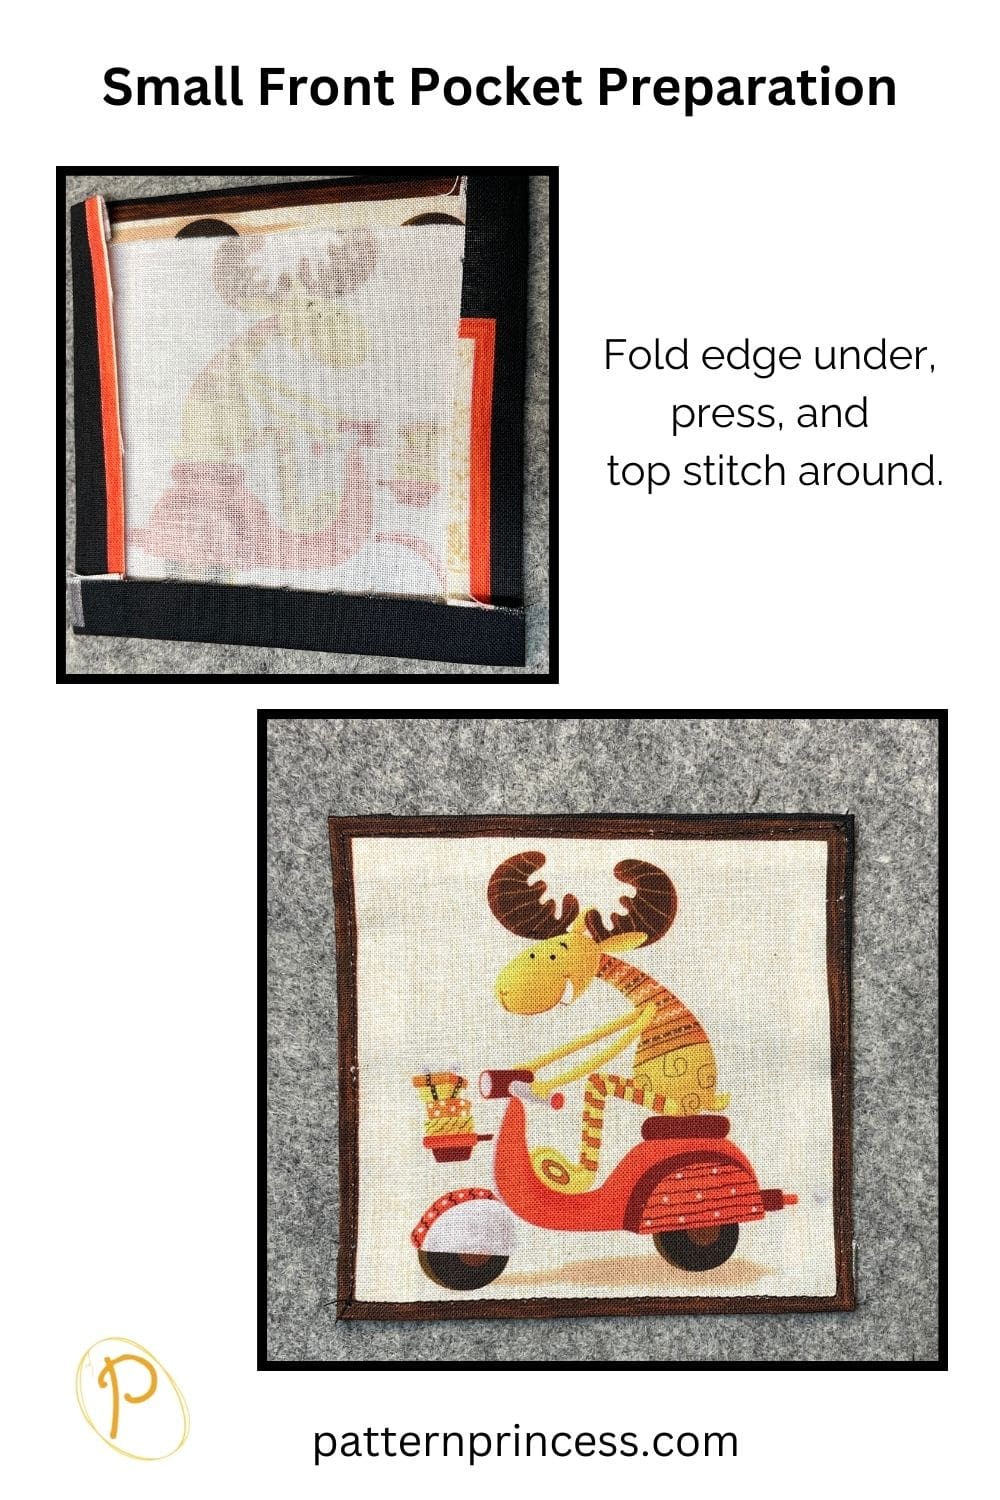
Small Front Pocket
For this step, you will need (1) 5” X 5” small square out of the printed fabric.
After you cut out the small square, turn the edges under to the wrong side ½” and press. Top stitch around the entire square to secure the edges.
Set it aside.
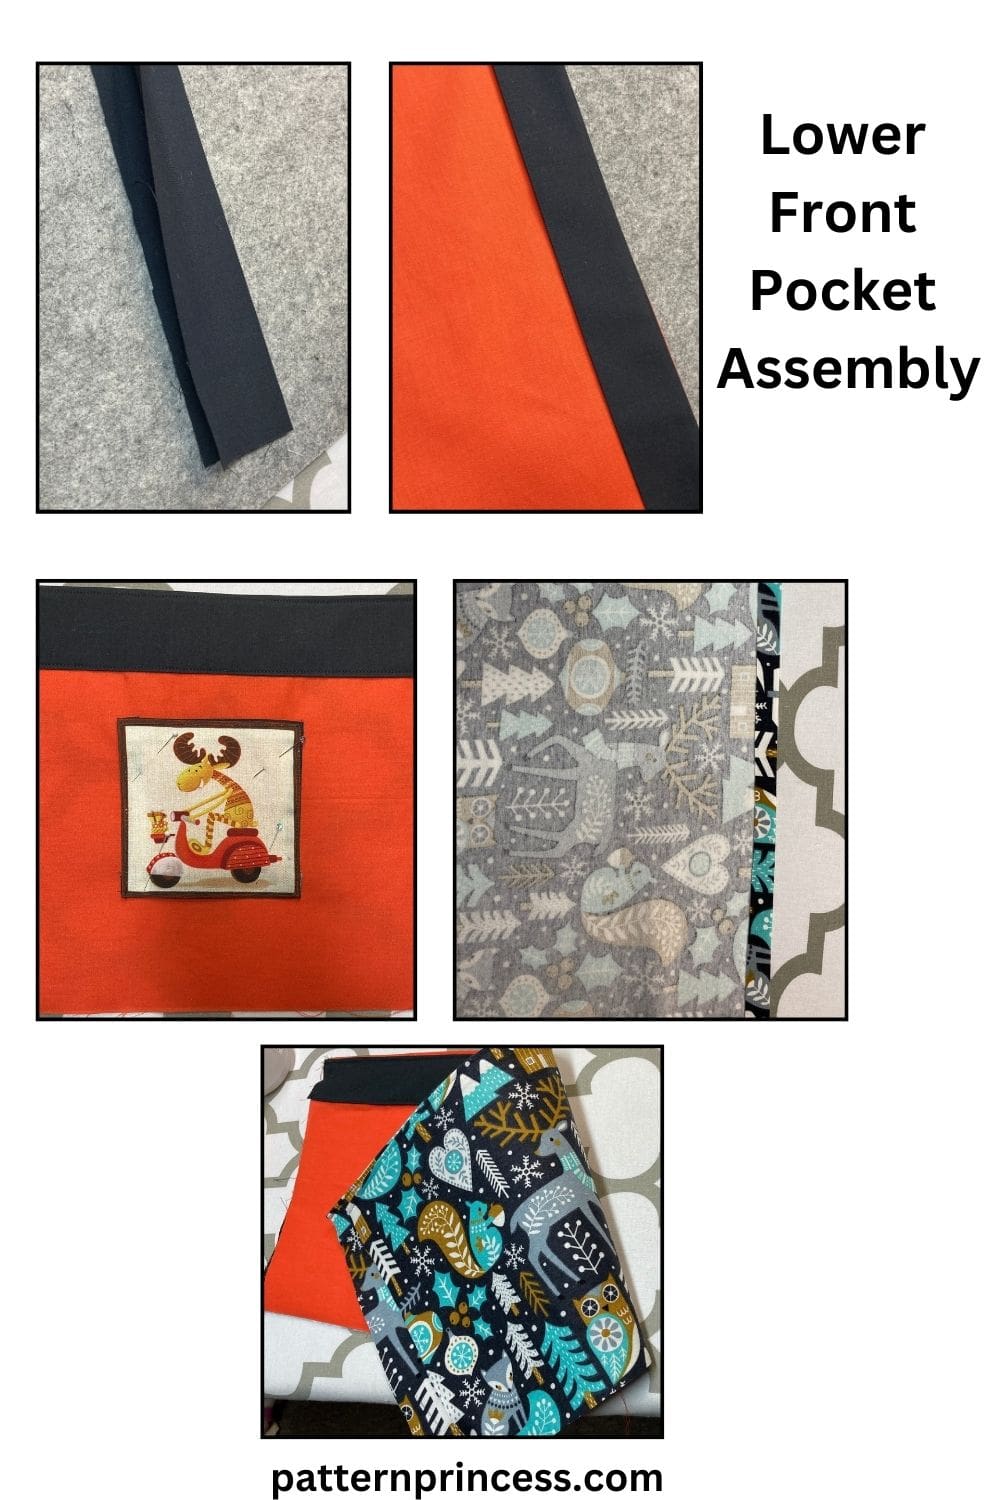
Front Lower Pocket
For this step, you will need (1) 9” X 18” rectangle of the orange fabric, (1) 9 ½” X 18” rectangle of the fleece, and (1) 4” X 18” of the black fabric.
Using the 4” X 18” of the black fabric fold in half lengthwise with the wrong sides together to 2” X 18”.
Place the raw edges of the black strip to the wrong side of the orange 9” X 18” rectangle. Using ¼” seam allowance, sew in place.
Next, fold over the folded edge of the black strip to the right side of the orange rectangle. Press. Top stitch along the top and bottom of the black strip.
Fold the orange fabric or measure to find the center. Place the small front pocket made in the previous step on the right side of the orange fabric center with the right side facing up. Sew along the sides and bottom to secure. The top will remain open.
Next fold the top edge of the fleece under ½” and press. Place the orange fabric right side down. Place the fleece on top of the orange fabric right side up. (In other words, the wrong sides together with the fold of the fleece between and behind the black strip). Match top edges. Top stitch the two layers together about ¼” in from the top edge. I did not sew the sides or the bottom.
This next step is optional. I spray basted the fleece to the back side of the front pocket to ensure it doesn’t move when assembling the pillow. Alternatively, you could top stitch around the entire rectangle.
Set this aside.
Upper Backing
For this step, you will need (1) 13” X 18” printed fabric and (1) 12 ½” X 18” fleece.
Beginning with the printed fabric, fold the bottom edge under ½” and press. Top stitch to secure.
Next using the printed fabric, either fold the fabric in half to find the center point or use a measuring tape to find the center. Starting with a line in the center of the printed fabric, right side up. Use a temporary marking pen to mark a sewing line from the top to the bottom every 2 inches apart. On either side of the center line.
Place the printed fabric right side down. Place the fleece on top of the printed fabric right side up. (In other words, wrong sides together). Match the top and sides raw edges. Pin in place.
Sew through both layers along the marked lines.
Set it aside.
Lower Backing
For this step, you will need (1) 9” X 18” rectangle of the black fabric, (1) 9 ½” X 18” rectangle of the fleece, and (1) 4” X 18” rectangle of the orange fabric.
Using the 4” X 18” of the orange fabric fold in half lengthwise with the wrong sides together to 2” X 18”.
Place the raw edges of the orange strip to the wrong side of the black 9” X 18” rectangle. Using ¼” seam allowance, sew in place.
Next, fold over the folded edge of the orange strip to the right side of the black rectangle. Press. Top stitch along the top and bottom of the orange strip.
Next fold the top edge of the fleece under ½” and press. Place the black fabric right side down. Place the fleece on top of the black fabric right side up. (In other words, the wrong sides together with the fold of the fleece between and behind the orange strip). Match top edges. Top stitch the two layers together about ¼” in from the top edge. I did not sew the sides or the bottom.
This next step is optional. I spray basted the fleece to the back side of the lower backing to ensure it doesn’t move when assembling the pillow. Alternatively, you could top stitch around the entire rectangle.
Set this aside.
Assemble Pillow and Sew the Layers Together
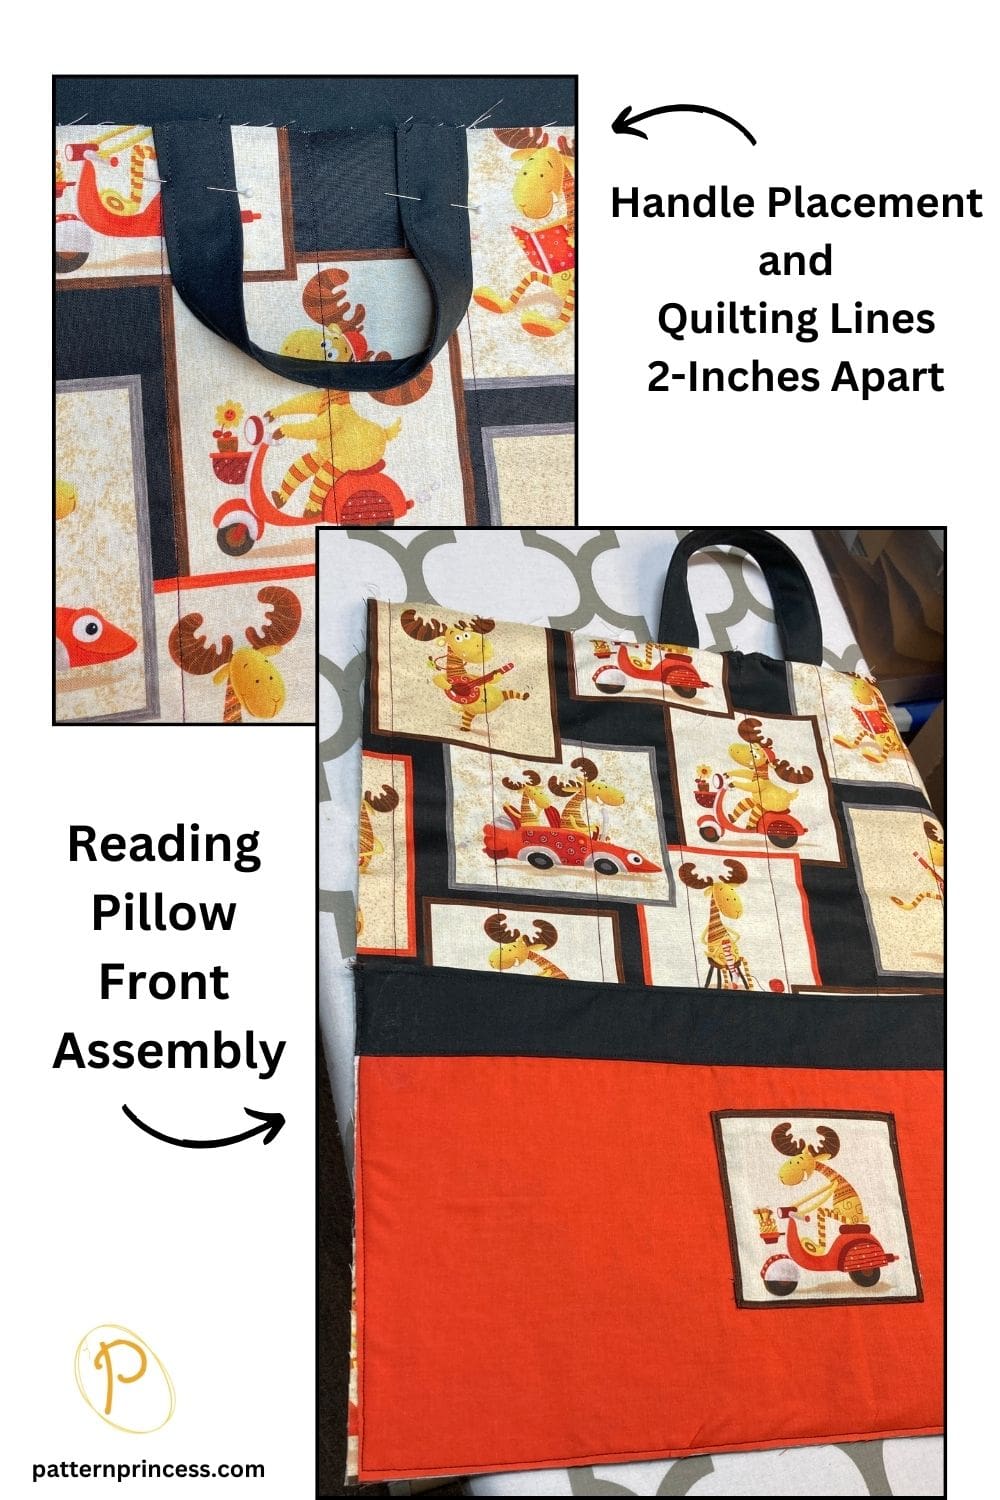
Place pillow front on your flat work surface, right side up.
Place the handle on the top edge centering the placement of the strip on either side of the center point. Aligning the raw edges. (I used the quilted stitching lines and aligned the strip with the lines on either side of the center line). Use pins or clips to secure, baste in place with a 1/8” seam. I went back and forth a few times to secure the handle.
Next place the orange lower front pocket with the right side up aligning the lower and side edges. Pin or clip in place. Baste along the sides and bottom using a 1/8” seam.
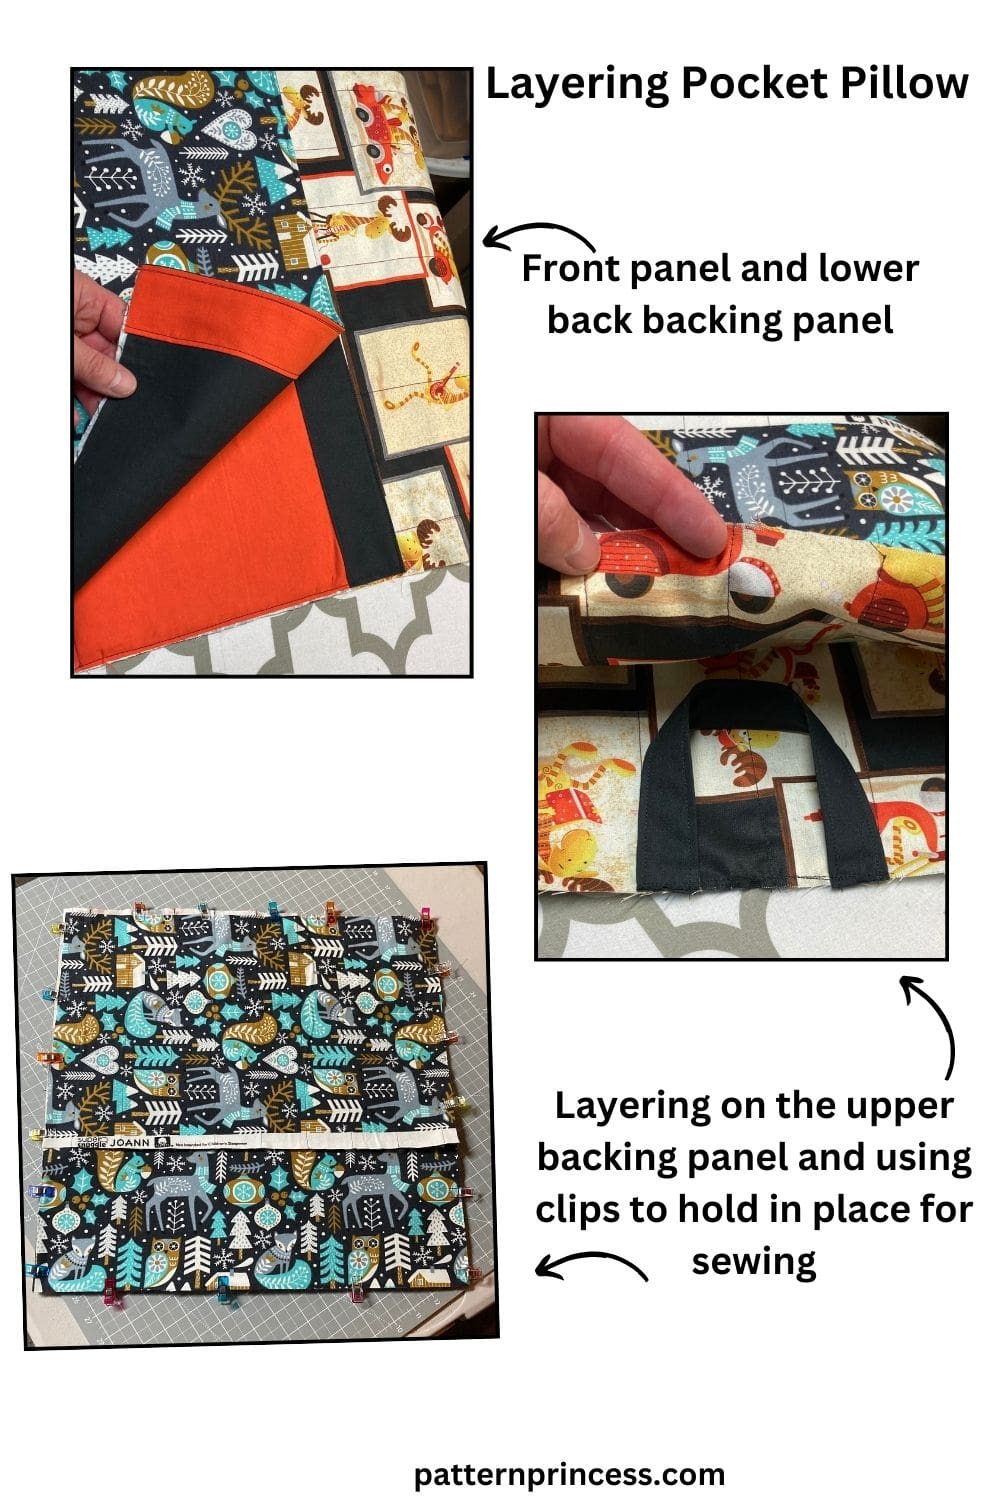
Place lower backing with the right side facing down aligning the raw edges with the sides and bottom. Align the placement of the orange strip on the lower backing with the black strip on the lower front pocket. Pin or clip in place.
Finally, add the upper backing with the right side facing down aligning the raw edges with the top and sides of the pillow front. Pin or clip all layers in place.
Sew the Layers Together
Sew around the entire perimeter of the pillow using ½” seam allowance. I sewed another round using ¼” seam allowance to help secure.
Turn pillow right side out.
Use a point turner or something else with a rounded point to push the seams out fully in the corners.
Fits a 16” X 16” or 17” X 17” pillow form. I found that the 17” X 17” pushes out the backing a bit. We ended up adding two snaps to help hold in place when using the larger pillow form.

You can find Victoria crocheting, quilting, and creating recipes. She has cooked in restaurants for over 20 years, including many larger parties. She learned to crochet when she was just 11 years old and has been crocheting ever since; over 50 years now. Over 40 years ago, she loved her first class in sewing and continues to hone her skills in quilting. Many have enjoyed the handmade gifts over the years. In her professional career, she has worked in management in a wide variety of businesses including higher education as a dean of a division. All the while attending college part-time to achieve her doctorate in higher education with an emphasis in e-learning.
Oh that fabric was perfect for this hop!! Cute project! xx
Hi Joy,
Yes, as soon as my daughter and I stumbled upon this fabric, we knew we had to have it. Just love how this project turned out.
Vicky
Pretty pillow. Thank you for the tutorial also.
Thank you, it’s my pleasure offering the free tutorial. A fun project once I got going on it.
Vicky
Children of all ages love these pillows. I have grand nieces and nephews who received these 2 Christma ago and use them to hold books during long car rides.
Your instructions were terrific and the moose fabric so entertaining. Lucky recipient.
Thank you Gretchen, I bet your grand nieces and nephews have all sorts of treasures packet in their cozy pillows on those car rides. It’s so fun to be able to share our talents with others. Thanks for stopping by.
Vicky
This is WONDERFUL! I love your pillow, and the cute fabric. Thank you for the tutorial as well!
Thank you, my pleasure to offer the free tutorial. Thanks for stopping by.
Vicky
Cute pillow, thank you for sharing.
Thank you, glad you enjoyed it.
Vicky
What a fabulous project. That fabric is just the cutest. I do think the small pocket is needed – a place to store another bookmark or maybe a pen or two – perfect.
Right?! There are so many little treasures that can be tucked in that cute little pocket and it adds so much to the overall design. Thanks for stopping by.
Vicky
What a cute pillow with adorable moose fabric! Thanks for sharing!
Thanks Carol, this fabric really looks great on this pillow. Glad we chose to make this rather than a quilt or something. It lets the cute fabric really shine.
Vicky
Cute pillow, and perfect fabric!
Thank you, I am so happy with the way it turned out.
Vicky
Your reading pillow is perfect for the blog hop!
Thank you. Glad you stopped by Gail.
Vicky
The reading pillow is adorable, with the perfect fabric. Thanks so much for sharing!
You are welcome. Once I figured out what to do, it was fun to make.
Vicky
Fabulous moose reading pillow for this hop and thanks for the instructions!
You are welcome. Glad to be a part of this blog hop Kathleen.
Vicky
Your reading pillow is really lovely!
Thank you Elizabeth.
Vicky
Wow, I love that reading pillow–sew cute with the moose fabric–and whoever uses it will love it too. Great way to promote reading and enjoy sewing! 🙂 Thanks for sharing the tutorial!
Thanks for stopping by Carol, I really do love how this came together and so does my grandson.
Vicky
Well, you had me with the moose, but what an adorable idea for toddlers. My grandies love carrying things around. I’m going to have to make a couple of these. Thanks for sharing. I am in love!
Aw, thank you so much Joan. There are so many treasures they can put in the pocket. How fun.
Vicky