
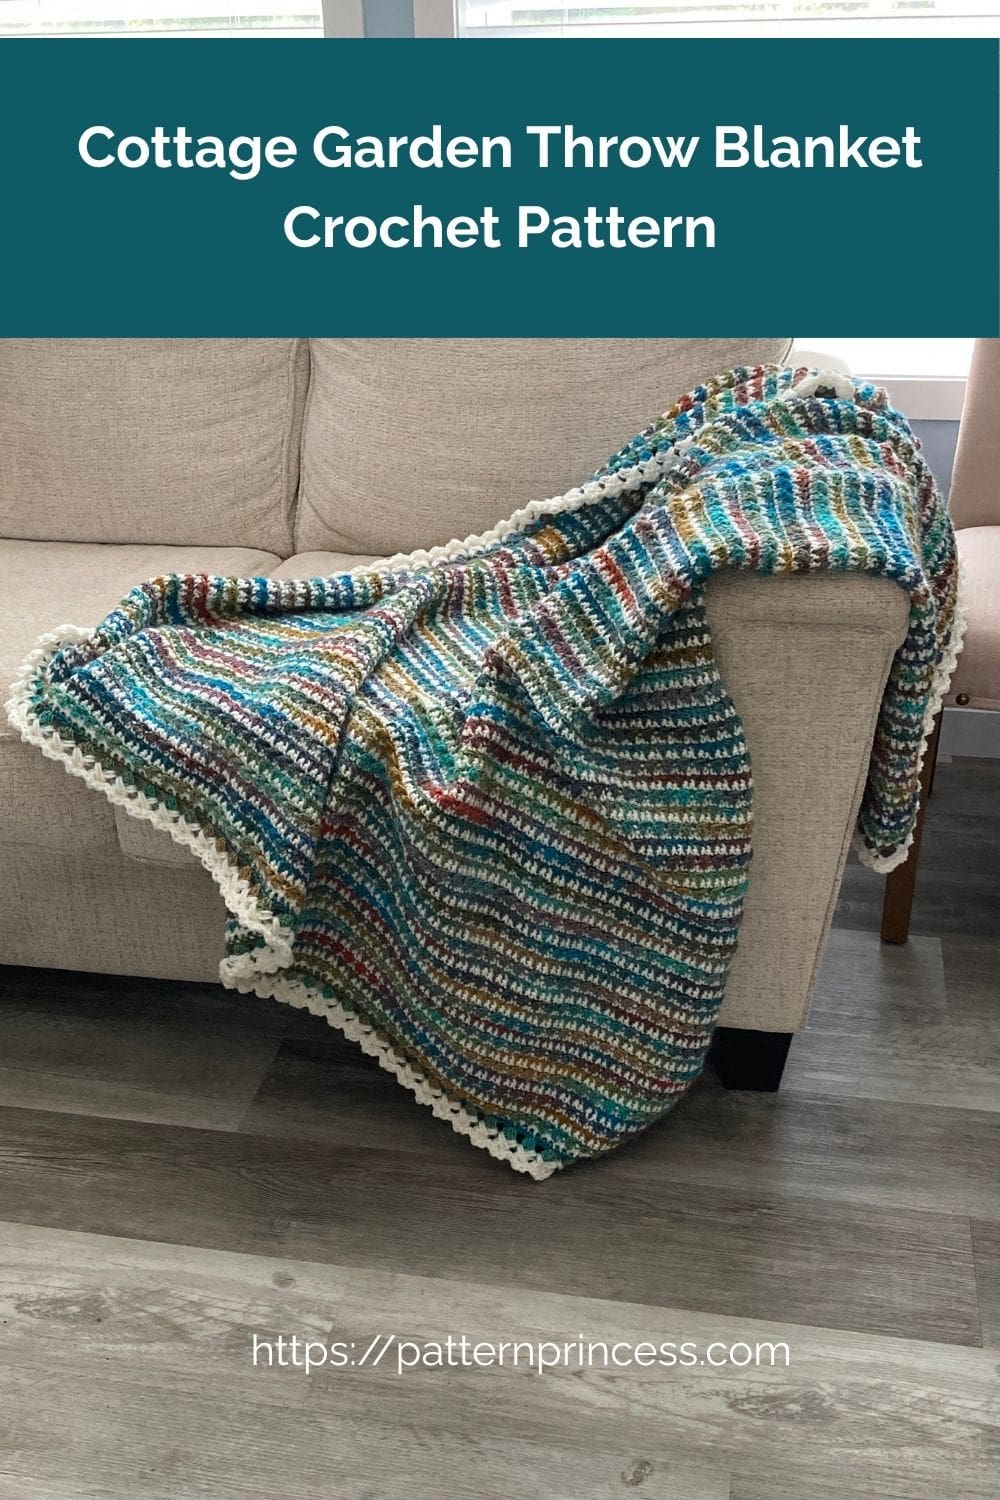
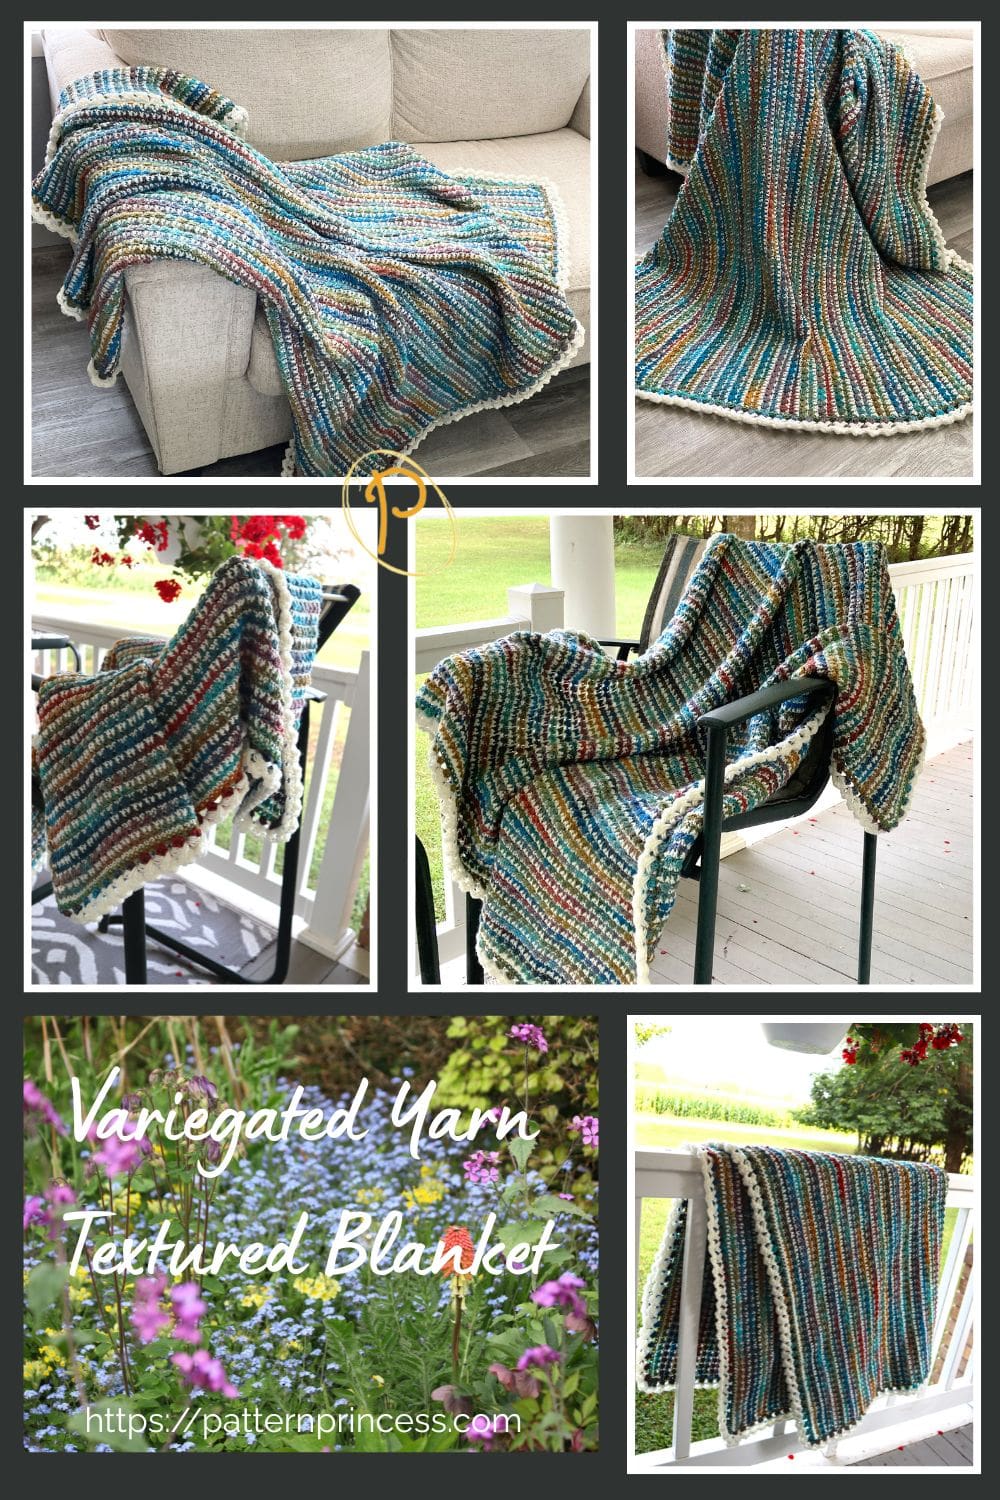
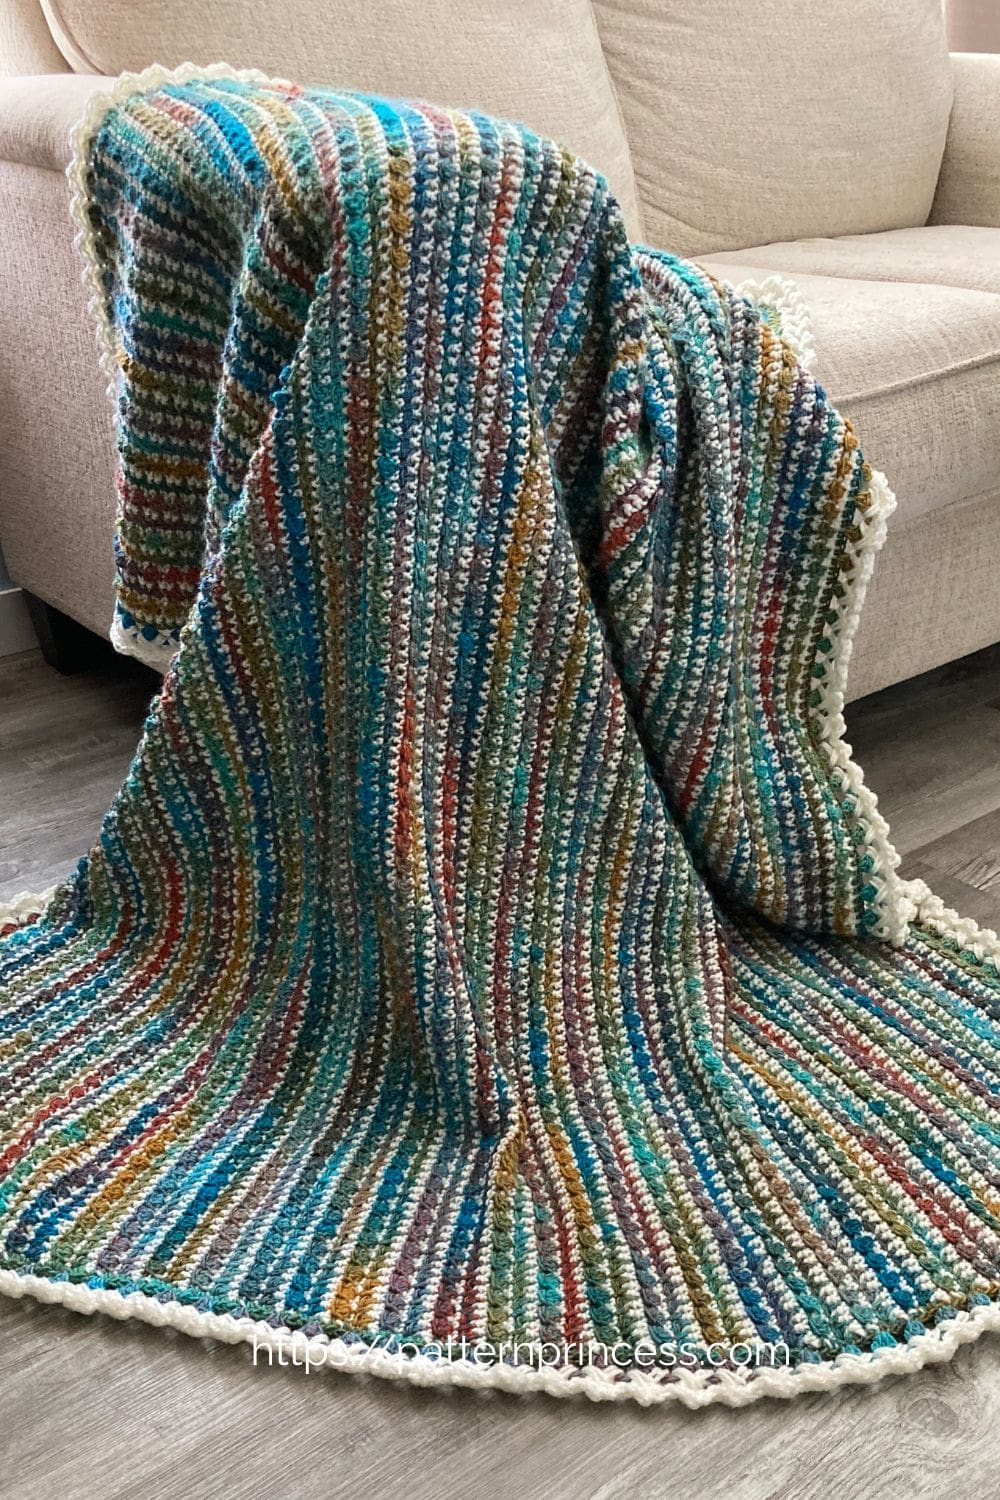
The Cottage Garden Throw Blanket is a beautifully textured crochet blanket that combines soft color changes with a unique variation of the cloud stitch. The raised clusters alternate from side to side, creating a dimensional texture that looks intricate while using a relatively simple two-row repeat.
The combination of yarn in colors Soft White and Paparazzi gives this blanket a soft, garden-inspired look. With the variegated yarn adding gentle pops of color throughout the textured stitches. The result is cozy, cheerful, and full of visual interest without requiring complicated colorwork.
This blanket is a wonderful project for crocheters who enjoy learning new stitch combinations and watching a textured pattern develop row by row.
The finished blanket is also completely reversible. While the clusters appear on opposite sides as you work through the two-row repeat, both sides have a lovely textured appearance.
Why You’ll Love This Crochet Blanket
- Beautiful texture: The raised 2-double-crochet clusters create a dimensional fabric with plenty of visual interest.
- Reversible design: Both sides of the blanket have an attractive textured appearance.
- Two-row stitch repeat: Once you understand the cluster placement, the main blanket pattern becomes easy to repeat.
- Eight sizes: Make anything from a small baby blanket to a king-size blanket.
- Two-color design: Alternating the solid and variegated yarn creates a beautiful garden-inspired effect.
- Great for gifting: The variety of sizes makes this pattern useful for baby gifts, throws, lap blankets, and larger bed blankets.
- Beautiful Crossweave border: The four-round border adds a finished look while incorporating the same crossed-cluster texture found throughout the blanket.
Pattern Construction
Work this blanket in rows from the bottom up. The main body uses a two-row repeat. Use one color for the cluster rows and the second color for the single crochet rows. Carry the yarn along the side for less yarn ends to weave in. Work a four-round border around the entire blanket.
About the Cottage Garden Stitch Pattern
The main blanket stitch is based on the cloud stitch, with a small variation that creates the look of crossed clusters.
The blanket uses a simple two-row repeat:
- One row is made with 2-double-crochet clusters separated by slip stitches.
- The following row is made entirely of single crochet stitches.
The clusters naturally alternate from one side of the fabric to the other as you work the repeat. This creates the raised texture that gives the Cottage Garden Blanket its distinctive appearance.
The border takes the texture one step further. It begins with a round of single crochet, followed by groups of 3 double crochet stitches. The next round uses crossed 2-double-crochet clusters over those groups, and the final round gently finishes the clusters with single crochet, half double crochet, and slip stitches.

Choosing Yarn for Your Cottage Garden Blanket
For the pictured blanket, I used two different yarns:
Yarn A: Red Heart Super Saver in Soft White
Yarn B: Red Heart Roll with It Melange in Paparazzi
Both are medium weight #4 yarns and work well together for this design.
The solid white yarn provides a soft background that allows the variegated yarn to stand out, while the Paparazzi colorway adds subtle changes of color throughout the raised clusters.
Other Yarn Ideas
This pattern would be beautiful in many different color combinations.
Try pairing:
- A solid neutral with a variegated yarn
- Cream with shades of pink, purple, or green
- White with a soft floral colorway
- Two coordinating solid colors
- Two contrasting colors for more defined texture
- A solid color with a long-color-change yarn for a more subtle effect
A smooth medium weight #4 yarn is recommended because it allows the clusters to remain well defined. Very textured or fuzzy yarns may make the crossed clusters more difficult to see and work into.
Choosing Your Blanket Size
This pattern includes eight suggested sizes, from a baby blanket through a king-size blanket. The pictured blanket is the Medium Throw Blanket, measuring approximately 50 x 50 inches before the border and 54 x 54 inches after the border.
Can I Make the Blanket a Different Size?
Absolutely!
The stitch pattern makes it easy to customize the width and length.
To adjust the width, begin with any even number of chains. The starting chain can be increased or decreased by multiples of 2.
To adjust the length, simply work more or fewer repeats of the two-row stitch pattern.
Keep in mind that your finished measurements may vary depending on your individual crochet tension. If you need a very specific finished size, it is always best to measure your work as you go rather than relying solely on the number of rows.

Before You Begin
There are a few things worth knowing before starting this blanket.
Keep your stitches loose.
If they are worked too tightly, slip stitches can become difficult to work into. When working the crossed clusters, they need a little extra room because they will be crossed when the border is worked. Avoid pulling the loops tightly.
Use stitch markers.
Stitch markers help hold the yarn loops in place while crocheting with the other color. Also, the slip stitches on the ends of the cluster rows can be difficult to see. A stitch marker can make these stitches much easier to locate when you work the next row.
Watch your stitch count.
Because the cluster row and single crochet row are worked differently, it can be helpful to count your stitches periodically, especially during the first few repeats.
Don’t be discouraged by the first few rows.
The stitch pattern may look a little unusual when you first begin. Once several rows are worked, the repeating texture becomes much easier to see.
Video and Photo Tutorials
I have included both right-handed and left-handed video tutorials to help you work the Cottage Garden Throw Blanket.
If you are new to this stitch pattern, I recommend watching the tutorial and looking through the photos before beginning the blanket. Seeing the cluster placement can make the written instructions much easier to understand.
Get Your Ad Free Printable PDF in our Etsy Shop.
Directions: Cottage Garden Throw Blanket
Skill Level
Intermediate Crocheter
You should be comfortable with basic stitches like chain, double crochet half double, and single crochet stitches. The stitch itself uses a repeating two-row pattern, but the crossed clusters for the border require attention to stitch placement and the order in which the clusters are worked.
Gauge
Approximately 12 stitches and 12 rows = 4 x 4 inches in pattern stitch.
Finished Size
This pattern has 8 sizes suggested.
- Baby Blanket = 26 x 32 inches without border, 30 x 36 inches with border.
- Lap/Toddler Blanket = 36 x 41 inches without border, 40 x 45 inches with border.
- Small Throw Blanket = 41 x 46 inches without border, 45 x 50 inches with border.
- Medium Throw Blanket (shown) = 50 x 50 inches without border, 54 x 54 inches with border.
- Large Throw Blanket = 56 x 66 inches without border, 60 x 70 inches with border.
- X-Large Throw Blanket = 61 x 71 inches without border, 65 x 75 inches with border.
- Queen Blanket = 76 x 86 inches without border, 80 x 90 inches with border.
- King Blanket = 86 x 96 inches without border, 90 x 100 inches with border.
Varying the Size
To adjust the width, simply adjust your chains by any multiple of 2 (even number). To make the project longer or shorter, simply crochet more or fewer rows of the repeating pattern.
Materials
Yarn A: Red Heart Super Saver. 100% Acrylic. 364 yards.
Color: Soft White
Yarn B: Red Heart Roll with It Melange. 100% Acrylic. 389 yards.
Color: Paparazzi
- Baby Blanket = Approximately 1,080 yards. 4 yarn skeins total. 2 skeins of yarn color A. 2 yarn cakes of yarn B.
- Lap/Toddler Blanket = Approximately 1,800 yards. 5 yarn skeins total. 2 skeins of yarn color A. 3 yarn cakes of yarn B.
- Small Throw Blanket = Approximately 2,300 yards. 7 yarn skeins total. 3 skeins of yarn color A. 4 yarn cakes of yarn B.
- Medium Throw Blanket (shown) = Approximately 2,900 yards. 8 yarn skeins total. 3 skeins of yarn color A. 5 yarn cakes of yarn B.
- Large Throw Blanket = Approximately 4,200 yards. 12 yarn skeins total. 5 skeins of yarn color A. 7 yarn cakes of yarn B.
- X-Large Throw Blanket = Approximately 5,020 yards. 14 yarn skeins total. 5 skeins of yarn color A. 9 yarn cakes of yarn B.
- Queen Blanket = Approximately 7,200 yards. 20 yarn skeins total. 8 skeins of yarn color A. 12 yarn cakes of yarn B.
- King Blanket = Approximately 9,000 yards. 24 yarn skeins total. 9 skeins of yarn color A. 15 yarn cakes of yarn B.
Crochet Hook. I used a size I 5.5mm crochet hook for the medium weight yarn.
If you are not able to find the yarn online, you can purchase it online. https://patternprincess.com/savings-center/ Savings Center – Pattern Princess
Scissors
Yarn Needle
Stitch Markers
Measuring Tape

Stitch Abbreviations (US Terms)
- CH = Chain
- CL = 2 Double Crochet Cluster
- DC = Double Crochet
- HDC = Half Double Crochet
- SC = Single Crochet
- SK = Skip
- SL ST = Slip Stitch
- SP = Space
- ST = Stitch
- STs = Stitches
- YO = Yarn Over
- [ ] = Repeat Between
Pattern Notes
- This pattern is written using U.S. crochet terminology.
- Carrying the yarn up the side. I am carrying the yarn up the side and changing yarn color every row.
- In order to carry the yarn up the side, one row you will turn your work and the other row you will not turn your work. This is noted in the row directions.
- This pattern uses the cloud stitch. However, the clusters pop out on the opposite sides every two rows because of the turn, no turn in this pattern.
- Chain 1 at the beginning of the row is the turning chain and does not count as a stitch.
- The slip stitch at the beginning and end of the cluster rows can be difficult to identify. Placing a stitch marker in these stitches makes them much easier to find when working the next row.
- This pattern is a two-row repeat One row consists of 2 double crochet clusters The next row consists of single crochet stitches across.
- The crochet border has 4 rounds. Round 1 consists of single crochet stitches. Round 2 consists of 3 double crochet groupings. Round 3 consists of 2 double crochet clusters crossed over each set of 3 double crochet groupings. And the last round 4 consists of single crochet, half double crochet, and single crochet stitches worked in the top middle of the crossed clusters with a slip stitch between the sets of clusters.
- This pattern includes both photo and video tutorials. Video links are located after the written pattern.
Crochet Stitches
Chain Stitch (CH ST)
Begin the chain stitch by making a slip knot on the crochet hook. Leave about a 5-inch tail on the yarn. This will be woven in later.
Next snug up the yarn loop that is on the crochet hook; while it should be firm, it should also be loose enough to slide on the hook with ease.
Keeping the loop on the hook, yarn over and draw the yarn through the loop. (The first chain stitch is complete).
Double Crochet (DC)
Yarn over, insert hook through a stitch and pull up a loop. Next, yarn over and pull through two loops on the hook. Lastly, yarn over again and pull through the last two loops on the hook.
Half Double Crochet (HDC)
Yarn over, insert the hook through a stitch and pull up a loop. Yarn over and pull through all three loops on the hook. For height, this stitch is between the single crochet and double crochet.
Single Crochet (SC)
Insert the hook in a stitch pull up a loop. Yarn over and pull through the two loops on the hook.
Slip Stitch (SL ST)
Insert the hook into the stitch, yarn over, and pull through the stitch and the loop on the hook.
Special Stitches
2 Double Crochet Cluster (CL)
Step 1. Yarn over, insert the hook into the stitch, yarn over and draw up a loop. There are three loops on the hook.
Step 2. Yarn over and draw through two loops.
Step 3. Yarn over and insert the hook into the same stitch, yarn over and draw up a loop. There are now four loops on the hook.
Step 4. Yarn over and draw through two loops.
Step 5. There are now 3 loops on the hook. Yarn over and draw through all three loops.
Tip: Don’t tighten the cluster as you work. Keeping the loops relaxed will make it much easier to work the crossed clusters in the next row.
Tips for Success
- Use stitch markers on the row ends. This holds the stitch loops in place and also helps mark the beginning and ending stitches of each row.
- Keep your slip stitches loose. If your project includes slip stitches, keep them relaxed. Tight slip stitches can make the fabric difficult to work into and may cause the edges to pull in.
- Don’t tighten your clusters. The clusters need a little room to cross over one another. Keep your loops relaxed as you work.
- Pay attention to the crossed clusters. Row 4 is the most involved row of the stitch pattern. Take your time and follow the written instructions carefully. The photo tutorial and video tutorial can also help you see exactly where each cluster is placed. Once you understand the movement of the clusters, the stitch becomes much easier to repeat.

Begin Cottage Garden Blanket Pattern
Start with the yarn A: Soft White.
Place a slip knot on your crochet hook.
Chain any number of stitches in a multiple of 2 (even number). Here are the recommended beginning chain stitches using the pattern gauge.
Reminder, this is 4 inches narrower than the final size if you are adding the crochet border.
- Baby Blanket = 76 Chain Stitches
- Lap/Toddler Blanket = 104 Chain Stitches
- Small Throw Blanket = 118 Chain Stitches
- Medium Throw Blanket (shown) = 144 Chain Stitches
- Large Throw Blanket = 162 Chain Stitches
- X-Large Throw Blanket = 176 Chain Stitches
- Queen Blanket = 220 Chain Stitches
- King Blanket = 248 Chain Stitches
Row 1
Continue using yarn A: Soft White.
SC in the 2nd CH from the hook and in each CH across. Turn
Row 2
Attach yarn B: Paparazzi.
CH 1 (Does not count as a ST). [SL ST into the first ST. CL in the next ST]. Repeat across between [ ]. End with a SL ST in the last ST. Do Not Turn
Row 3
Switch to yarn A: Soft White.
CH 1 (Does not count as a ST). SC in the first ST and in each ST across. Turn
Row 4
Switch to yarn B: Paparazzi.
CH 1 (Does not count as a ST). [SL ST into the first ST. CL in the next ST]. Repeat across between [ ]. End with a SL ST in the last ST. Do Not Turn
Row 5
Switch to yarn A: Soft White.
CH 1 (Does not count as a ST). SC in the first ST and in each ST across. Turn
Rows 6 and Beyond
Repeat Rows 4 and 5 until your project reaches the desired length.
Here are the suggested rows to crochet for each size.
- Baby Blanket = 97 Rows
- Lap/Toddler Blanket = 123 Rows
- Small Throw Blanket = 139 Rows
- Medium Throw Blanket (shown) = 151 Rows
- Large Throw Blanket = 199 Rows
- X-Large Throw Blanket = 213 Rows
- Queen Blanket = 259 Rows
- King Blanket = 289 Rows
Finishing
After you work the last ST using yarn color A, cut off the yarn leaving about a 12-inch long tail. Pull the yarn tail through the last loop on the hook.
Thread the yarn needle with the yarn tails and weave them through the crochet stitches back and forth until the yarn feels secure. Snip off the excess yarn.

Crochet Border
Continue using yarn B: Paparazzi.
Round 1
Turn your work. CH 1 (Doesn’t count as a ST). 1 SC in the first ST and each ST across, 3 SC in the corner.
On the first side. 1 SC in each row, 3 SC in the corner.
On the bottom. 1 SC in each ST, 3 SC in the corner.
On the last side. 1 SC in each row, 3 SC in the corner. Join with a SL ST into the first SC. Do Not Turn
Round 2
Continue using yarn B: Paparazzi.
3 DC in the first ST. [SK 2, 3 DC in the next ST]. Repeat between [ ] to corner. In the corner SK 1 SC, in the next SC work 3 DC, SK 1 SC.
Continue on the side. In the first ST work 3 DC in the same ST. [SK 2, 3 DC in the next ST]. Repeat between [ ] to corner. In the corner SK 1 SC, in the next SC work 3 DC, SK 1 SC.
Continue on the bottom. In the first ST work 3 DC in the same ST. [SK 2, 3 DC in the next ST]. Repeat between [ ] to corner. In the corner SK 1 SC, in the next SC work 3 DC, SK 1 SC.
Continue on the last side. In the first ST work 3 DC in the same ST. [SK 2, 3 DC in the next ST]. Repeat between [ ] to corner. In the corner SK 1 SC, in the next SC work 3 DC, SK 1 SC. End with a SL ST into the first DC. Do Not Turn
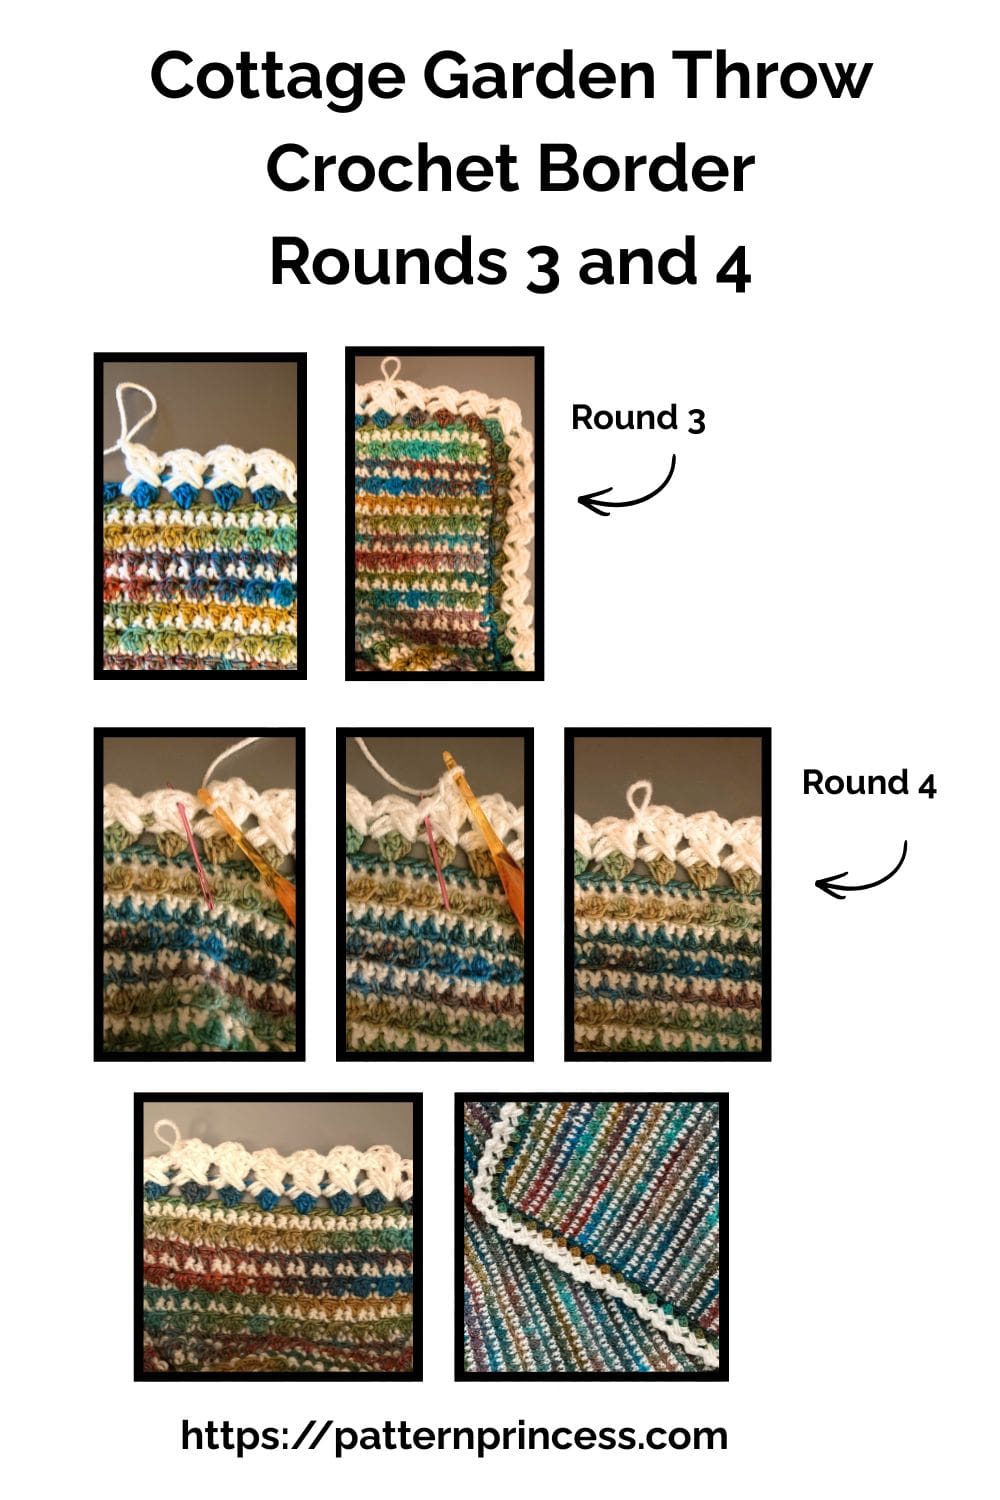
Round 3
Attach yarn A: Soft White. Between any 3 DC group.
CH 1 (Doesn’t count as a ST). SK the first 3 DC STs and work a CL between the next two groups of 3 DC STs, CH 1. Then go back and work a CL , Ch 1 on the other side of the first group of 3 DC STs that you skipped. (You should have 2 cluster stitches crossed above a group of 3 DC clusters).
Next, [SK to the far side of the next group of 3 DC clusters. (The SP between the second and third groups of 3 DC STs away from where you are). Work a CL, CH 1. Then go back to the other side of the skipped group of 3 DC STs and work a CL, CH 1]. Repeat across between [ ]. End with a SL ST into the top of the first CL of the round. Do Not Turn
Round 4
Continue using yarn A: Soft White.
In the top SP between the crossed CL and work (1 SC, 1 HDC, 1 SC). Next, in the SP between the groups of 3 DC where the clusters meet, work a SL ST. [SK to the next top SP between the crossed CL and work (1 SC, 1 HDC, 1 SC). In the SP between the groups of 3 DC where the clusters meet, work a SL ST]. Repeat around between [ ]. End with a SL ST into the first SC.
Finishing
After you work the last ST using yarn color A, cut off the yarn leaving about a 12-inch long tail. Pull the yarn tail through the last loop on the hook.
Thread the yarn needle with the yarn tails and weave them through the crochet stitches back and forth until the yarn feels secure. Snip off the excess yarn.
Video Tutorials for the Cottage Garden Throw Blanket on our YouTube Channel
Videos For the Blanket
Videos for the Border
We hope that you have enjoyed this lovely crochet pattern.
XO
Vicky & Casey

You can find Victoria crocheting, quilting, and creating recipes. She has cooked in restaurants for over 20 years, including many larger parties. She learned to crochet when she was just 11 years old and has been crocheting ever since; over 50 years now. Over 40 years ago, she loved her first class in sewing and continues to hone her skills in quilting. Many have enjoyed the handmade gifts over the years. In her professional career, she has worked in management in a wide variety of businesses including higher education as a dean of a division. All the while attending college part-time to achieve her doctorate in higher education with an emphasis in e-learning.
Stay connected with Pattern Princess
Add Pattern Princess as a preferred source in Google Search to make it easier to find our crochet patterns, recipes, quilt patterns, and other creative projects when you're looking for something new to make.
