Last updated on July 5th, 2024 at 12:27 am
Learn how to sew a face mask to keep yourself safe during these uncertain times. In the news the past few days, the announcers keep letting us know that at this point everyone should be wearing a mask to protect themselves and others in the community.
*Post contains affiliate links* for more information please read the disclaimer on the About Us page.

Shortage of Face Masks
Since there is a shortage of masks right now and I am not interested in paying exorbitant fees for an air mask, I have decided to do some research and make my own for myself and family members. I need to let you know that this is NOT a MEDICAL GRADE AIR MASK; however, you can still protect your face with other types of face covers even if they are non-medical grade.

Get a PDF Printable of This Tutorial
According to Good Morning America, top health officials in China warn against not wearing a mask. They say that not wearing one is a big mistake during this pandemic.
Photo and Video Tutorial for this Reusable Face Mask Sewing Pattern
Sewing Skills
If you have a sewing machine and have basic sewing skills, you can make this face mask. The basic pattern involves two layers of fabric, three 3 folds and elastic to go around the ears. No sewing machine? That is okay, you can hand sew this together too , it will just take longer.
Simple Sewing Pattern for Making a Reusable Air Mask
This is a super simple tutorial. It’s pretty much a rectangular piece of fabric with pleats and elastic on the side. The pleats help give the extra room needed to breath comfortably.

Disclaimer: This Face Mask Pattern – Does NOT Protect Against Viruses. It is NOT a Replacement for an N95 Mask

What You Need to Make This Face Mask
- (2) 6 x 9 Inch Rectangles of Cotton Fabric
- (2) 1/8 Inch or 1/4 Inch wide Elastic that is 7 Inches Long
- Sewing Machine
- Thread
- Tape Measure
- Pins
- Scissors
Let’s Get Started
I have not sewn anything for a few years, so I had to go digging through my plastic totes to see what I had. Lucky me, I found quite a few fat quarter fabric swatches and 8 yards of 1/8 inch elastic. All of the rest of the supplies were there too. However 1/4 inch elastic is a bit stronger and would work better for everyday use. Also, you can use any cotton fabric. No fabric? Cut up an old cotton shirt. Supplies can be difficult to get right now, so you might have to be creative and use what you have.
What is a fat quarter?
A fat quarter of fabric is a one-fourth yard cut that usually measures 18″ x 22″. Here is how I cut my fabric. Oh yeah! I was also lucky enough to have a fabric with stripes. This makes it wonderfully easy to cut a straight line. As you will notice from the photos, I do not have a fancy rotary cutter or a fabric cutting board. The old fashioned scissors is what I used.
Since we need the fabric 9 inches wide, the fat quarter below can be folded in half and cut. That makes it so easy to cut a straight line with a scissors.

In the photo below, I folded the fabric in half and started cutting to show you how I aligned the scissors to get a straight edge.

Start measuring each half now to make the final 6 inch X 9 inch sizes. Measure and cut every 6 inches.
Here are photos of how to measure if you are new to measuring and sewing. The lines on this fabric make it wonderful to cut a straight line.

Notice the Fat Quarter is 22 inches long. Therefore, that will make three pieces of fabric for the mask with a 4 X 9 inch left over. This would make a nice child size. Remember we need to pieces of fabric for each covering. Therefore, one Fat Quarter will yield enough material for 3 adult face coverings and 1 child.
Time to Start Pinning and Sewing
Pin the two of the 6 X 9 rectangles together (right sides together). In the photo below, you can see the right side (top side) on the left and the wrong side (under side) on the right.

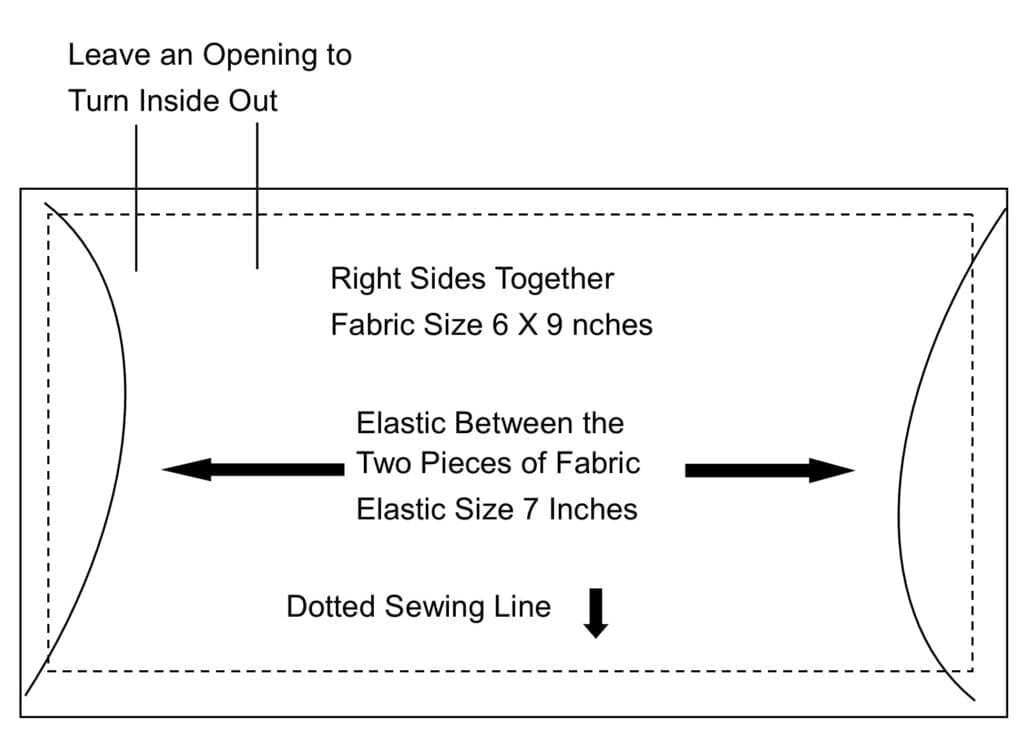


First Sewing Pass
With the right sides together, start sewing about mid-way on the 9 inch side. There needs to be a hole so this can be turned inside out. Sew with approximately 1/4 inch seam. Sew almost to the end-take the elastic and put it between the material. Continue sewing to the entire end, turn and sew up the side almost to the end. Bring the other half of the elastic between the material on that end and continue sewing to the end. Turn.
Sew up the other 9 inch side again, almost to the end, insert the elastic between the fabric and continue sewing. Turn, sew up the side and when you are close to the other end, tuck the last part of the elastic between the material. Continue sewing to the end and turn sewing just a little bit on the first 9 inch side where you started. Remember leave about a 2 inch opening so you can turn the mask inside out.
In the photo below, the first sewing pass is complete. Notice a couple of things. The elastic you can see peaking out on the right side. That is okay, no one will notice as that will be on the inside once turned inside out. also the top left has the opening. That is how we will turn this inside out. Go ahead and do that now.

In the photo below, the air mask has been turned inside out. See how quickly this is coming together? With the first sewing pass, most of the work is done.

Second Sewing Pass
In this second sewing pass, you will want to sew around the entire outside. This will close up the hole that was left in the first sewing pass. However, in order to make this fit nicer on the face, you will want to add three pleats. Don’t worry, that is not hard to do.
Adding Pleats
Pick the fabric up between your fingers, fold over and pin on both sides.


Begin sewing on the 9 inch side. Just remove the pins before sewing over the area.

Take your time sewing over the pleats. There is a lot of material that needs to fit under the foot.

Third Sewing Pass
In order to provide a bit more stability, make one more pass sewing all the way round the air mask again.
You are now complete.
Reusable and Washable Air Mask
The nice thing about this mask is that it is washable. However, I would put this in a fabric bag before washing just to keep it from snagging on any other clothing. Here is a mesh fabric bag that would be nice to use.

Get a PDF Printable of this Tutorial
Video Tutorial of This Face Mask
My pattern for the face mask is a photo tutorial of this video that was aired on Good Morning America. Therefore, if you would rather watch a video of this reusable face mask sewing pattern, it is available here.
If you loved this post, please share. It helps to show me that these types of posts are helpful – thank you!
While you are visiting, why don’t you check out the recipes and get some recipe ideas for some home cooked meals.

You can find Victoria crocheting, quilting, and creating recipes. She has cooked in restaurants for over 20 years, including many larger parties. She learned to crochet when she was just 11 years old and has been crocheting ever since; over 50 years now. Over 40 years ago, she loved her first class in sewing and continues to hone her skills in quilting. Many have enjoyed the handmade gifts over the years. In her professional career, she has worked in management in a wide variety of businesses including higher education as a dean of a division. All the while attending college part-time to achieve her doctorate in higher education with an emphasis in e-learning.
Yes, I love this place
Pingback: Face Mask Pattern 6 X 9 – Custom Masks – Custom Face Masks
Pingback: Face Mask Pattern Fat Quarters – Custom Masks – Custom Face Masks
Pingback: Face Mask Pattern 9 X 7 – Custom Masks – Custom Face Masks