Last updated on July 4th, 2024 at 11:28 pm
Join us and learn how to sew a tote bag from an old shirt. Transforming an old tunic into a stylish tote bag is not only a creative way to upcycle your wardrobe but also a fun and practical sewing project.
In just a single afternoon, you can breathe new life into an unused garment and create a unique accessory that reflects your personal style. And at the same time, save on plastic bags.
This project is sure to inspire your creativity and add a touch of eco-conscious flair to your everyday carry-all.
It’s a great way to declutter your closet of old clothes. We all have those shirts that we love the fabric on, yet we never wear. Maybe it doesn’t fit well or maybe we never have the right occasion to wear it. Well, I have the perfect solution. You can wear it over your shoulders as a tote bag.
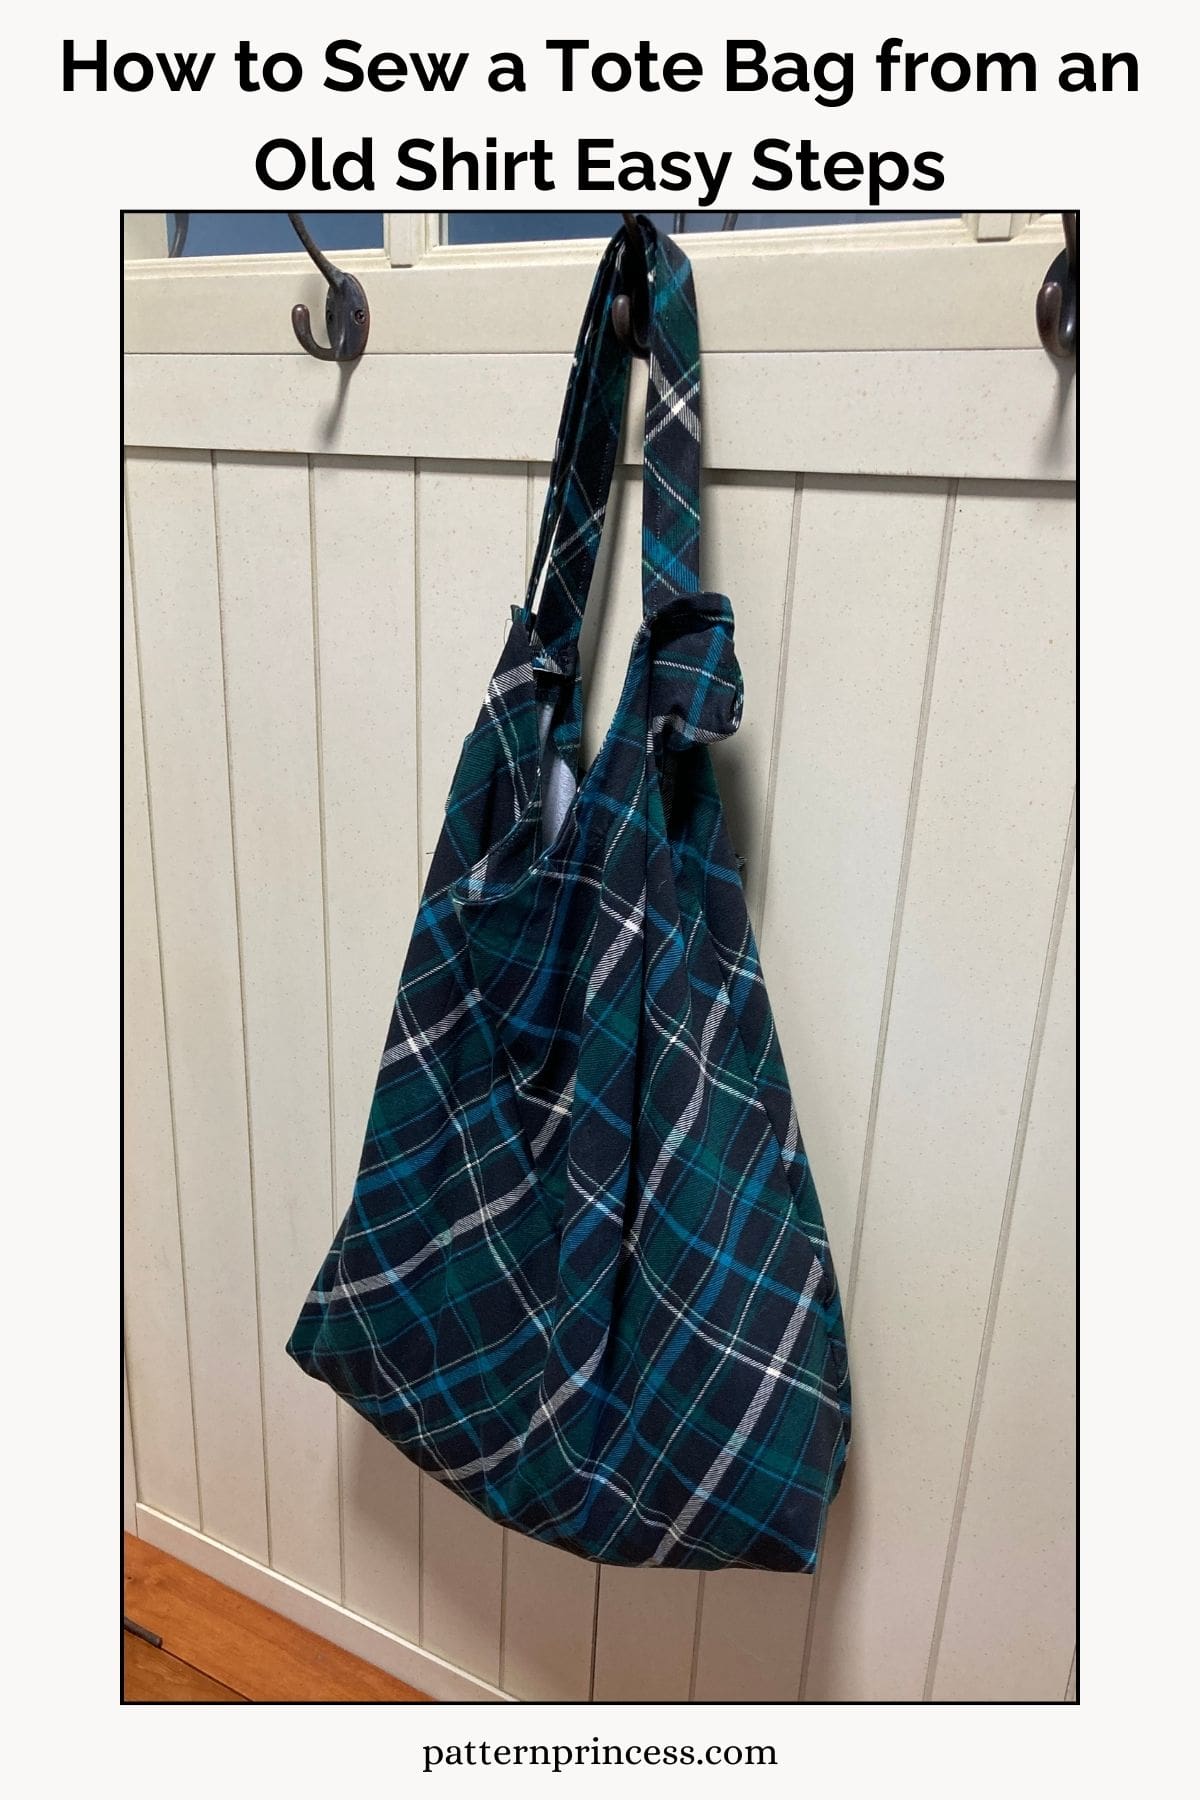
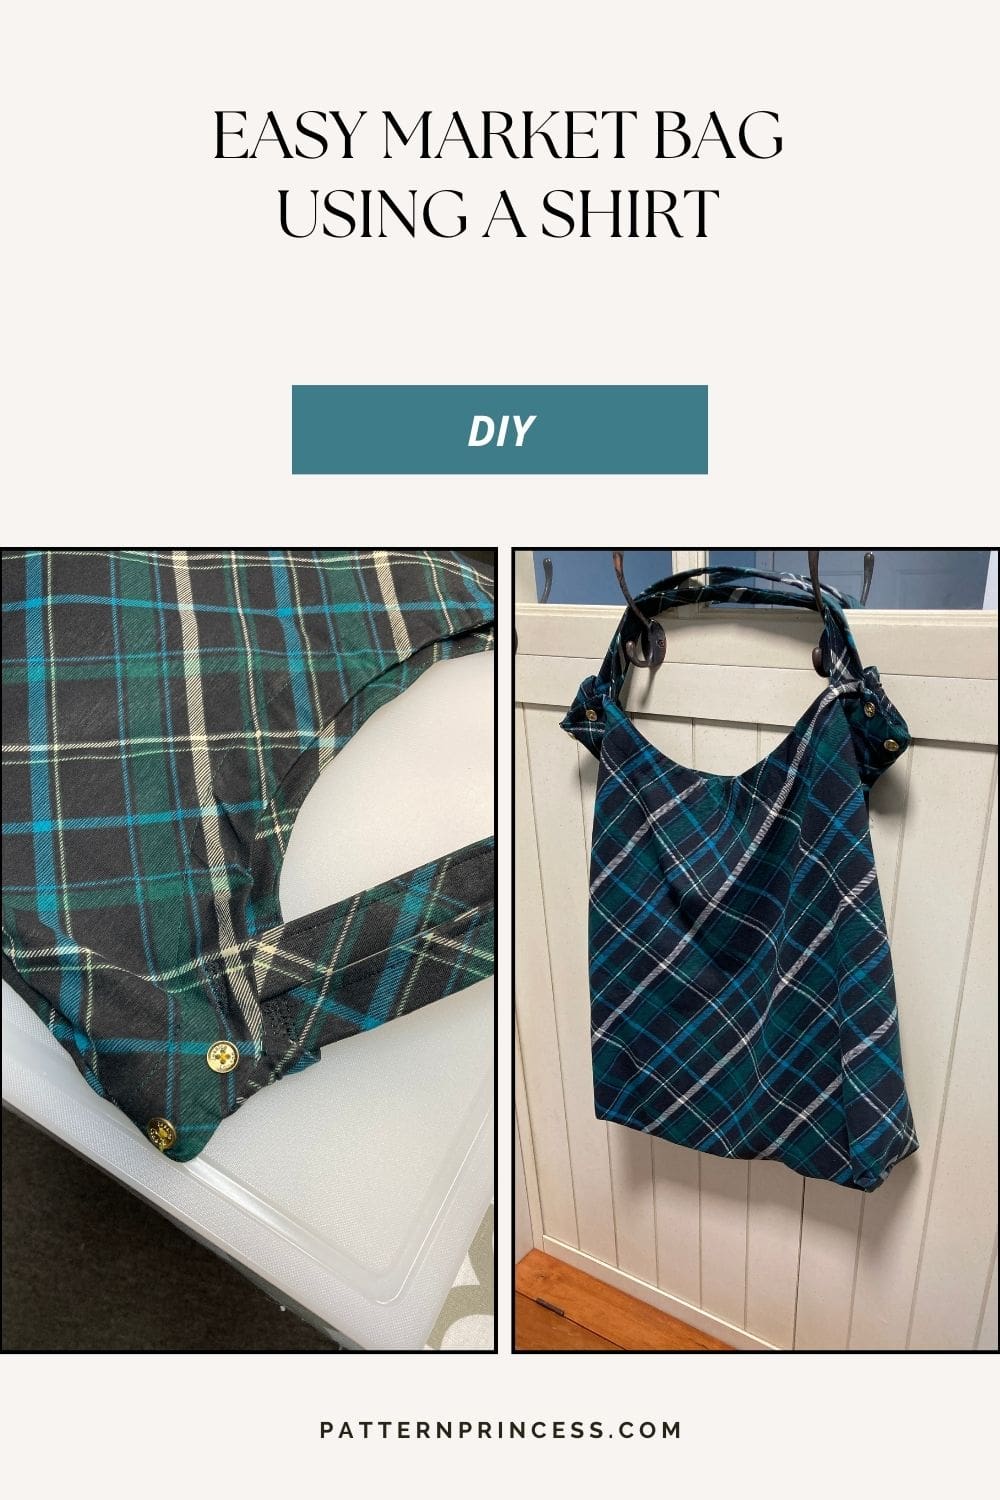
Handy Shopping Bag
Fold this up and stash it in your trunk for a reusable shopping bag when you make your trips to the grocery store or a summer farmer’s market. It’s easy to throw in the washer and dryer to clean thoroughly between uses.
Basic sewn shirt bag
There are lots of tutorials on how to make reusable bags. Heck, even Martha Stewart has a DIY version. While there are numerous versions on how to make the basic t-shirt bag, I have yet to find one on making one like this tutorial.
While using an old t-shirt is the most common way, my pattern uses a tunic and has a pocket inside to store a variety of things. In my case it is yarn, crochet hooks and things for my grandbaby. It holds up way better than a paper bag.
My method keeps the neckline and hem intact. It saves time and the neckline is so pretty on this shirt with the button embellishment. We are going to use almost the whole shirt.
I loved the fabric so much that I saved the sleeves. You never know when I might need to add an applique to something.
Inspiration for this Tote Bag
This shirt has been hanging in the closet for quite a few years. I loved the fabric, but it was huge. I always meant to figure out a way to sew it differently so it would fit. That never happened. Instead it just took up room in my closet.
Then Project Quilting came along. Every other week, there is a challenge to make something. This time the challenge was that the project must be wearable or have been made from previously worn items. It was time to use the shirt. I loved the fabric and now it is useful.
Get Your Printable PDF in our Etsy Shop.
Direction: How to Sew a Tote Bag from an Old Shirt Easy Steps
Skill Level
Easy Sewing
You should be able to line up seams and sew fabrics together.
Finished Size
19 X 19 inches plus the handles.
Pattern Notes
All seams are ¼ inch unless otherwise noted.
You can use any size shirt for this sewing project. However, the size of the shirt will determine the final size of the bag. This is a big bag and a smaller shirt will result in a smaller bag.
Materials Needed
A large tunic shirt
2 pieces of fusible interfacing 9 X 4 inches. (Optional. This is to add stability to the handles).
Equipment / Tools
- Pencil
- Pair of Scissors
- Quilting Ruler
- Rotary Cutter
- Straight pins
- Iron
- Ironing board with a pad
- Sewing Machine
- My Favorite Quilting Supplies
Instructions for Upcycling the Tunic Shirt
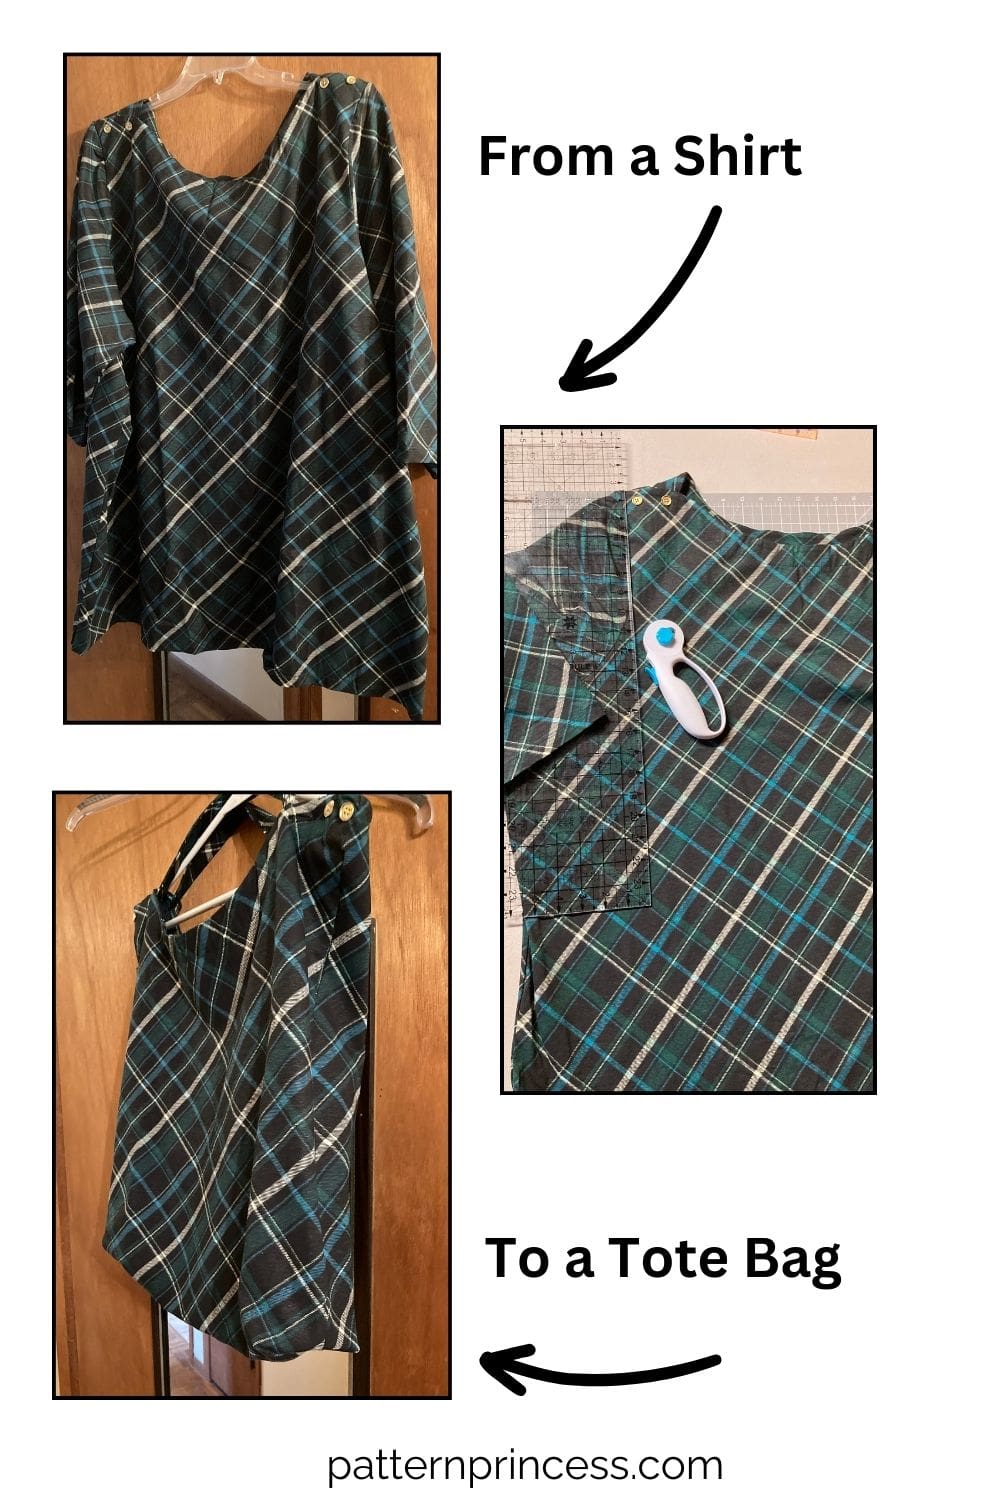
Begin by cutting the pieces out of the shirt. Lay the shirt out on a flat surface. Place the long quilting ruler lengthwise from the top to the bottom of the shirt. Place it on the sides of the shirt by the shoulder/arm hole seam down to the bottom hem. Use the rotary cutter to cut through both layers of the shirt. Repeat this step on the other side.
I kept the neckline as it was because it was so pretty on this shirt, and I thought it would look nice with the transformed shoulder bag.
Since this was such a large tunic, it was quite long and there was enough to make a pocket inside the bag. When measuring from one side to the other, it measured 19 ½” X 19 ½”.
Therefore, I measured 19 ½” from the neckline down from to the waistline of the shirt. Lay the long quilting ruler across the shirt at that mark. Use the rotary cutter to cut through both layers.
The two pieces that were cut off for my shirt measured 191/2” X 13”.
Now you have the bag front, back, and the inside pocket. The shoulder seems should still be joined at this point.
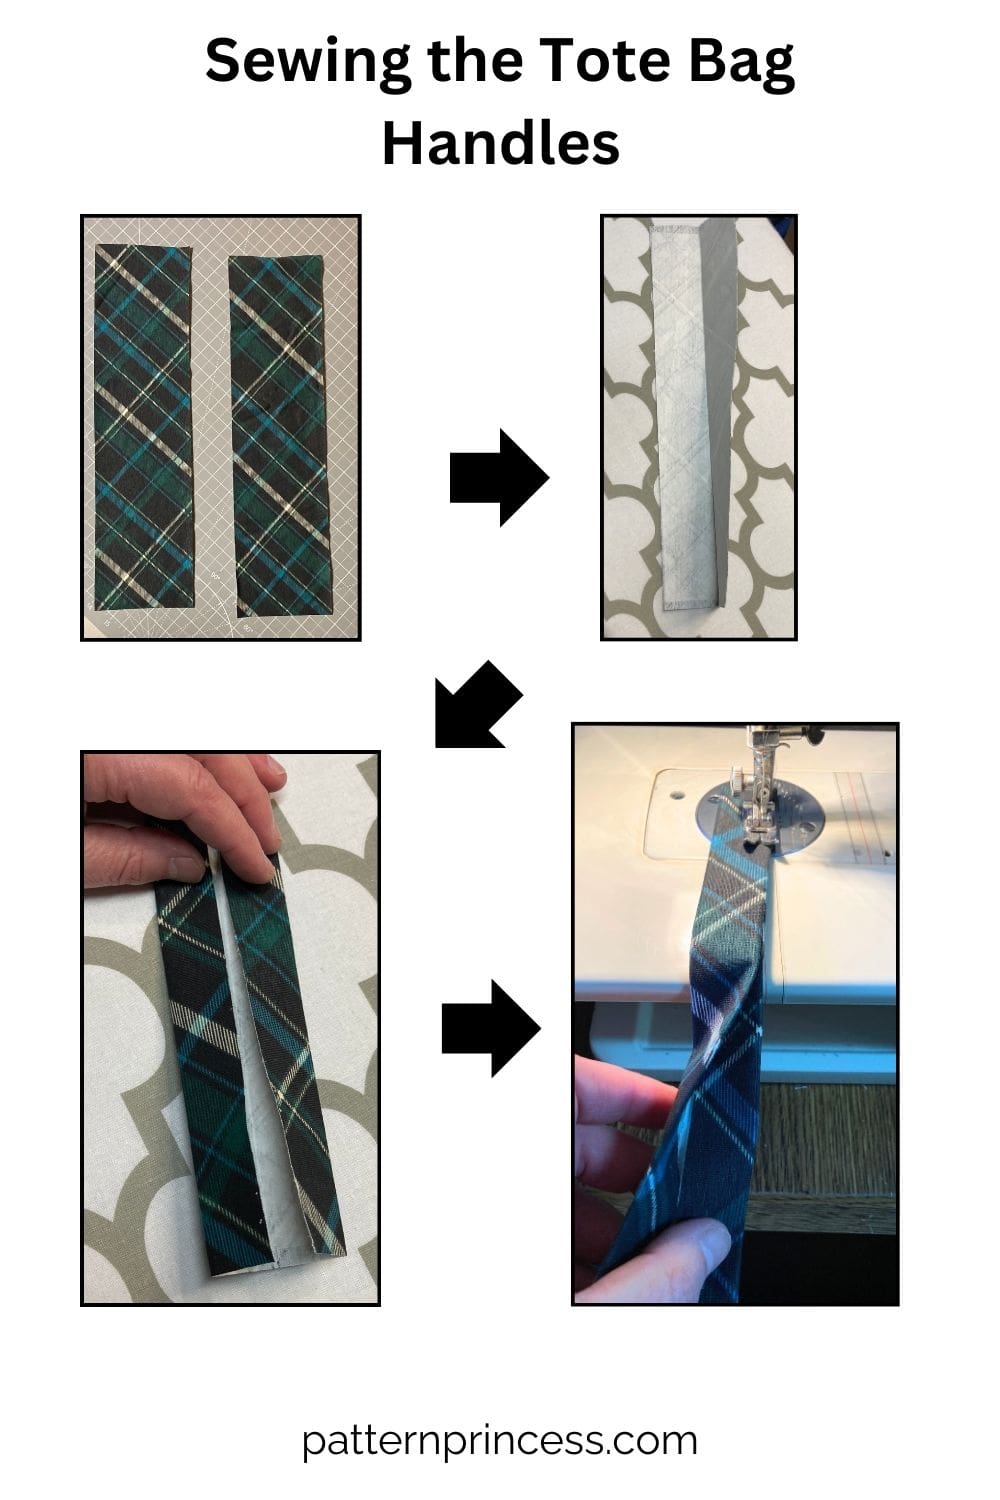
Making the Handles
Using one of the pieces of the lower part of the shirt that you cut off, measure and cut out two pieces 9” X 4”.
If you want your handles stiff, then also cut out two pieces of fusible interfacing.
Following package instructions, use your iron to fuse to the back side of the two pieces of 9” X 4” fabric.
Using one of the pieces of fabric with the interfacing fused to the back, fold it in half lengthwise and press. Then unfold and fold each side to the center fold and press. Next fold the fabric in half lengthwise and press. Now the raw edges are tucked nicely into the center of the fold. Top stitch along the edge the length of the fabric to close. Your piece should measure 9” X 1”.
Repeat the steps for the other handle. Set the handles aside.
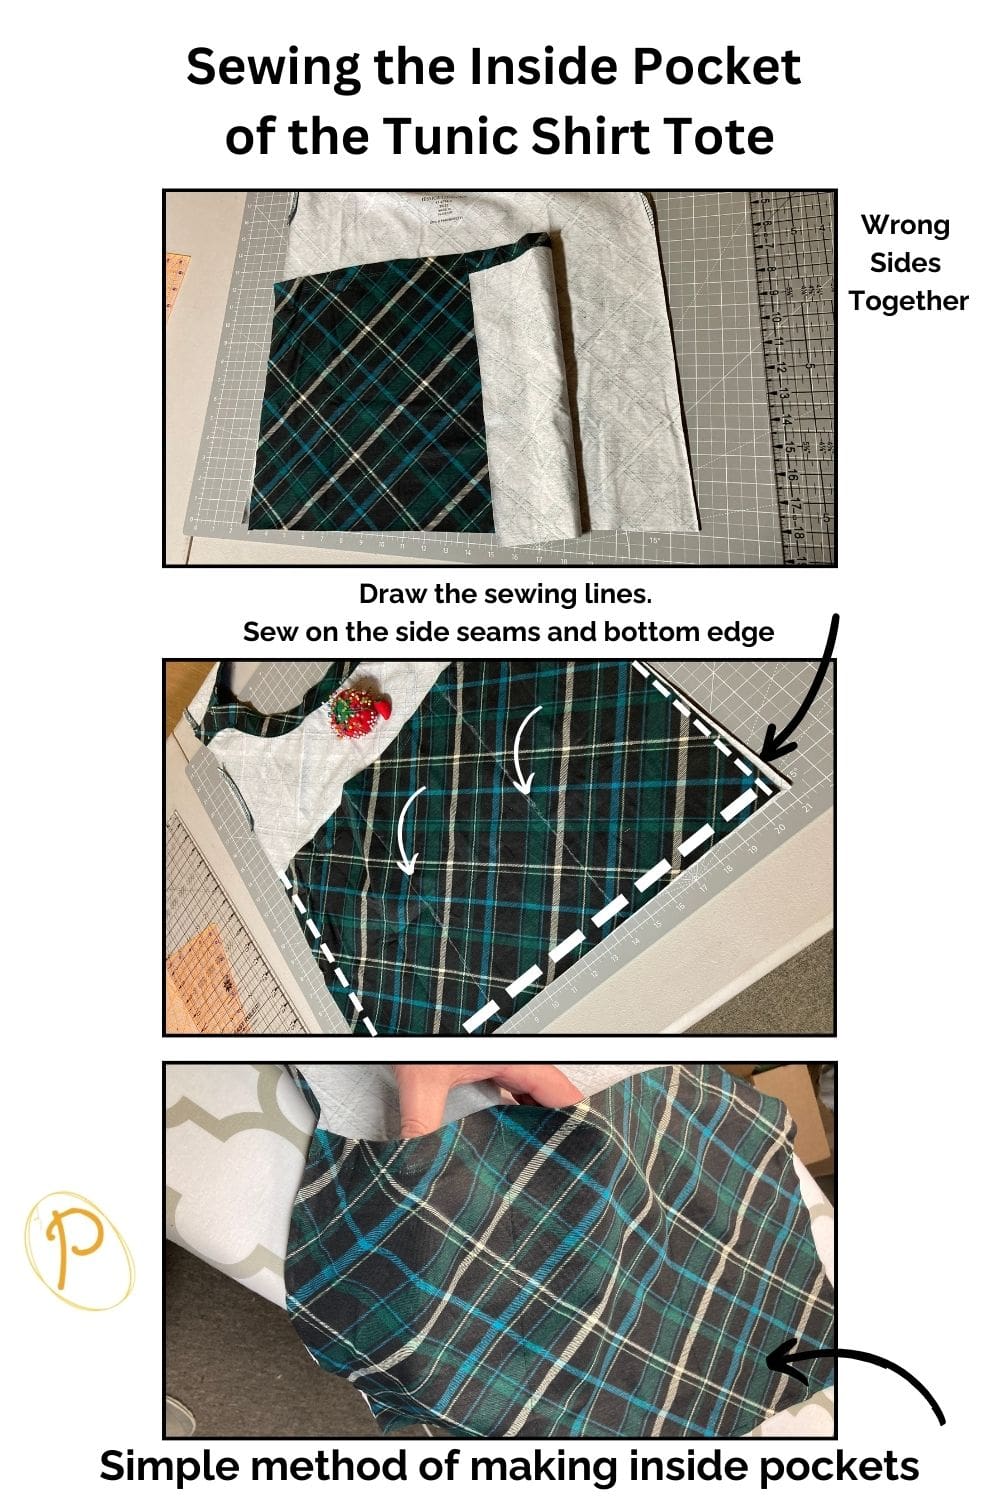
Sewing the Inside Pocket
Take the shirt front and back that you previously cut and open it up. With the back of the shirt fabric right side facing out. Place the remaining 19 ½” X 13” panel on top of the shirt back fabric wrong sides together.
To save sewing, make sure to put the hemmed edge on the top and match up the raw edges on the bottom and sides. Pin in place. If you want to make individual pockets. Use a ruler and a marking pencil to draw lines from the bottom to the top edge of the pocket panel. I made 2 lines in mine.
Sew around the sides and bottom. Then sew a straight line from the bottom edge to the top of the pocket panel along the drawn lines to make the individual pockets.
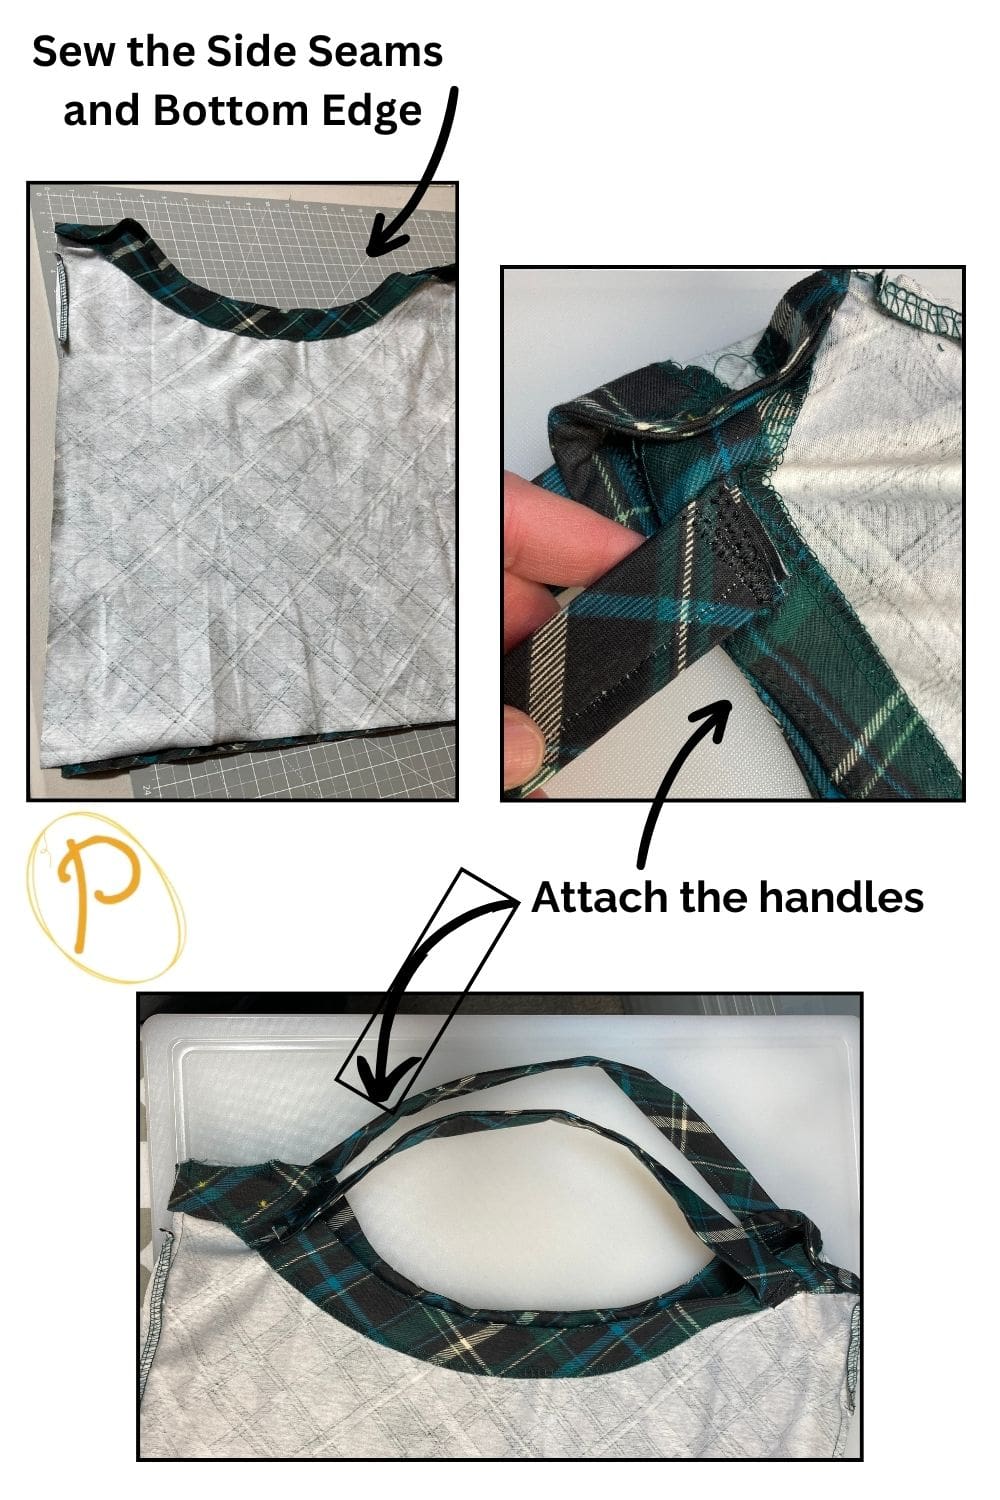
Sewing the Front to the Back
Now it’s time to sew the front of the shirt to the back of the shirt to make the bag.
Flip the shirt over with the pocket panel facing out. Align the front and back of the shirt seams with the right sides together. Pin in place. Sew around the side seams and bottom edge.
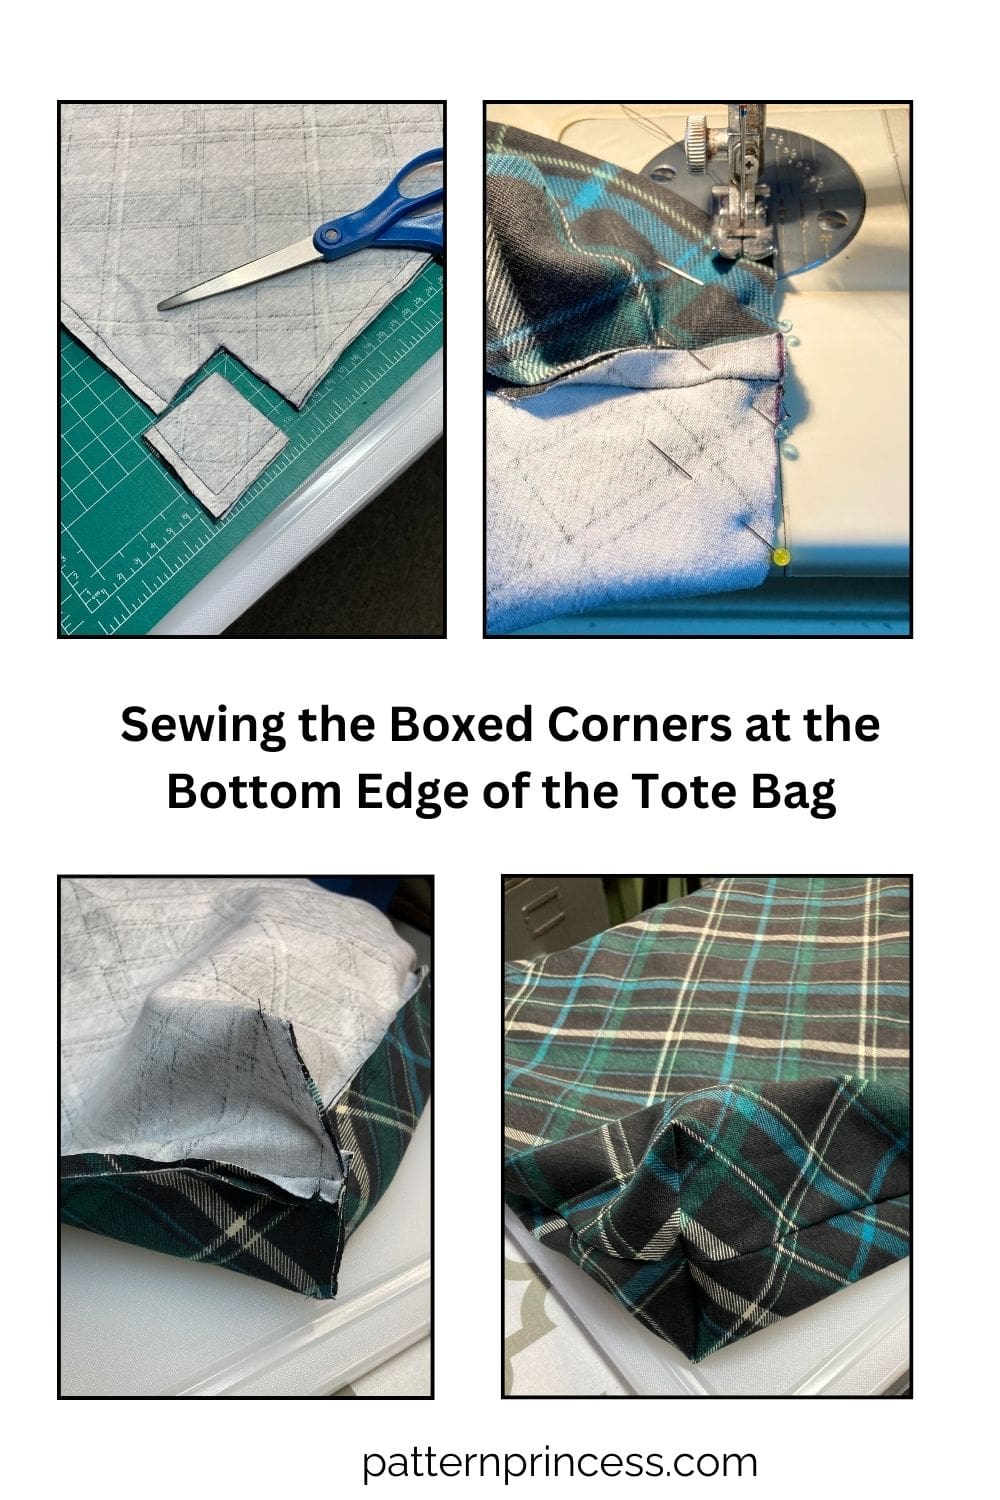
Making Boxed Corners for the Bottom of the Bag
Lay the bag flat with it still inside out. Use a ruler to cut out a 2” square on the bottom right corner and the bottom left corner.
Next line up the side seam with the bottom seam nesting the seams. Pin in place and sew together.
Sew on the Handles
For the handles I chose to put one on each shoulder seam on the same side. I used the zig zag stitch and sewed back and forth a few times to secure. However, you could use a straight stitch and just go back and forth a few extra times.
Alternatively, you can place the handles at the shoulder seams across from each other, sewing into place.
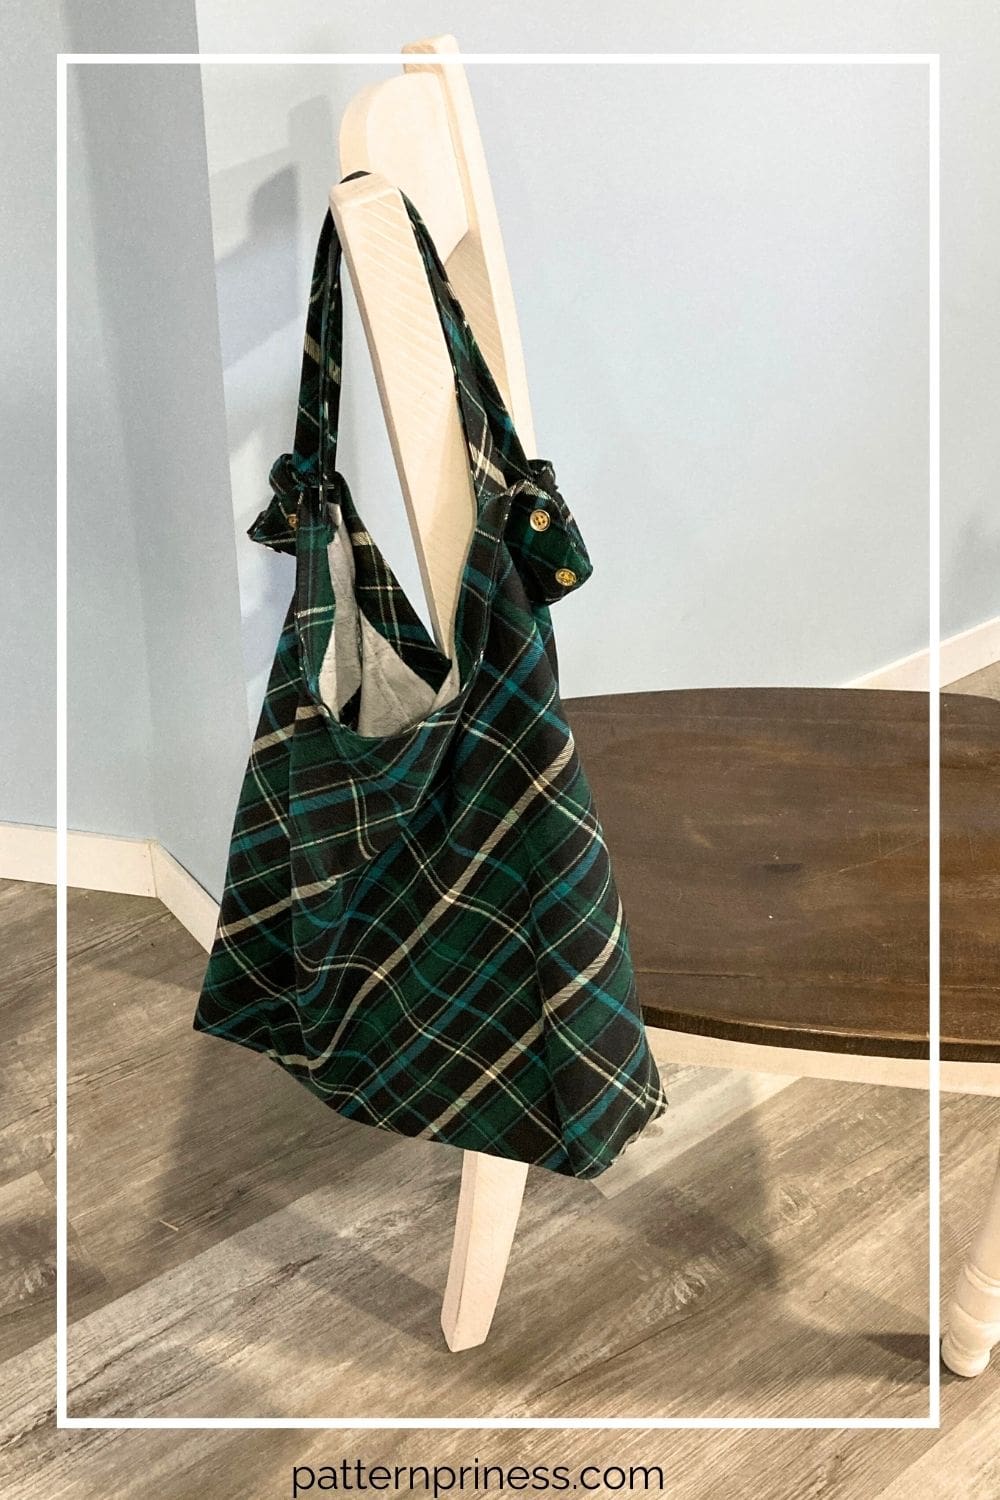
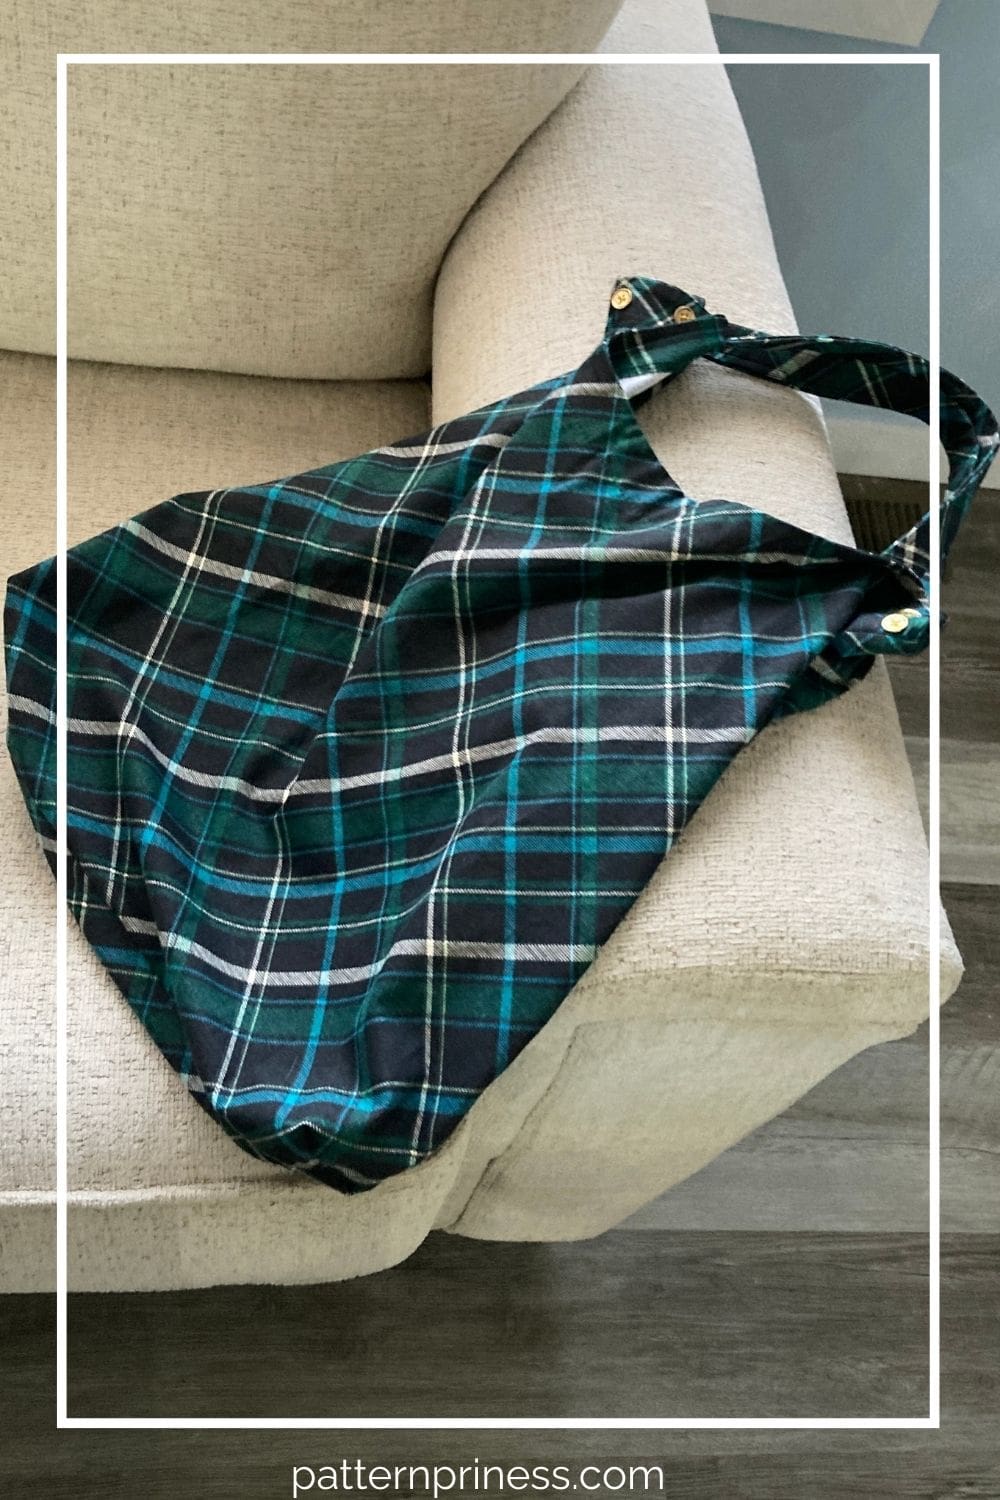
Your Tote Bag is ready to use.

You can find Victoria crocheting, quilting, and creating recipes. She has cooked in restaurants for over 20 years, including many larger parties. She learned to crochet when she was just 11 years old and has been crocheting ever since; over 50 years now. Over 40 years ago, she loved her first class in sewing and continues to hone her skills in quilting. Many have enjoyed the handmade gifts over the years. In her professional career, she has worked in management in a wide variety of businesses including higher education as a dean of a division. All the while attending college part-time to achieve her doctorate in higher education with an emphasis in e-learning.
This turned out great!
Thank you so much. I love how this bag turned out as well.
Vicky