Last updated on July 4th, 2024 at 11:30 pm
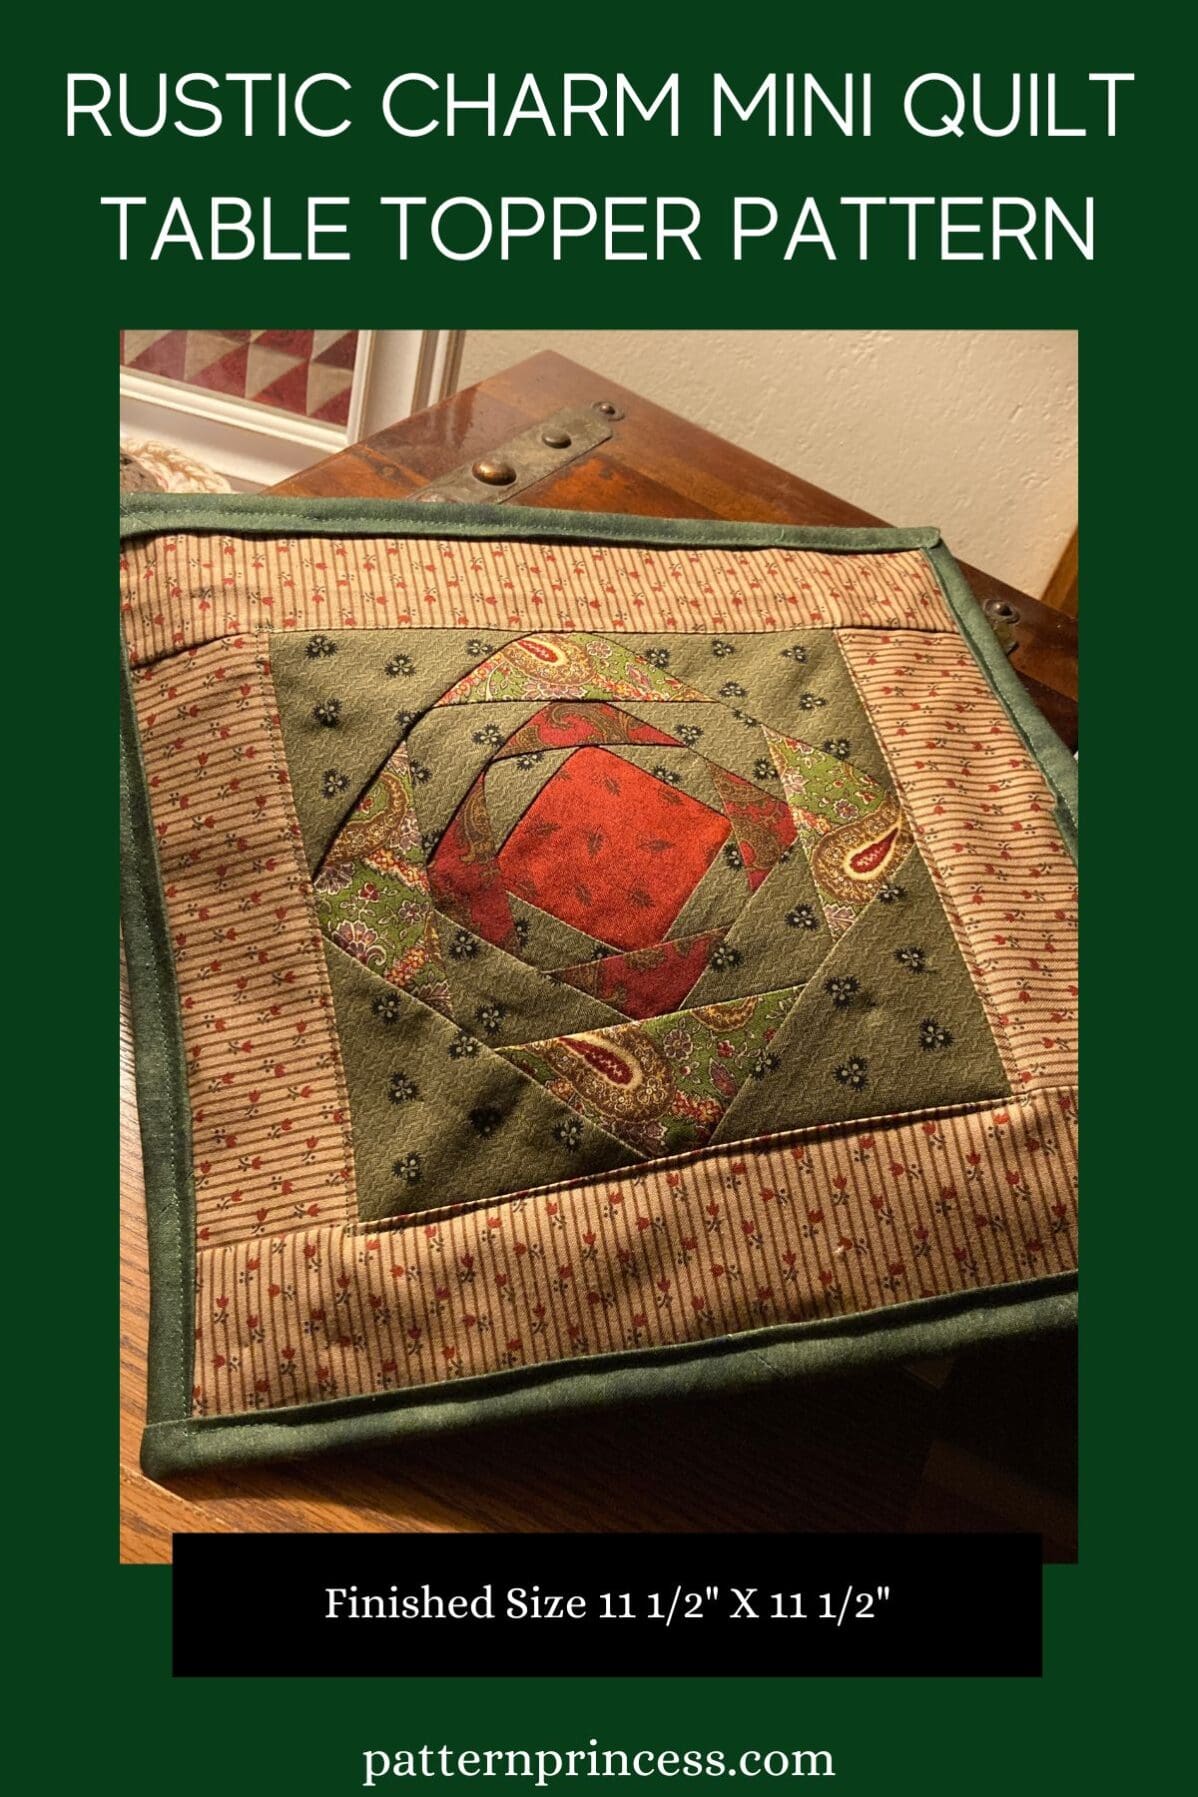
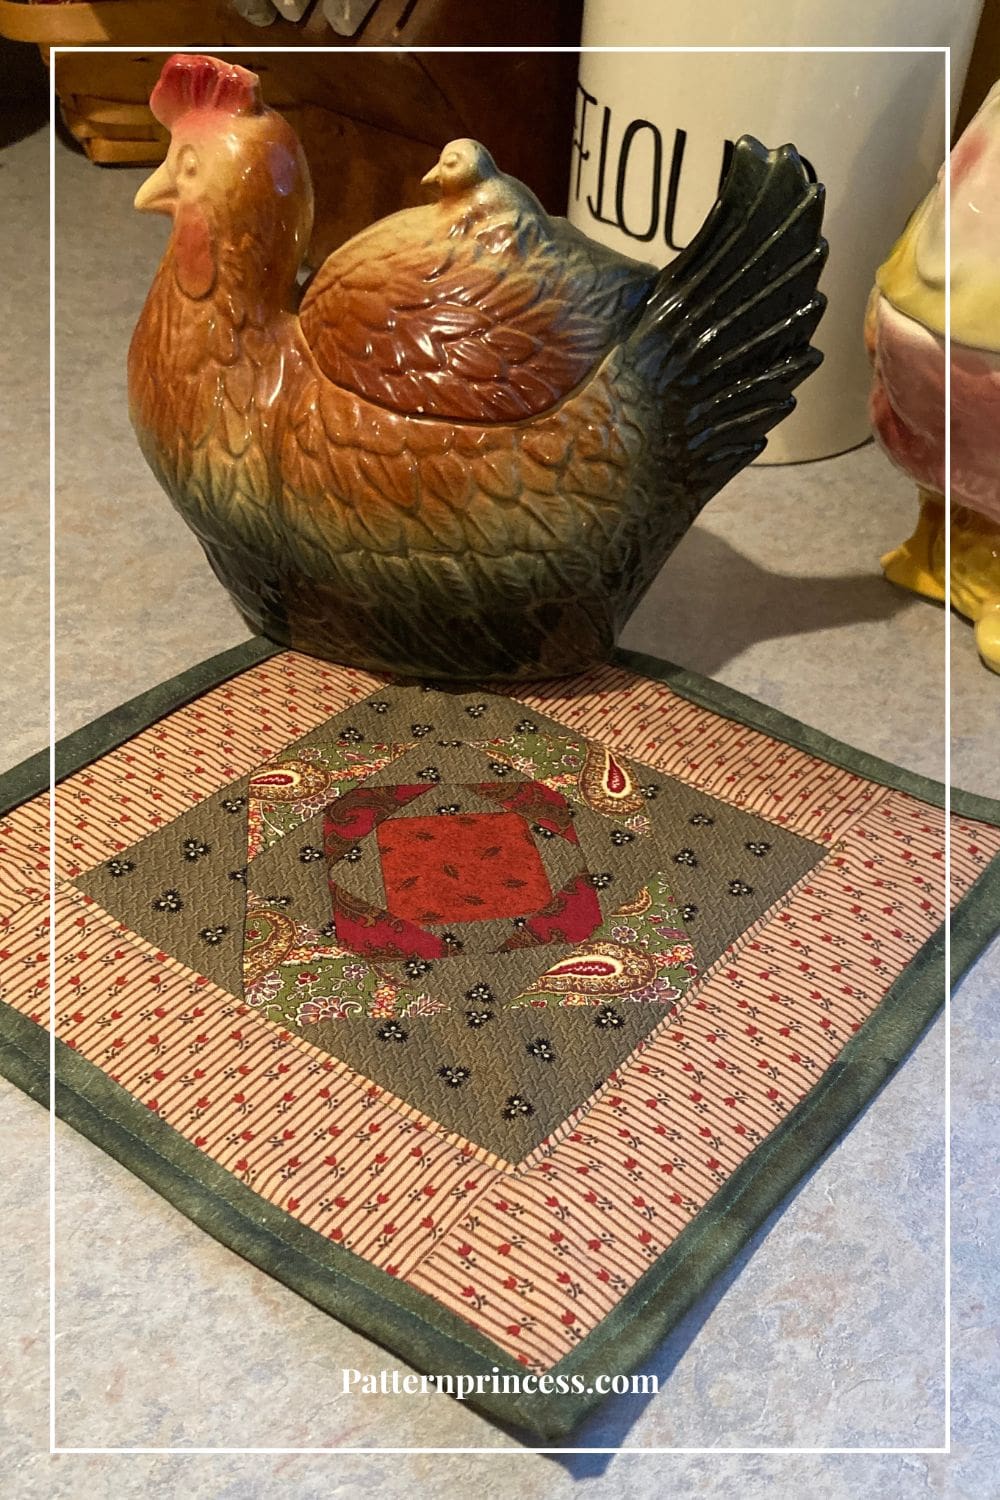
If you have some fabric scraps lying around and want to turn them into lovely home decor, this Rustic Charm Mini Quilt Table Topper Pattern is for you. This pattern uses the exploding block, which is a square in the square block technique. It is easy and fun to make.
You can finish this project in a few hours and enjoy its rustic charm all year round.
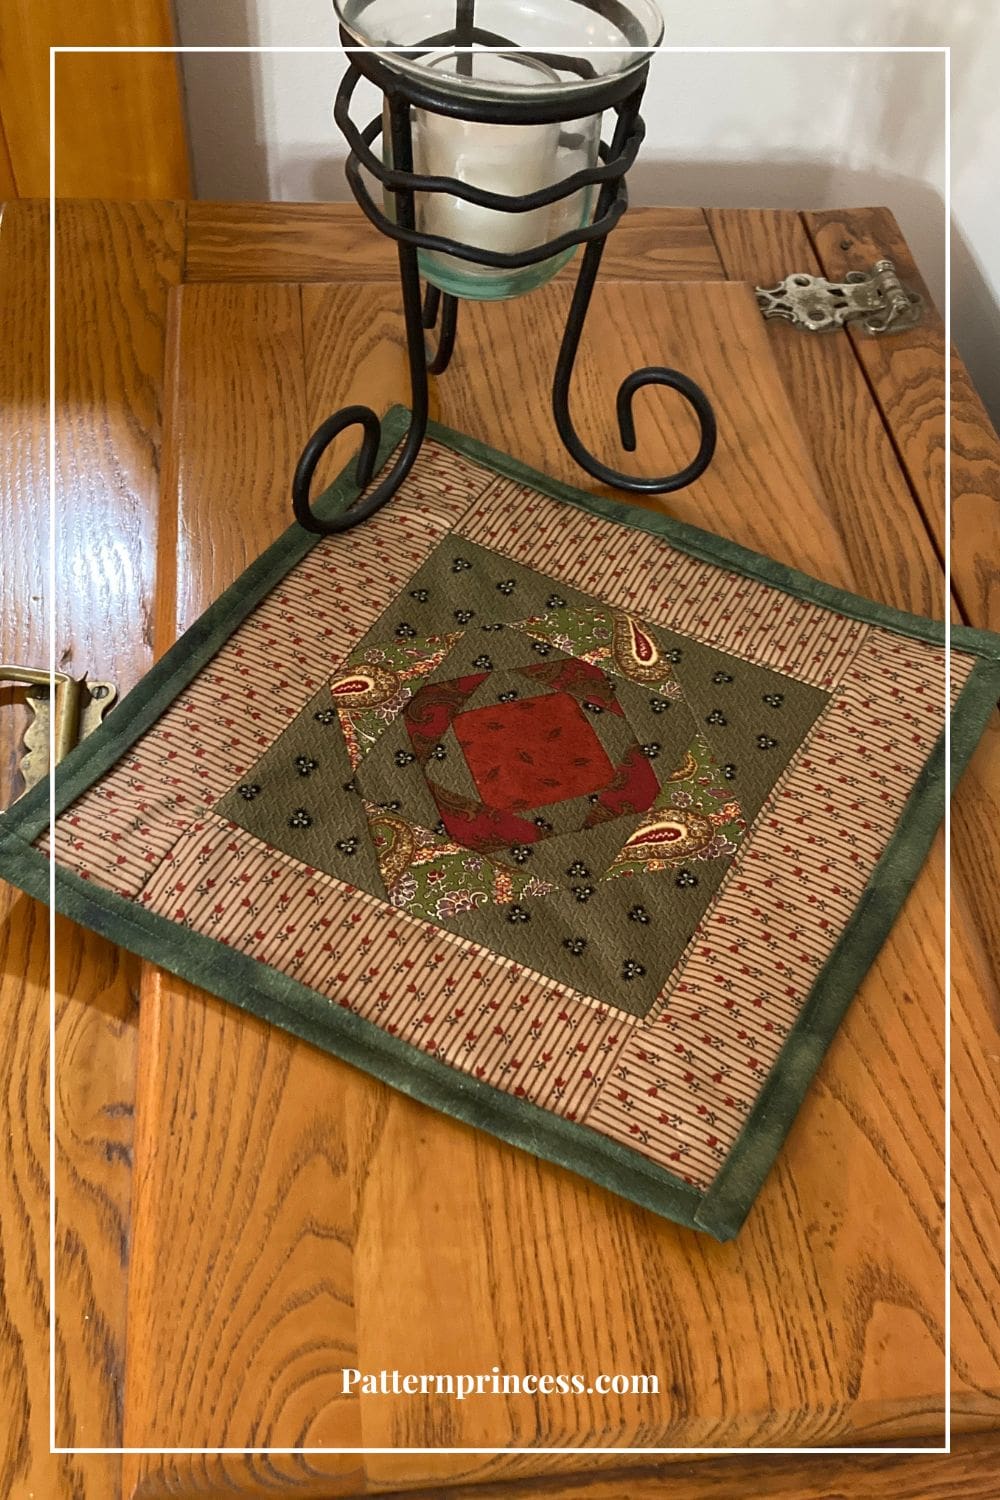
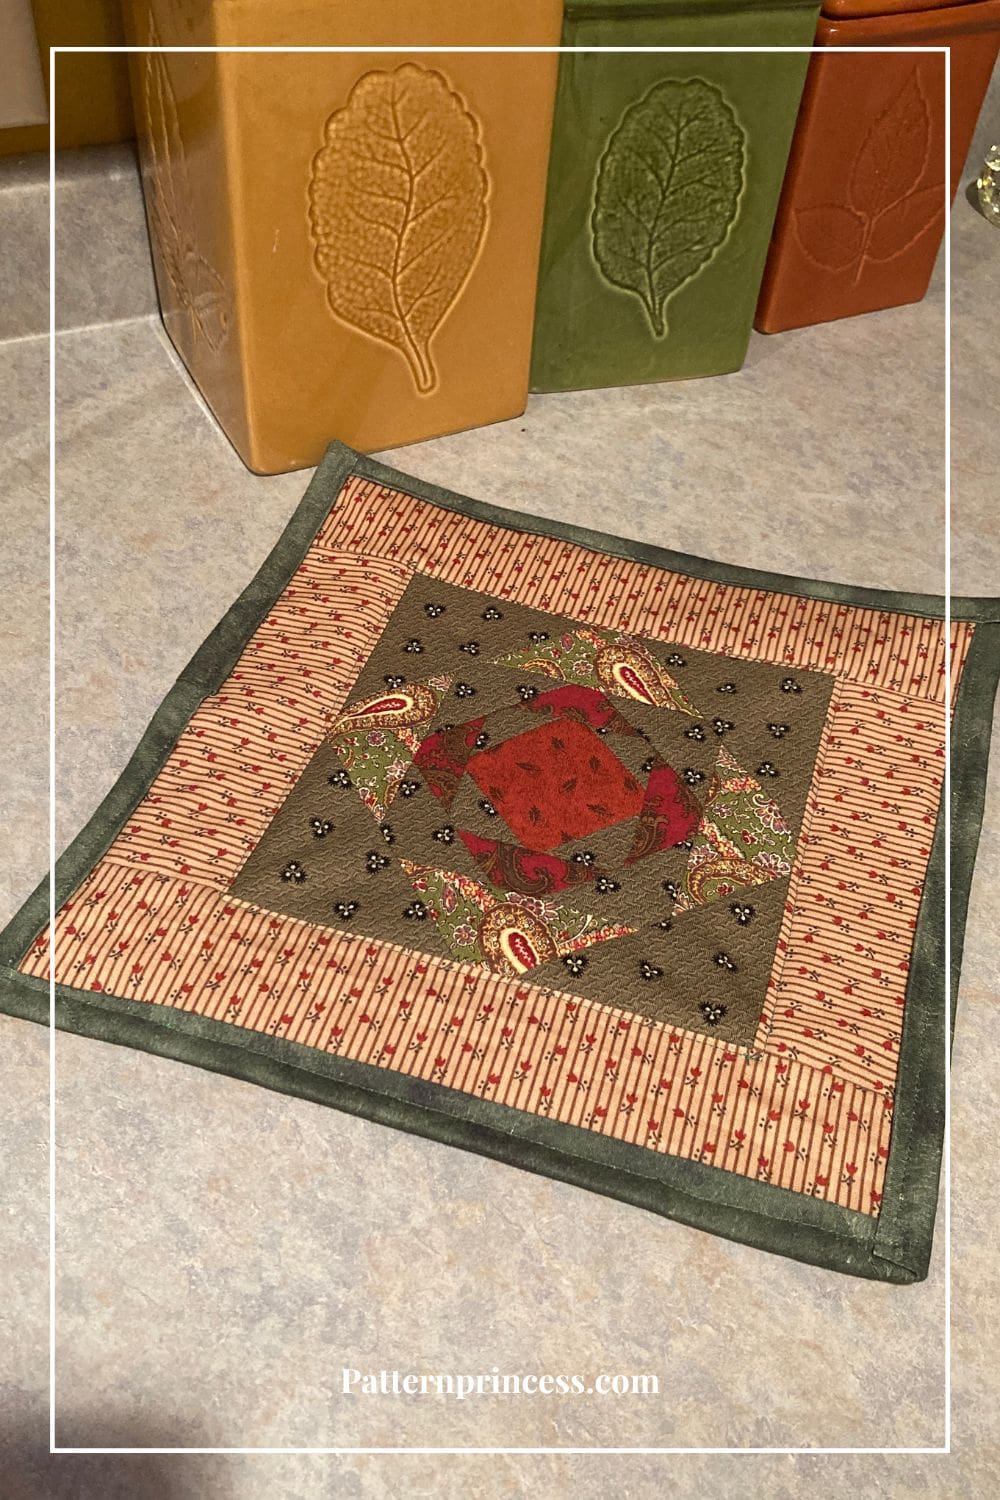
This miniature masterpiece is a cutie with timeless charm in a compact, versatile form. It’s more than just a table topper. Use this as a mini quilted wall hanging, or a useful kitchen accessory as a large hot pad.
Use five fat quarters to make this gorgeous square that can be used as a wall hanging, table topper, or other home decoration.
Post contains affiliate links, and we earn commissions if you shop through the links on this page. For more information, please read the disclosure section under the About Us page.
Fat Quarter Friendly Sewing Pattern
A few months ago, I was in a fabric store and saw these gorgeous fat quarters. I grabbed them, not even sure what I was going to do with them. When searching mini quilts on Pinterest, I seemed drawn to the patterns that used half square triangles or other smaller shapes.
Then I came across the exploding square in a square quilt block, and I knew what to do. The only problem now was to figure out what fabric to use for each layer, the border, backing, and binding.
I need to tell you, this was made as a birthday gift for my sister, but I really want to keep it. If we kept everything, we loved that we made, we would never give anything away. When I make something that I really want to keep, then I know it will be a gift that is truly appreciated by the recipient.
Decorative Table Topper a Useful Handmade Gift
This mini quilt I made for my sister’s birthday. She has kind of a rustic country chic throughout her home. I’m going to let you in on a joke we have between us. Her house looks all put together like a beautiful picture in a magazine. My house looks like someone haphazardly tried to decorate it. I really try, but she outshines me.
Those of you that don’t have that skill, like me, can attest that when we walk into a house that is coordinated and put together, we stand there in awe when we walk in the door.
At least I am crafty, and I can make things that are pretty.
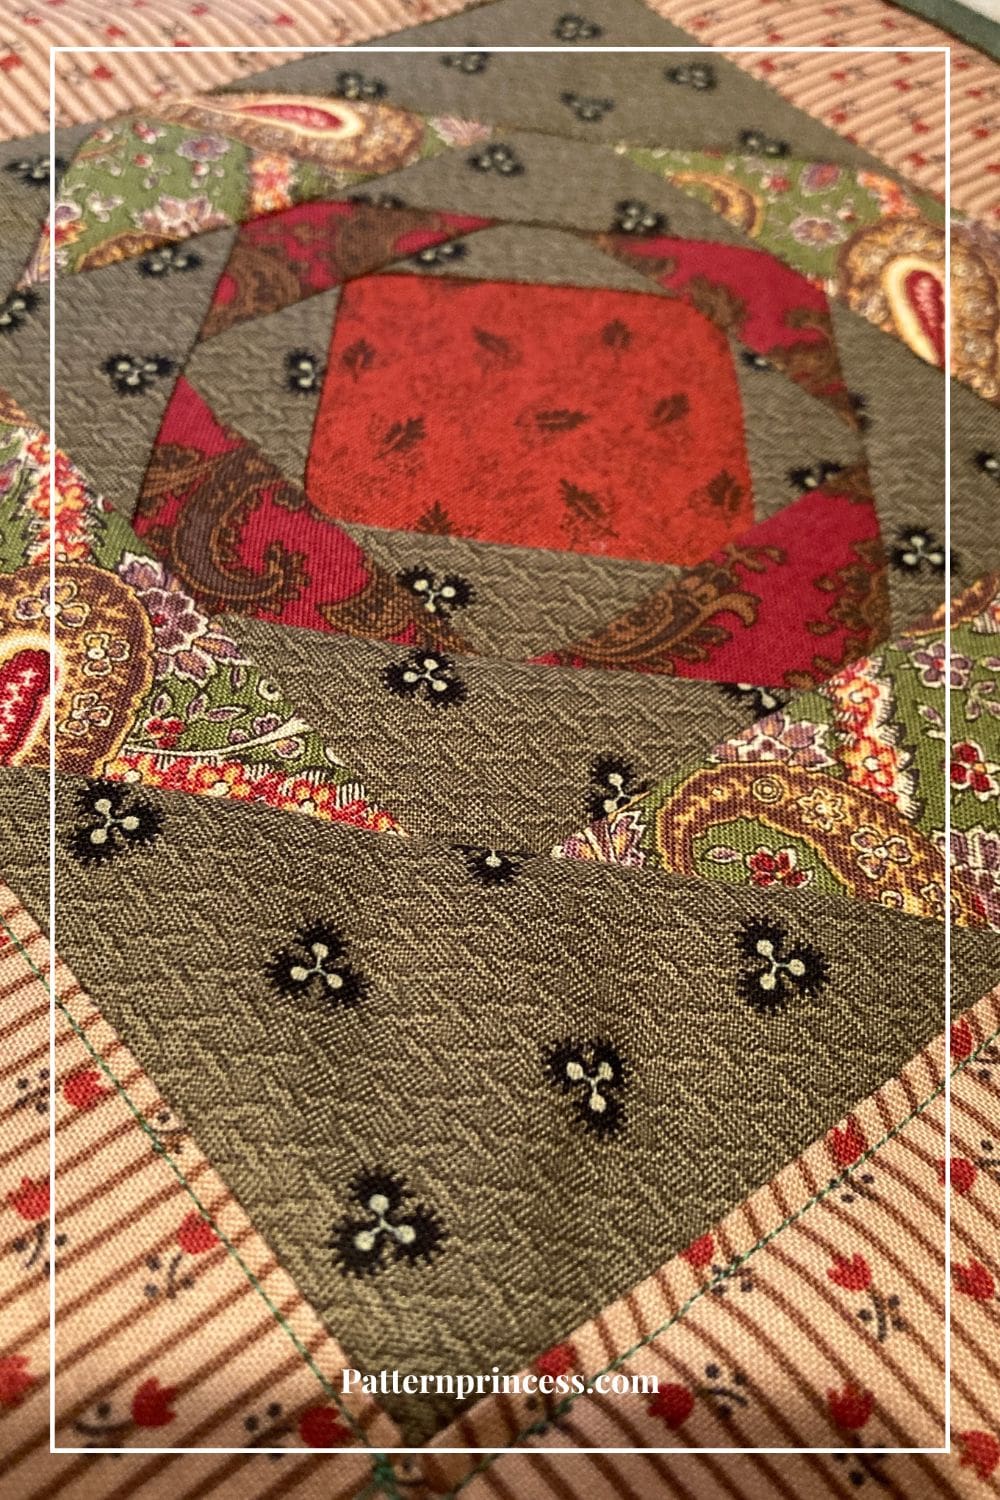
Exploding Square Quilt Block
While you can use the traditional square in a square quilt block, for this pattern, I used the exploding square quilt block. It went together quickly.
Just five rounds and a pretty border and you will have this lovely mini quilt top ready. This block before adding the border fabric measures approximately 7 ½” X 7 ½”.
While I will provide directions below, you can find a detailed tutorial on how to make the square in a square exploding quilt block. The block made in the tutorial is a 6 ½” X 6 ½” block.
Directions: Rustic Charm Mini Quilt Table Topper Pattern
Skill Level
Advanced Beginner pattern. This one is great for someone that can complete multiple steps in sewing. While there are no points to line up, you do need to be able to sew a slightly smaller, wonky square in another square.
Finished Size
The finished size is 11 ½” X 11 ½”.
Equipment and Tools
Rotary Cutter
Quilting Ruler
Cutting Mat
Rotating Cutting Mat
Iron
Ironing Board or Pressing Mat
Pins
Clips
Sewing Machine
Fabric Scissors
Disappearing fabric marker
Pattern Notes
All seams are 1/4 inch unless otherwise noted.
Sew with right sides together unless otherwise noted.
Press seams to the outside unless otherwise noted.
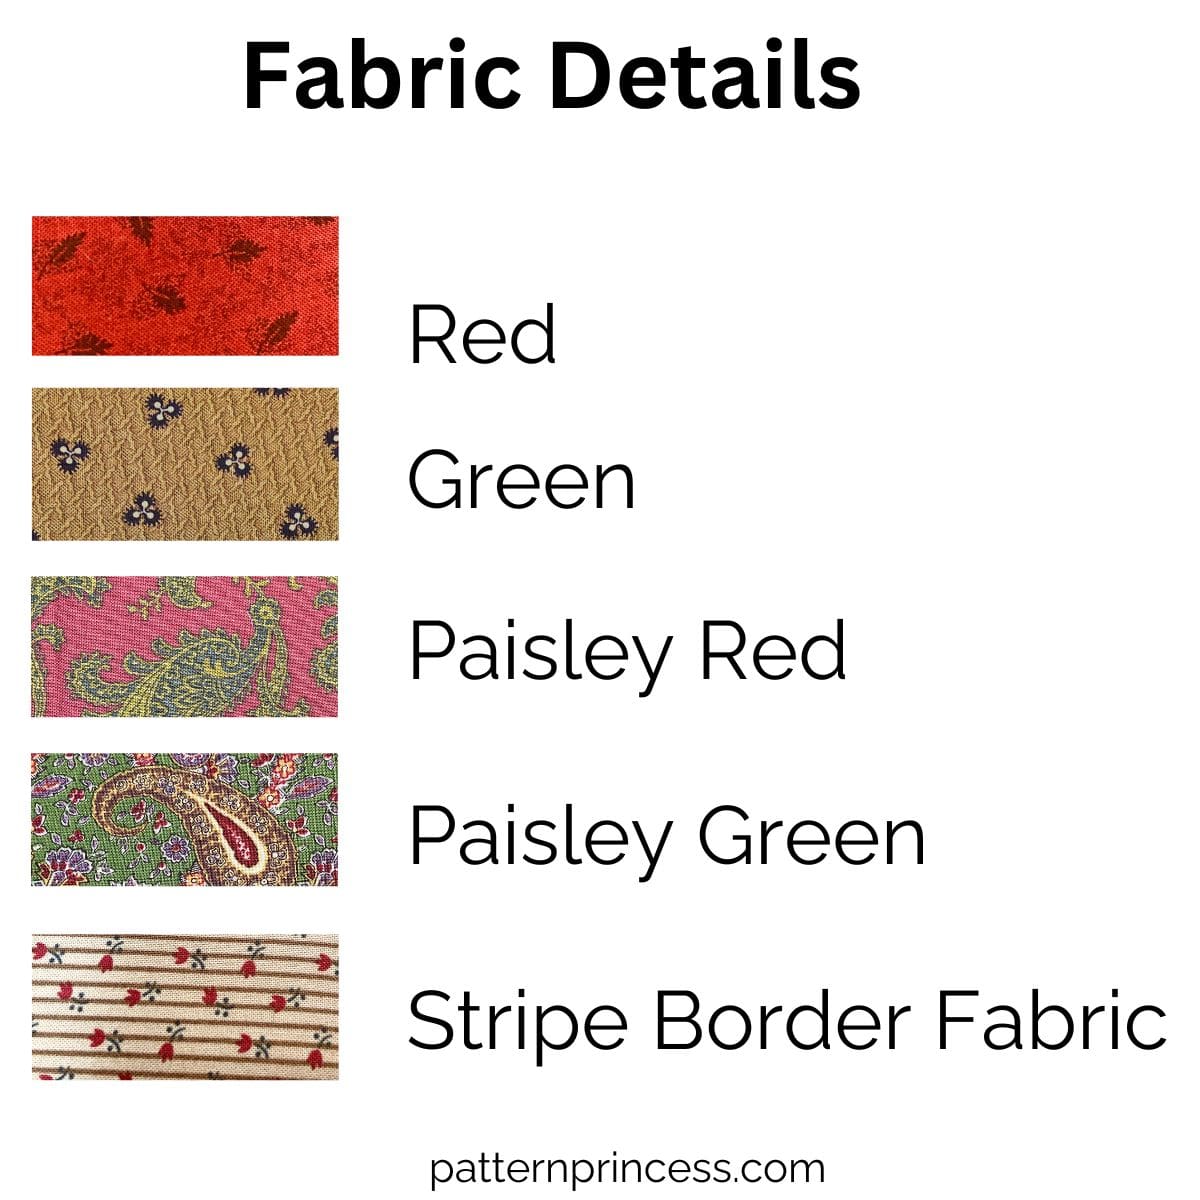
Here are the fabrics that I used, Fabric is from Moda, their Collection for a Cause Millbrook Series 1889.
Fabric and Batting Requirements
You will need the following:
Four partial fat quarters.
Red and Green. Two total. Cut one (1) 2 ½” X 2 ½” square of each fabric in contrasting colors. (square 1 and 2)
Paisley Red. Cut one (1) 3 ¾” X 3 ¾” square of fabric in another color. (square 3)
Green. Cut one (1) 4 ½” X 4 ½” square of fabric in another color or as in the one I made the same green that was used in the first set of two squares. (square 4)
Paisley Green and Red. Cut one (1) 5 ¾” X 5 ¾” square of fabric in another color. (square 5)
Green. Cut one (1) 7 ½” X 7 ½” square of fabric in another color. (square 6)
A fat quarter or fabric for the border.
Cut two (2) pieces 2 ½” X 7 ½” and two (2) pieces 2 ½” X 11 ½”.
I used one fat quarter trimmed to size.
Backing Fabric, use a square approximately 13” X 13”.
Batting, use a square approximately 13” X 13”.
Binding, make a piece 2 ½” X 61” long. I used leftover green fabric from one of the fat quarters.
It is best to have both your backing and batting a bit larger than your quilt top to make sure that things are covered in case there is any slippage during the sewing process.
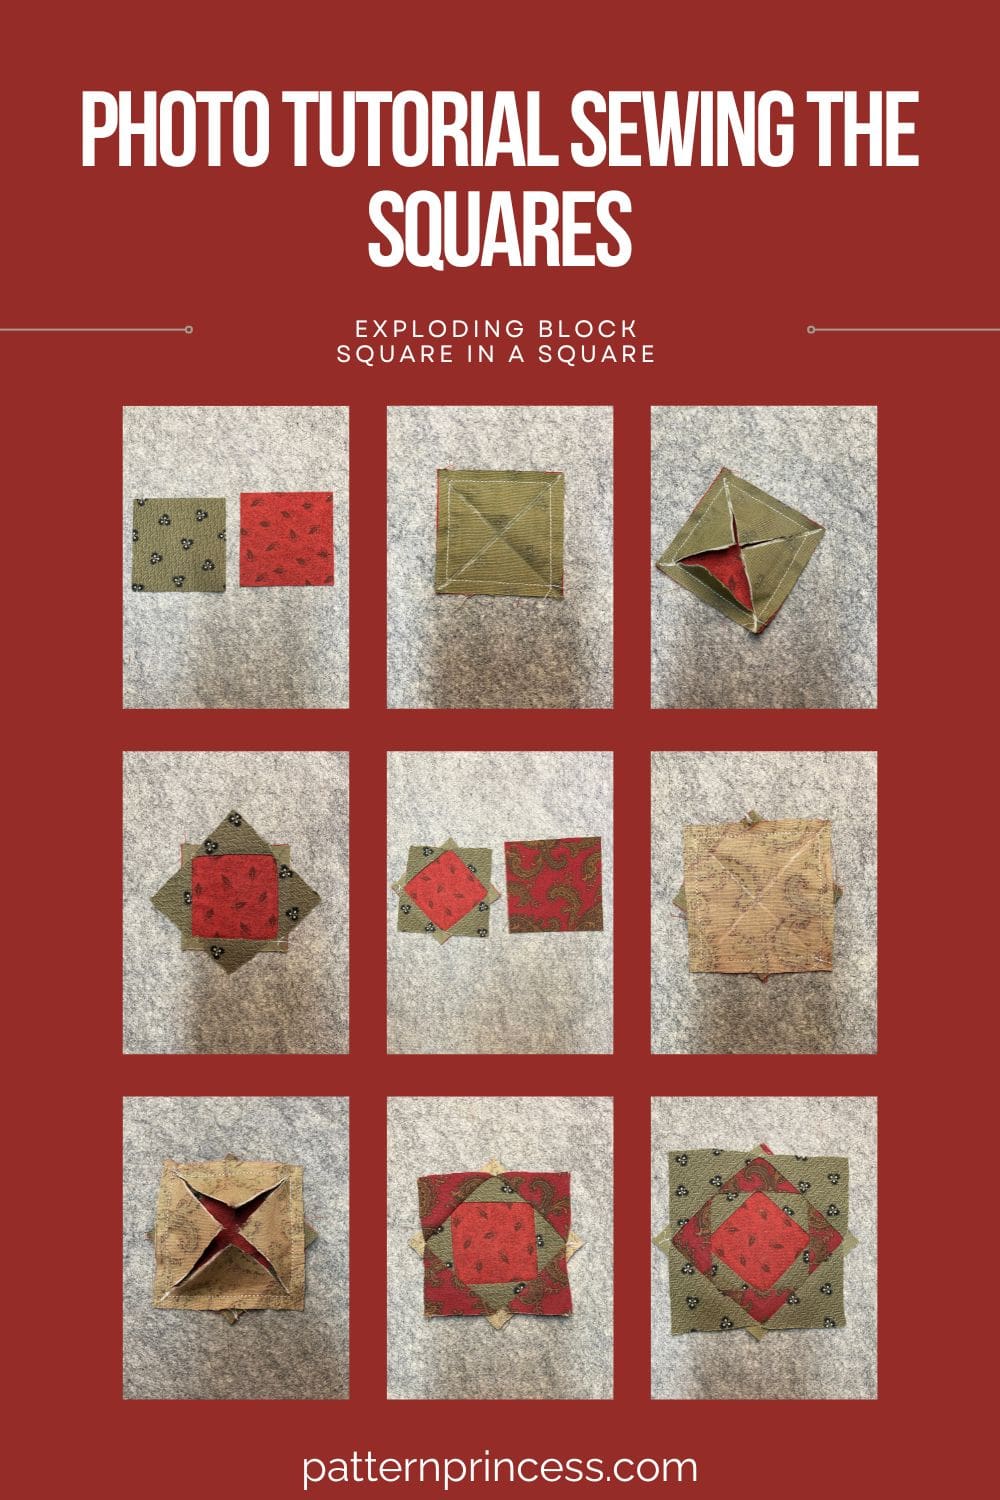
Making the Square in a Square Exploding Quilt Block Mini Quilt Top
Use red and green fabric squares. One of each (1) 2 ½” X 2 ½” square of fabric in contrasting colors. (square 1 and 2)
Place one of the 2 ½” X 2 ½” squares on top of the other with the right sides facing together. Pin in place.
Using a ¼” seam allowance, sew all the way around the outer edges, all 4.
Draw diagonal lines from corner to corner on the square of fabric that you want to show as the square around the center square. Use a ruler and a fabric marker to draw your “X” shape line on the fabric.
Next, it is time to cut along the lines being careful not to cut through the fabric square below. To do this, pinch it up in the middle and make a small snip along a line. The small snip makes it easy to get your scissors in there to cut along the diagonal lines right up to the sewing line but not through it.
I like using a fabric scissors with a nice point at the end so I can trim very close to the stitching line (but not through it).
Press each side open to reveal your center block, pressing the sewing seam to the outside. The center block is now set on point. If you want to have a bit less bulk at the seams, you can trim off the points on the sides. I left mine today.
Adding the Third Square
Paisley Red. Cut one (1) 3 ¾” X 3 ¾” square of fabric in another color. (square 3)
Place this square on top of the square you just made with the right sides together. Pin together.
Note. You will notice that the square in a square you just made is slightly smaller than the 3 ¾” block. That is because by just cutting the center seam rather than sewing a ¼” seam and trimming, you lose a bit of the seam allowance.
Sew around all four edges. Pro Tip. Because the square is a bit wonky, follow the 3 ¾” block size when sewing and it will come out.
Draw the “X” diagonal lines from corner to corner on the square of fabric that you just sewed on. Cut along the lines being careful not to cut through the fabric square below. Cut the lines right up to the sewing line but not through it.
Press each side open to reveal your center block. Trim the points on the sides if desired.
Fourth Square
Green. Cut one (1) 4 ½” X 4 ½” square of fabric in another color or as in the one I made the same green that was used in the first set of two squares. (square 4)
Repeat the steps.
Place the right sides together. Sewing around all four sides using the ¼” seam allowance. Mark the diagonal lines. Cut the lines up to the sewing line. Press open.
Fifth Square
Paisley Green and Red. Cut one (1) 5 ¾” X 5 ¾” square of fabric in another color. (square 5)
Repeat the steps.
Place the right sides together. Sewing around all four sides using the ¼” seam allowance. Mark the diagonal lines. Cut the lines up to the sewing line. Press open.
Sixth Square
Green. Cut one (1) 7 ½” X 7 ½” square of fabric in another color. (square 6)
Repeat the steps.
Place the right sides together. Sewing around all four sides using the ¼” seam allowance. Mark the diagonal lines. Cut the lines up to the sewing line. Press open.
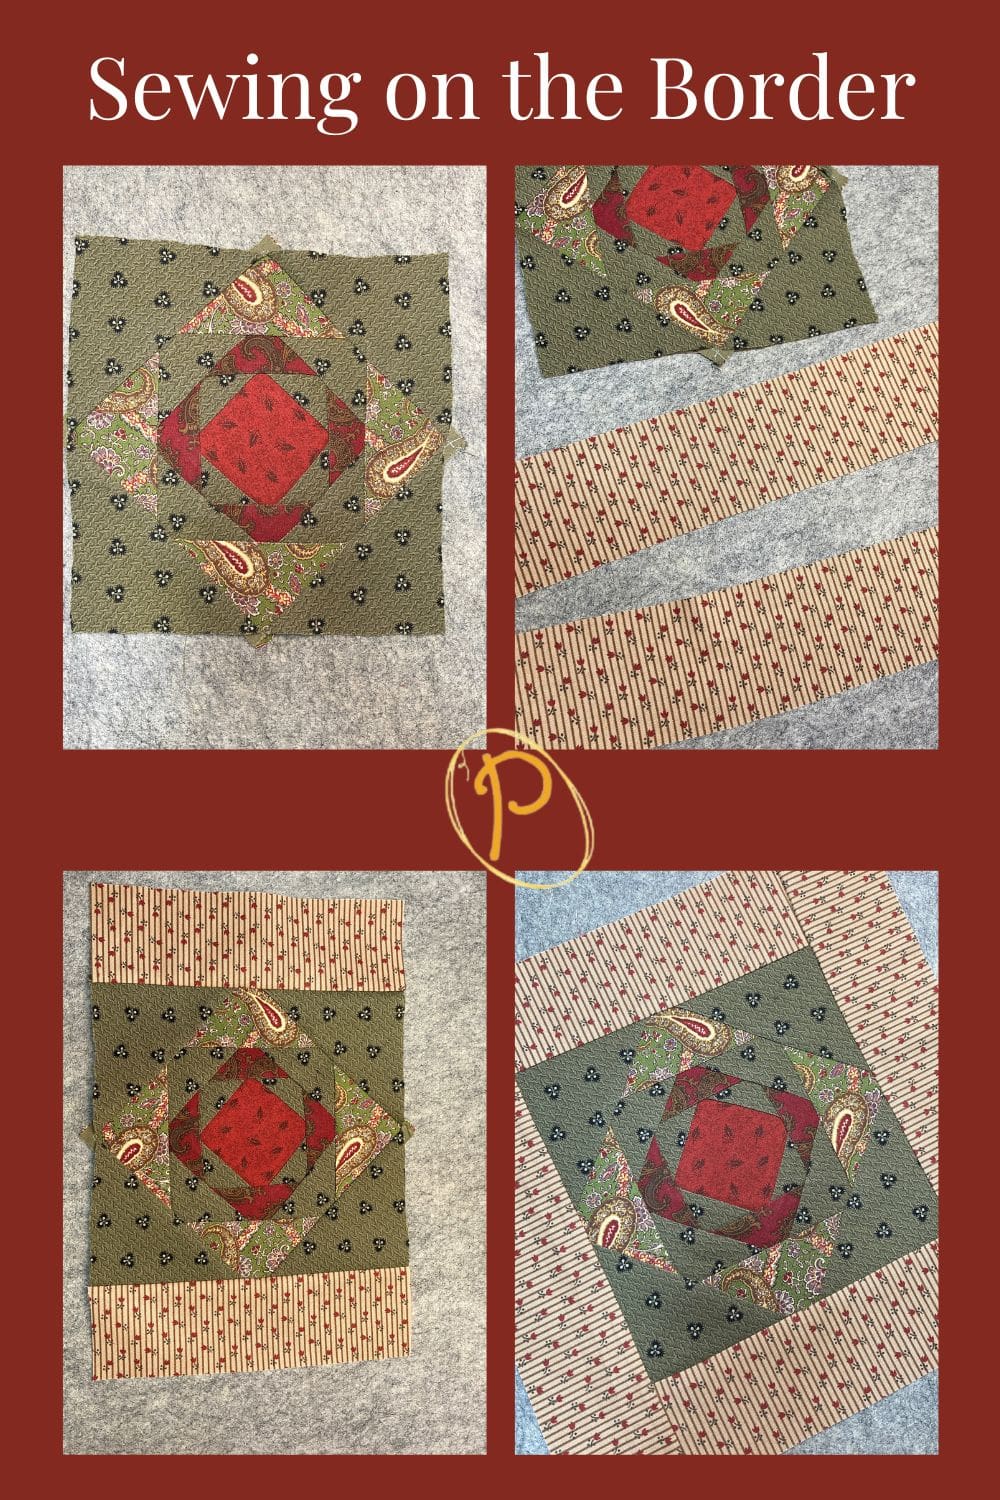
Sewing on the Borders
Use the two (2) pieces 2 ½” X 7 ½” and two (2) pieces 2 ½” X 11 ½” for this step.
I used the striped fabric as my borders.
Place one strip on the top and one on the bottom with the right sides together. Pin in place. Sew on using ¼” seam allowance.
Press seams to the outside.
Next, place one strip on each side with the right sides together. Pin in place. Using ¼” seam allowance.
Press seams to the outside.
Adding the Backing Fabric and Batting
Just like you would for a larger quilt, I made the quilt sandwich including the backing fabric, batting, and the mini quilt top.
Use the backing fabric and batting cut to 13” X 13”.
As previously noted, the backing fabric and the batting should be a few inches larger all the way around than the top fabric. This makes sure that there is backing and batting covering the entire quilt top fabric even during the sewing process.
Place the backing fabric on a flat solid surface with the right side down facing out. Smooth out any wrinkles. Use painters’ tape to secure the edges of the fabric down. This will help hold it in place and reduce the chance of a wrinkle developing as you place the next two layers.
Next, center the batting on top of the backing fabric smoothing out any wrinkles.
Finally, place the quilt top on the batting, centering it with the right side up. Smooth out any wrinkles.
Next you can either use a glue basting spray or safety pins to secure the layers.
If using pins, put one in each corner and around the entire quilt about every 5-6 inches or so through all three layers.
Use any quilting design you desire to hold the layers together. I didn’t want to detract from the pretty fabric and squares, so I sewed along the seam lines.
Once the layers are quilted together in your desired design, it is time to trim the batting and backing.
Using a long ruler and rotary cutter, trim the backing fabric and batting to the size of the top square.
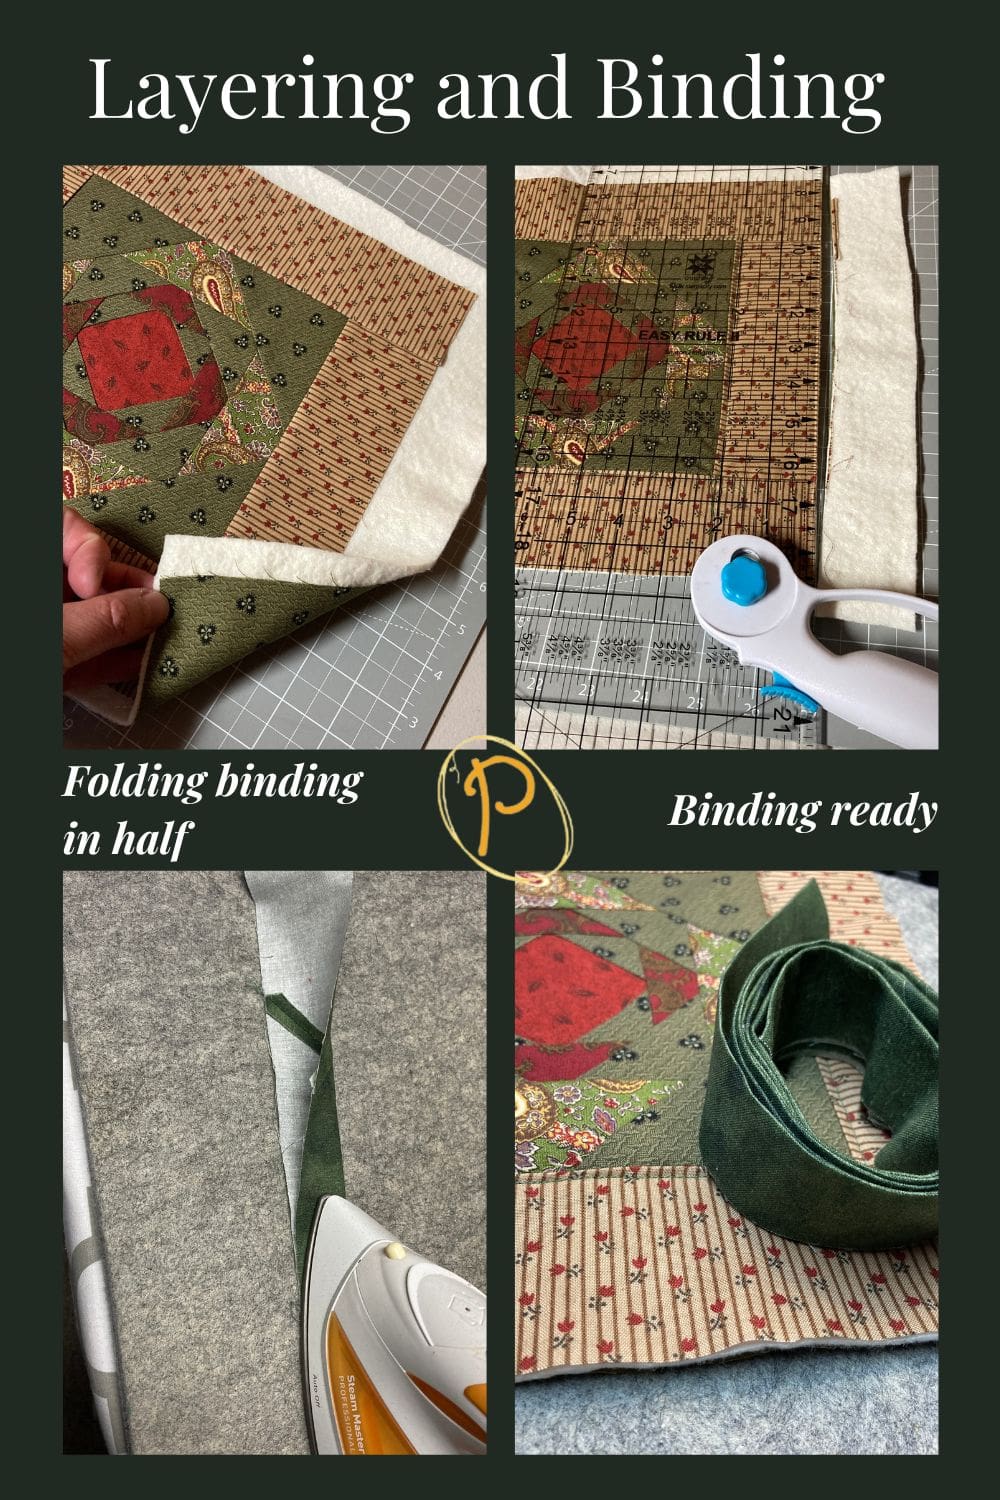
Sew the Binding to the Mini Quilt
Prepare the binding and sew onto the edges.
First, prepare the binding strips.
Binding, make a piece 2 ½” X 61” long. I used leftover green fabric from one of the fat quarters.
You can find a tutorial for making binding on the website.
Once the strips are sewn together, fold in half lengthwise with wrong sides together and press.
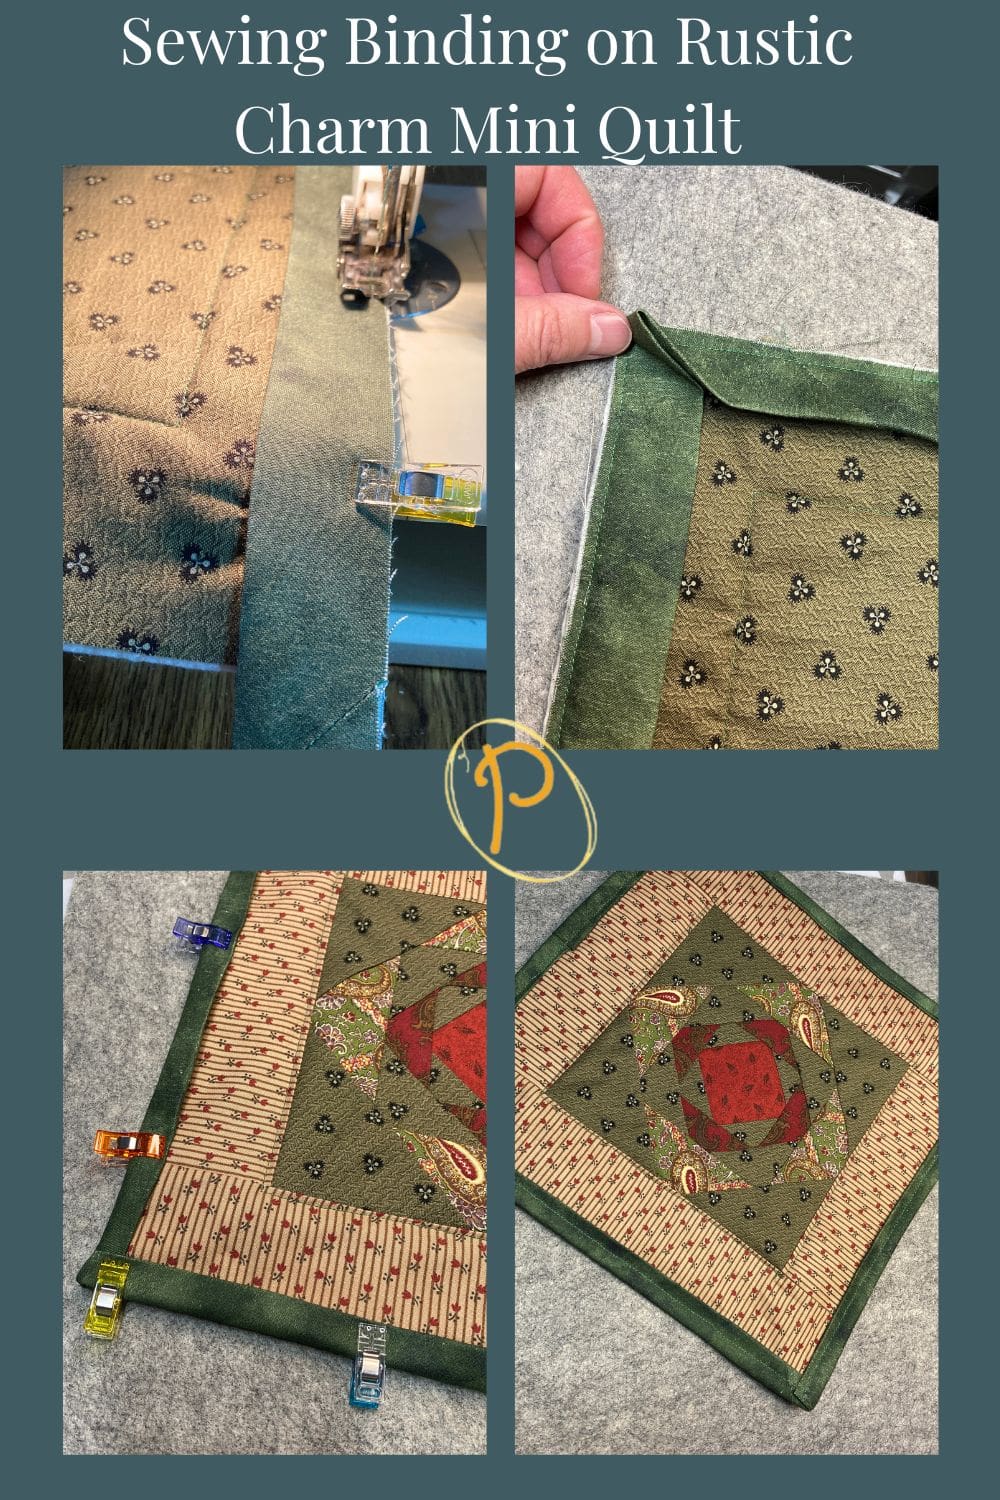
It’s time to sew the binding strip on. I planned on using the sewing machine to finish the binding. Therefore, I sewed the fabric onto the backing fabric. If I planned on finishing the binding by hand, I would sew the binding to the front fabric.
Pin the raw edge of the binding onto raw edge of the back. I generally start in the middle of a side leaving approximately a 2” tail hanging.
Note: This hanging part will be used to sew to the other end of the binding strip when you have finished sewing all four sides of the binding onto the quilt.
Sew the binding onto all four sides of the easy quilt making sure to miter the corners and join the binding. Pro Tip. I find that a walking foot works nicely for this and helps all the layers slide under the sewing foot easier. Less bunching of fabric.
Sewing the Binding to the Mini Quilt Table Topper
You can use your sewing machine to sew the binding on the front of the quilt. Just fold the binding over the edge with the folded part on the top side of the mini quilt. Use your ¼” seam allowance to sew in place.
Once all the sides and corners are stitched, you are done.
It is ready to use or give as a gift or use.
Here are a few other free quilt patterns to inspire your next sewing project.

You can find Victoria crocheting, quilting, and creating recipes. She has cooked in restaurants for over 20 years, including many larger parties. She learned to crochet when she was just 11 years old and has been crocheting ever since; over 50 years now. Over 40 years ago, she loved her first class in sewing and continues to hone her skills in quilting. Many have enjoyed the handmade gifts over the years. In her professional career, she has worked in management in a wide variety of businesses including higher education as a dean of a division. All the while attending college part-time to achieve her doctorate in higher education with an emphasis in e-learning.