Last updated on July 4th, 2024 at 11:29 pm
Enter the Snowball Quilt Block. Today, I am thrilled to share with you a timeless quilting technique that seamlessly blends simplicity with sophistication. As someone who has spent countless hours immersed in the world of sewing, I find sharing the world of quilting with you fulfilling.
Experience the joy of effortless quilting with this pretty square. Tailored for beginners, this pattern is not only precut-friendly but also offers the flexibility to customize with scraps, yardage, charm squares, or your favorite layer cake.
The straightforward construction makes it ideal for throw quilts, baby quilts, and home decor projects. Create coordinated pillow covers, table runners, or wall hangings using this block.
Post contains affiliate links, and we earn commissions if you shop through the links on this page. For more information, please read the disclosure section under the About Us page.
Exploring the Easy Snowball Quilt Block: A Traditional Gem with Amish Roots
Delve into the rich tradition of quilting with the Snowball Quilt Block, an age-old design originating from Amish quilting traditions. Initially crafted to mimic circles when viewed from a distance, the block’s visual impact is influenced by the chosen colors and patterns.
The exciting news is that creating these quilt blocks is more straightforward than one might think. Originally, the traditional piecing method involved crafting a nine-patch block using half-square triangles strategically placed on the corners. This resulted in an enchanting octagon shape surrounded by four beautifully integrated triangles.
We don’t have to make a 9-patch block to make our snowball unit. Our shortcut method uses just one large square and four small squares.

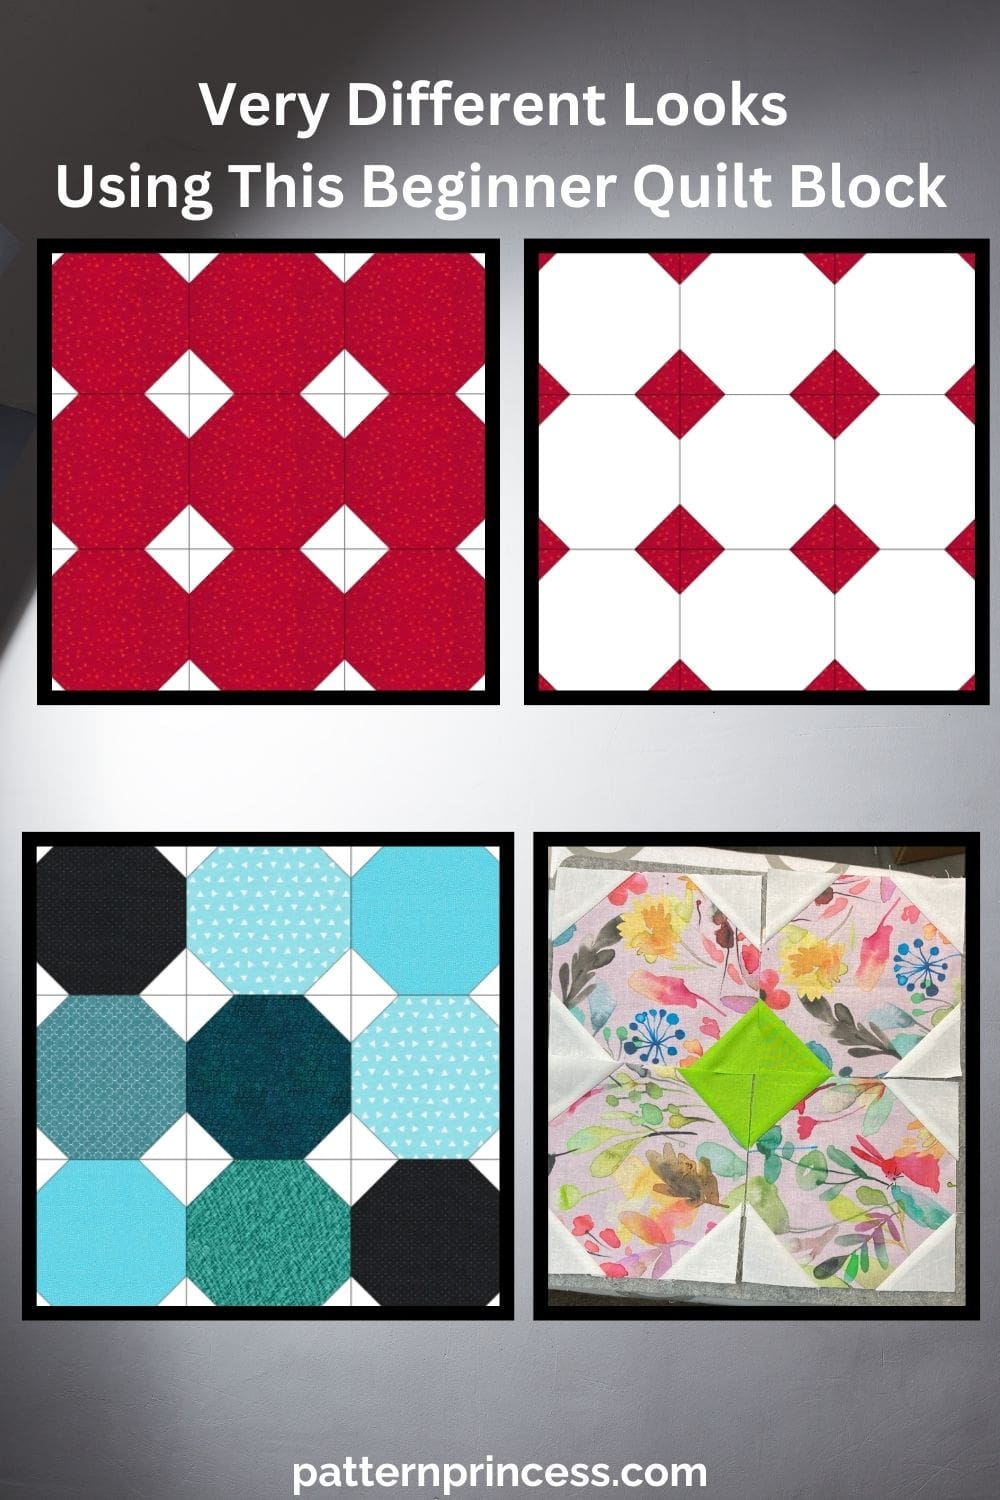
Very Different Looks Using This Beginner Quilt Block.
Play with the size of the squares and you can achieve very different looking blocks. Along with the different sizes, switch up the background squares or corner squares and use different colors. Make this a scrappy snowball or use a preplanned color scheme.
It’s a great way to use up fabric scraps.
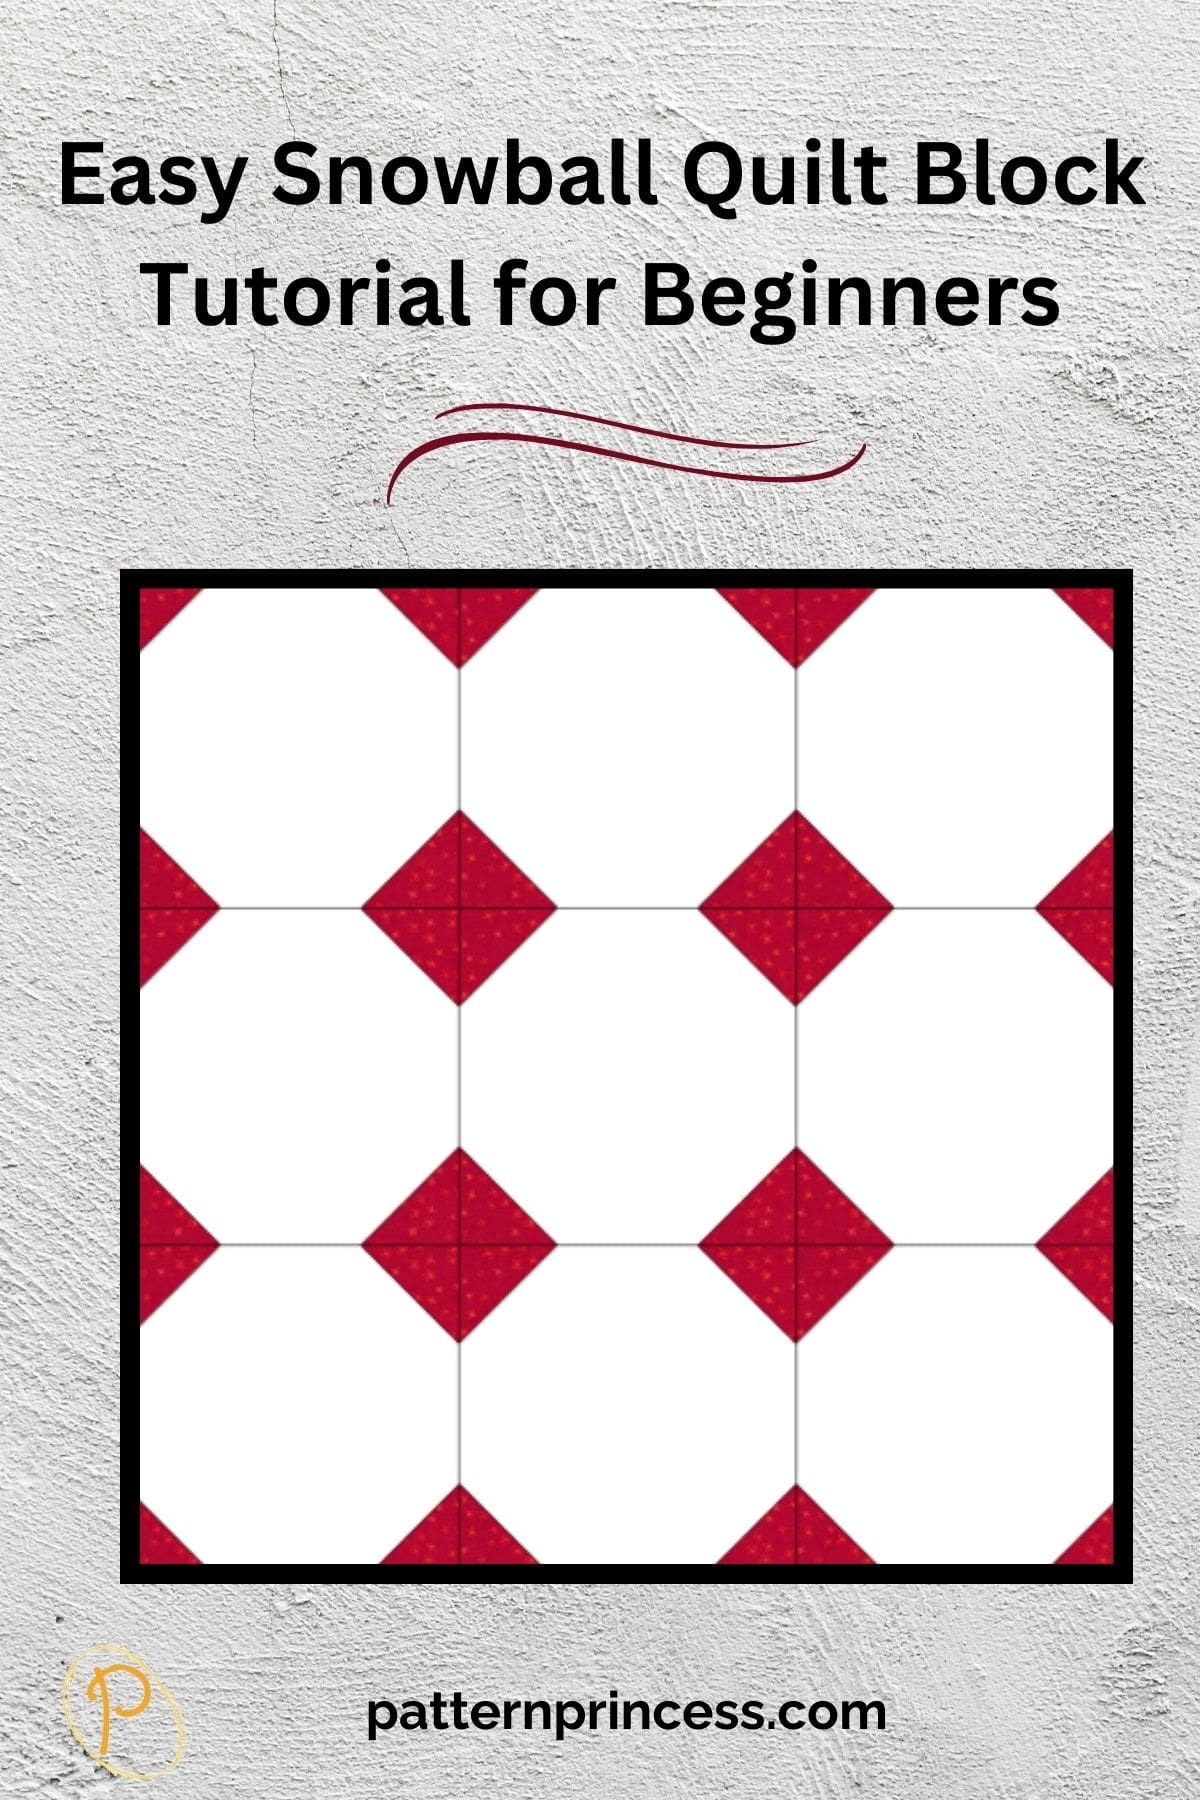
Easy Snowball Quilt Block Tutorial for Beginners
Embrace the ease of the Quick Corner Method as you bring your Snowball Unit to life.
This quilt block unit is a delightful addition to your repertoire. What makes this technique truly special is its versatility, and in this guide, we’ll explore various sizes ranging from a charming 2-inch block to a statement-making 12-inch masterpiece.
See the chart for the suggested combinations of large and small squares. When using the suggested size, you will end up with more of an octagon shape. If you use a smaller square on each corner, you will have more of a round snowball shape for your snowball corners. Therefore, feel free to change up the corner square size to achieve your desired look.
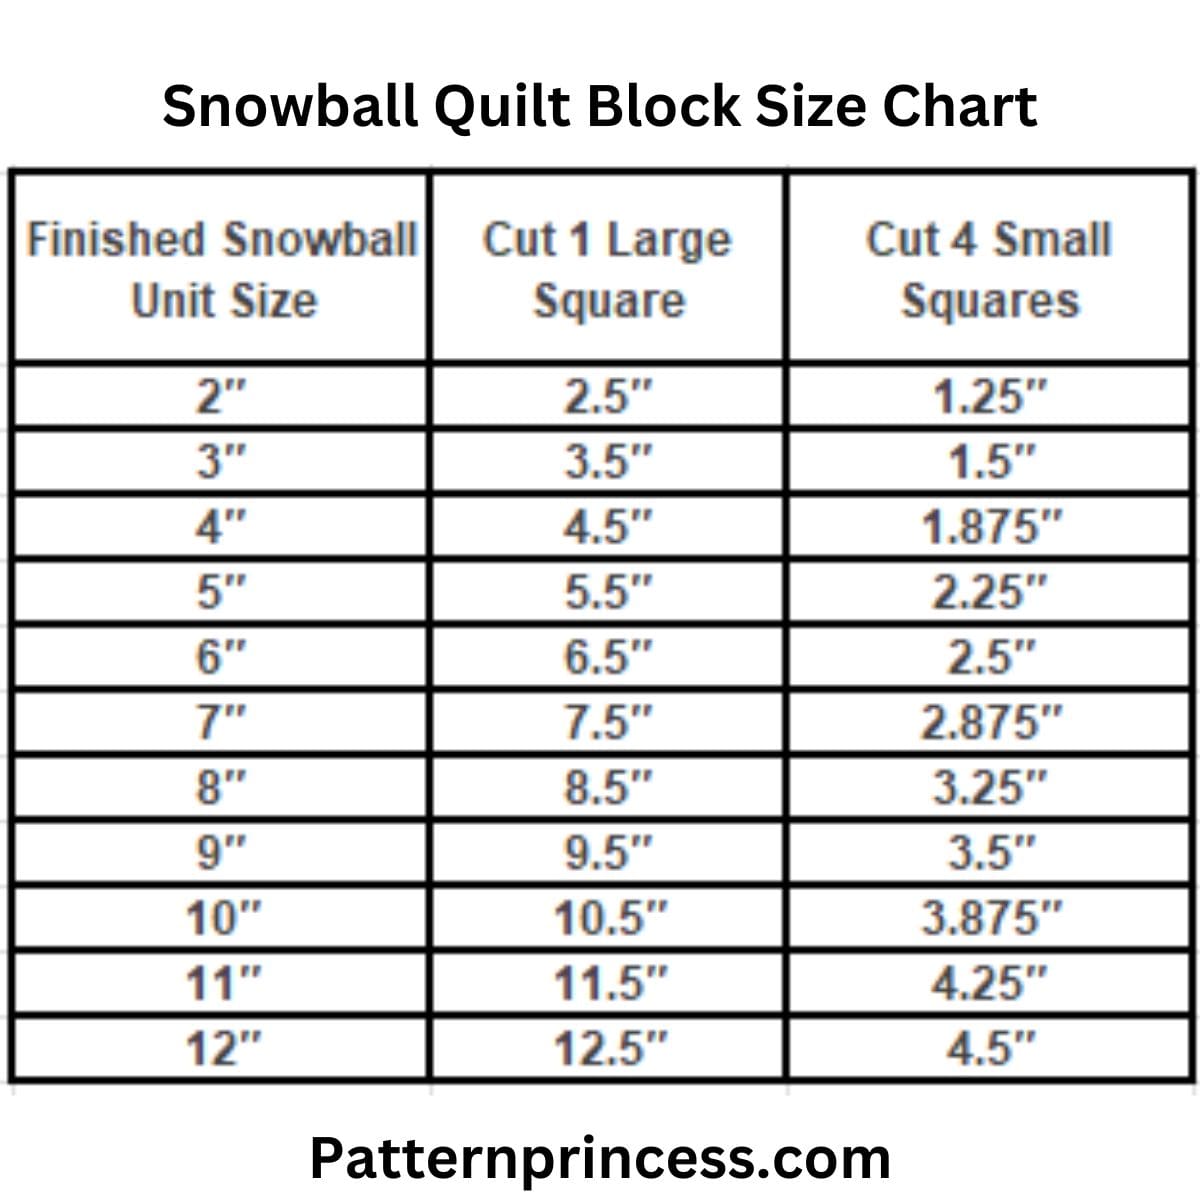
This chart provides suggested square combinations for this unit.
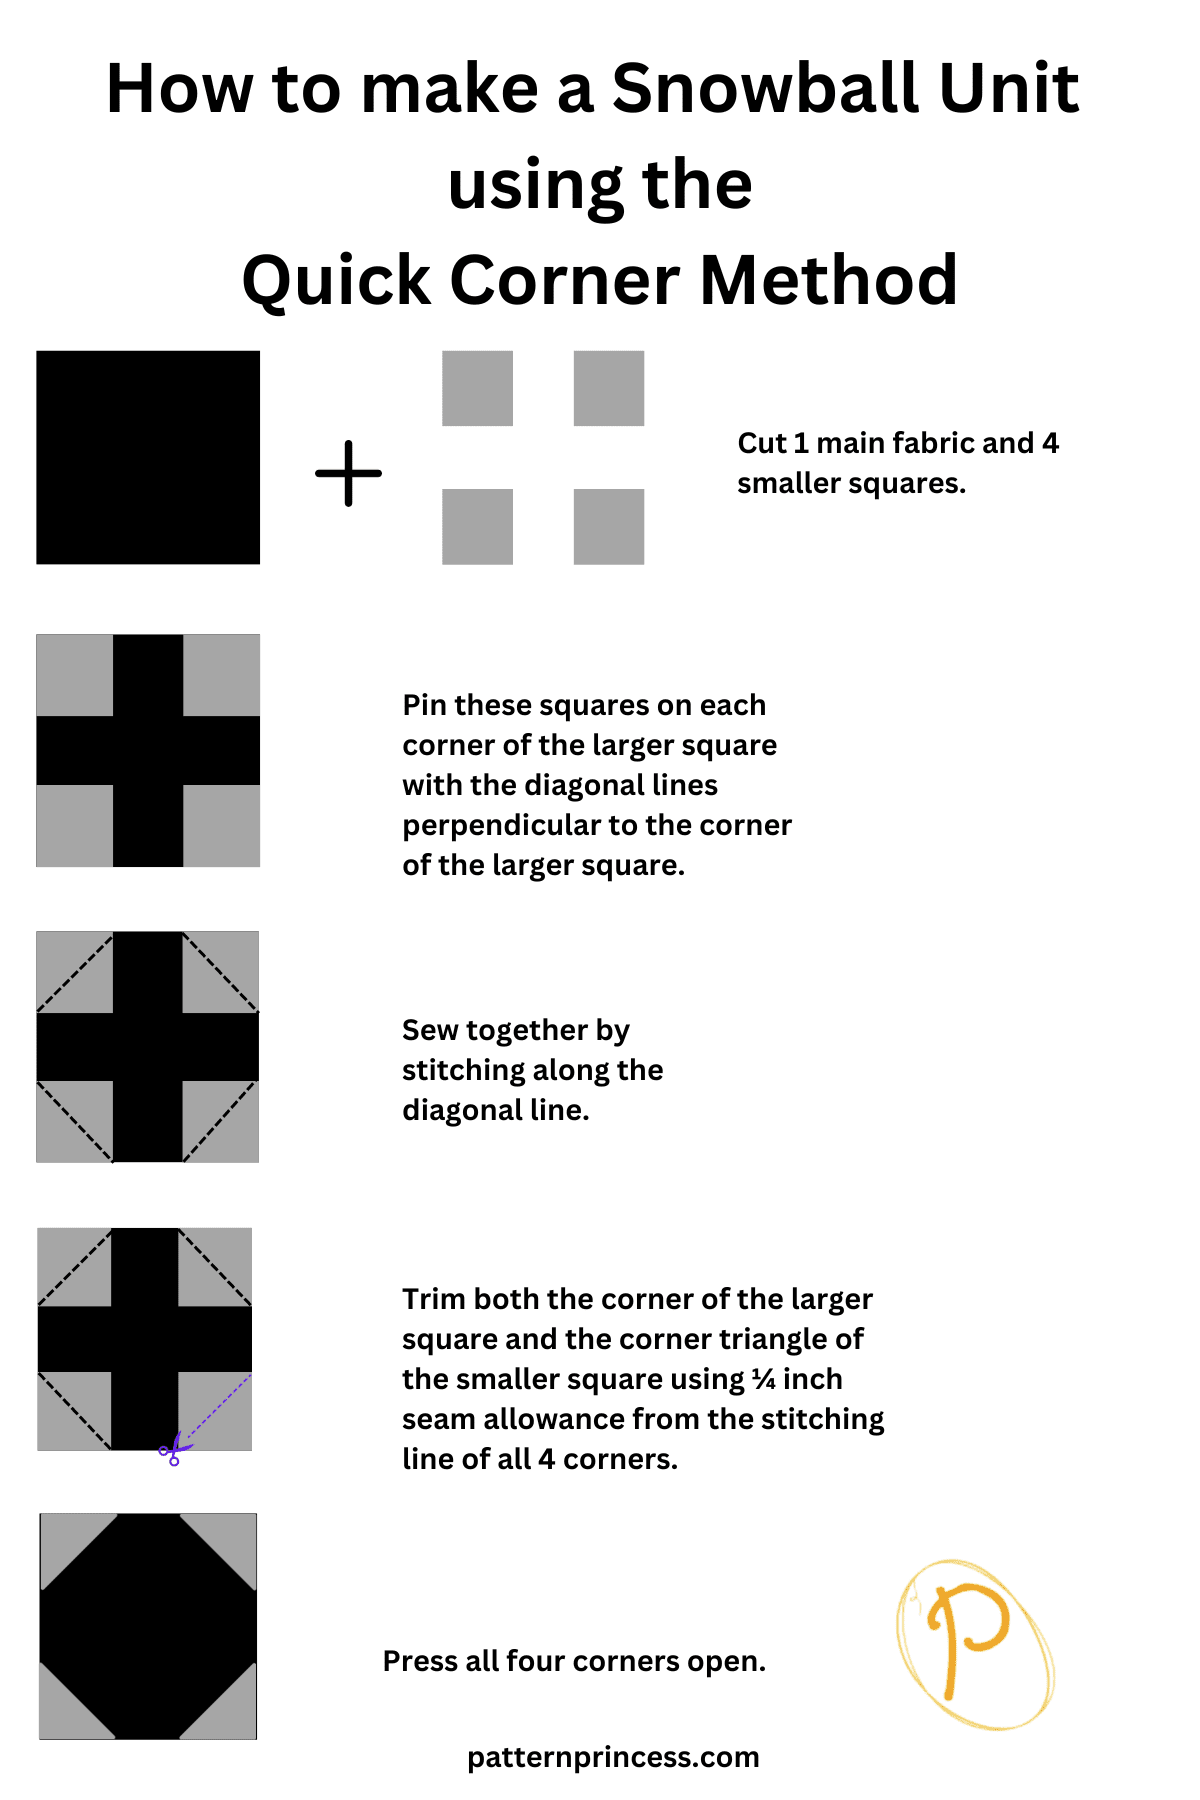
How to make a Snowball Unit using the Quick Corner Method
Skill Level
Beginner Quilter
Quilt Block Name
Snowball Quilt Block
Finished Block Size
Use the square size provided to sew the block desired, from 2 inches through 12 inches.
Equipment and Tools
- Rotary Cutter
- Quilting Ruler
- Cutting Mat
- Rotating Cutting Mat
- Iron
- Ironing Board or Pressing Mat
- Pins
- Clips
- Sewing Machine
- Fabric Scissors
- Disappearing fabric marker
- My Favorite Quilting Supplies
** Download the Free Quilt Block Pattern PDF file with the Step-by-Step Diagram. After the written pattern. Just sign up for the newsletter and you will have access to this file and more. Once signed up, you can also find other free PDF downloads available to you. **
Pattern Notes
All seams are 1/4 inch unless otherwise noted.
Sew with right sides together unless otherwise noted.
General Fabric Requirements for Each Quilt Block
In addition to your usual quilting supplies here are the fabric requirements.
For each block you will need
One (1) large square of fabric in contrasting color.
Four (1) squares of fabric in a different color.
See the suggest block size chart for your desired finished size.
It’s another beginner quilt pattern, that looks like it could be complicated, but is actually very easy to sew.
Make a Snowball Unit with the Quick Corner Method by following these simple steps.
Step 1
Cut 1 main fabric and 4 smaller squares. Identify the finished size of your unit and refer to the chart below for precise cutting measurements of the individual pieces.
Step 2
On the wrong side of each small square, use a fine pencil and a straight edge and lightly draw a diagonal line on the back side of each of the square. Alternatively, you can achieve the same effect by folding them in half diagonally to mark the line.
Step 3
With the right sides together, pin these squares on each corner of the larger square with the diagonal lines perpendicular to the corner of the larger square. See the illustration below for guidance.
Step 4
Sew together by stitching along the diagonal line, remove pins as you come up to them. See the illustration below for guidance.
Step 5
Trim both the corner of the larger square and the corner triangle of the smaller square using ¼ inch seam allowance from the stitching line of all 4 corners.
Step 6
Press all four corners open, pressing the seams open or toward the darker fabric. The smaller square now becomes the corner piece of the large block.
Step 7
Use a ruler to square up/trim any uneven corners.
That’s it, you have this snowball block complete. A simple block with endless design possibilities and size options.
We have other free quilt patterns on the website, be sure to explore them for your next sewing project inspiration.

You can find Victoria crocheting, quilting, and creating recipes. She has cooked in restaurants for over 20 years, including many larger parties. She learned to crochet when she was just 11 years old and has been crocheting ever since; over 50 years now. Over 40 years ago, she loved her first class in sewing and continues to hone her skills in quilting. Many have enjoyed the handmade gifts over the years. In her professional career, she has worked in management in a wide variety of businesses including higher education as a dean of a division. All the while attending college part-time to achieve her doctorate in higher education with an emphasis in e-learning.