Last updated on July 4th, 2024 at 11:29 pm
This fat quarter friendly pattern uses strips in two lengths to make a fun table runner and four mug rugs. Are you ready to roll with us into the world of “Bowling Lanes and Strikes”?
My nephew and his fiancé are amazing bowlers. They have both had 300 games a few times in tournaments. So, when they purchased their first home, I thought it would be fitting to have something that was handmade and bowling themed.
I think something handmade is a great way to show how much they are thought of, and it is something they can use for a long time. Buying a new home ranks near the top five of the most important things that happen to us in our lives. What better way to mark special occasions like this than to dress up their table setting.
A few months ago, I found this cute fabric and I planned on getting something made and sent to them. Well, now they are here to visit, and I still have not started anything! There are already a few sewing projects that I am working on, and I thought I would get those done and make something sooner.
However, today was the day. I set everything else aside and I made this fun and playful bowling themed table runner. The best part is, it’s not a lot of hard work. In just one day, I was able to make this table décor and four matching mug rugs.
I am sharing this free sewing pattern with you.
Post contains affiliate links, and we earn commissions if you shop through the links on this page. For more information, please read the disclosure section under the About Us page.
Playful Fabric
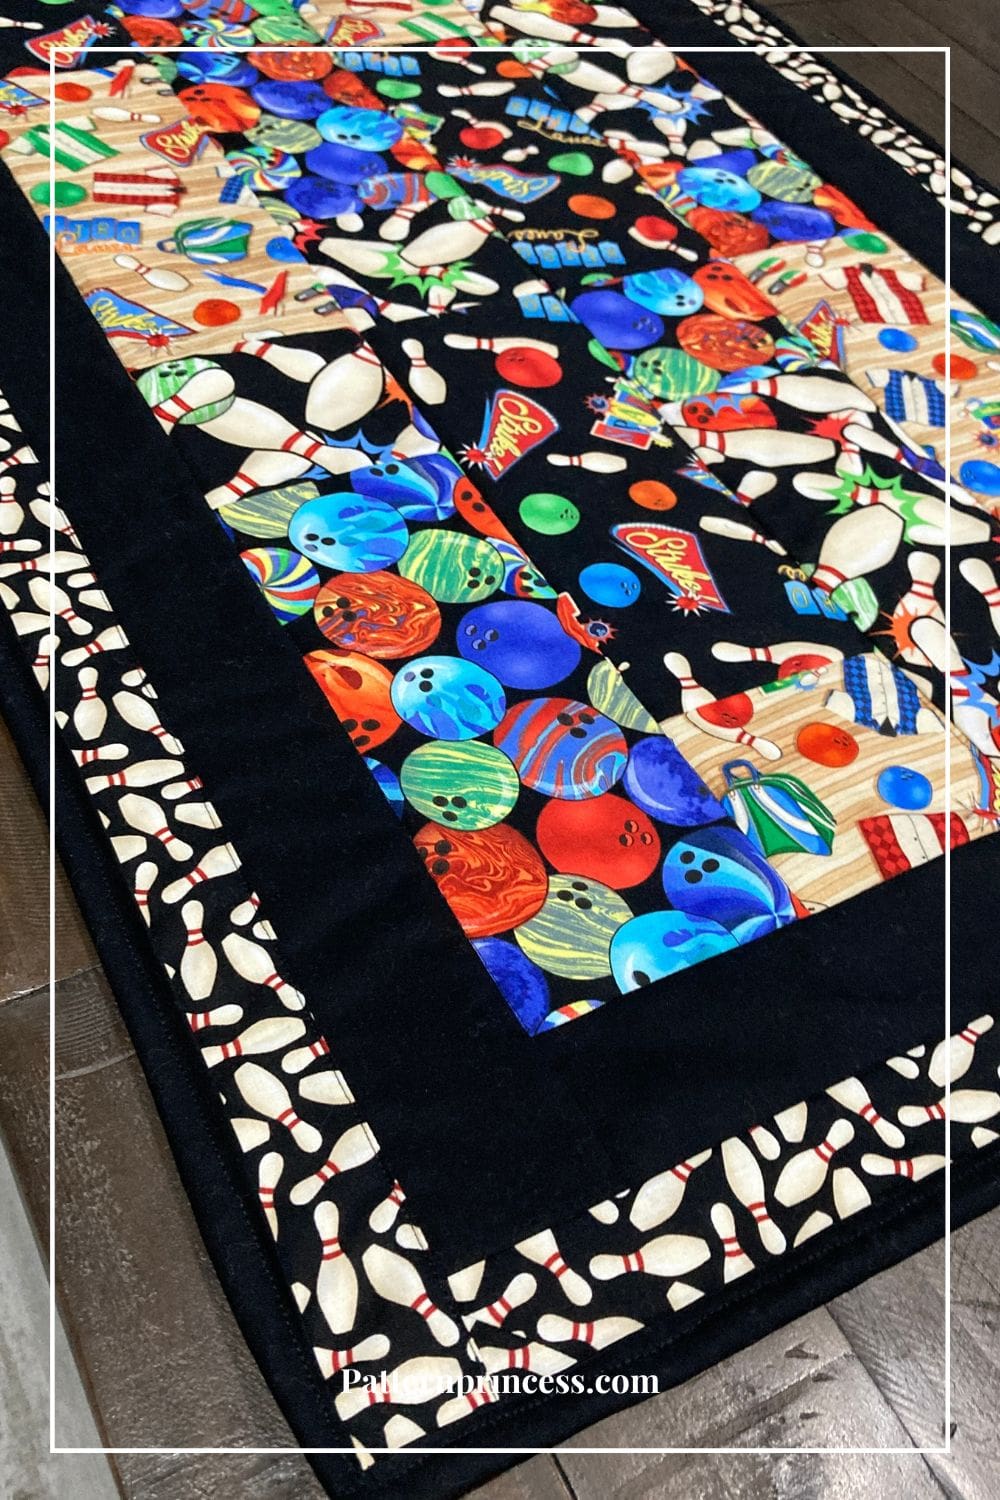
As I was searching for the perfect housewarming gift that I could make a few months ago. I found this bowling themed fabric online from a company called Blank Quilting Corporation. They had a package of 5 fat quarters in a “Rock ‘N Roll” bundle. I am not an affiliate for them, just wanted to give you the link if you wanted to find the same fabric.
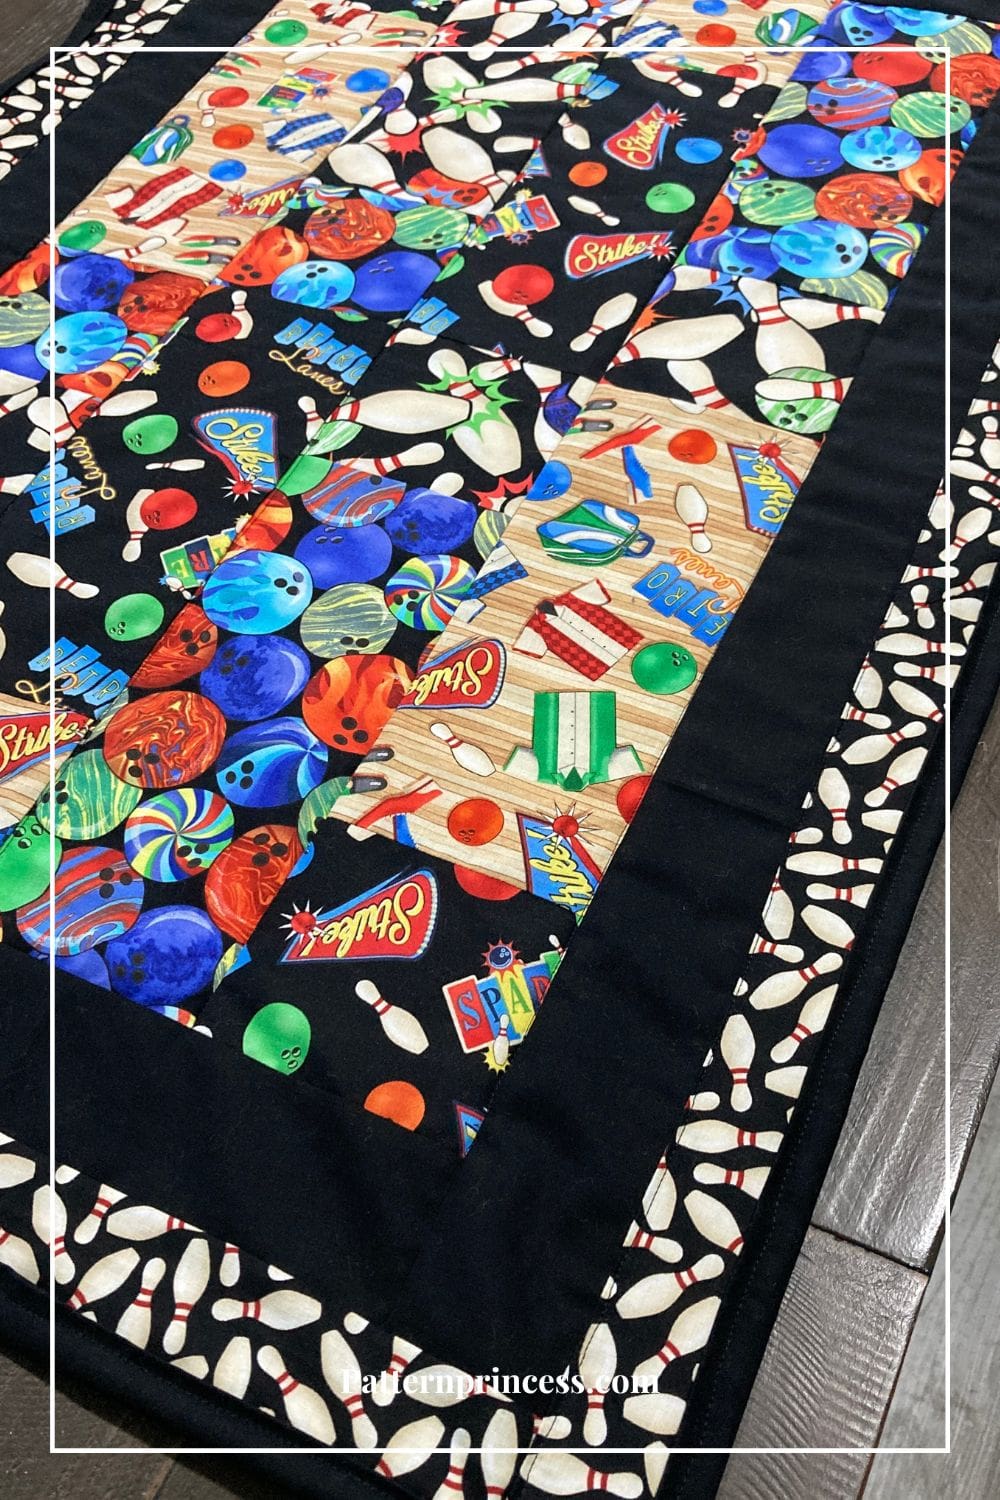
Four fabrics were used for the center tiles, one was a border and I used strips of a partially used jelly roll in black fabric for another border.
The backing fabric was a yard of scrap fabric that didn’t have a home with another project yet. I chose to have grey for the backing as their house is modern looking using grey with light blue, and mint green accents. Therefore, on the days they don’t have a bowling tournament, they can use the backside of the table runner to match their home décor.
Quick and Easy Fat Quarter Sewing Pattern
This delightful project allows you to craft a stylish table runner and four coordinating mug rugs in no time. Effortlessly transform fabric into a chic table runner that adds a touch of elegance to any dining space. The accompanying mug rugs are perfect for completing the set, creating a cohesive and visually appealing ensemble.
- The pattern is thoughtfully designed to be beginner-friendly, ensuring a stress-free and enjoyable sewing experience.
- Use your favorite fat quarters or mix and match fabrics to personalize your table runner and mug rugs, making them uniquely yours.
- With minimal cutting, this pattern allows you to complete the set in a short amount of time, making it a perfect weekend or one day project.
- Customize the fabric choices to match individual tastes and preferences.
- It’s just the right size for a dining room table or a coffee table covering in your living room.
If this is your first time making a table runner and mug rugs, this may take longer than a day, but it is certainly doable in a few days.
Directions: Bowling Lane and Strikes Table Runner Pattern: Bonus Mug Rugs
Quilting Skill Level
Easy, great for a beginner
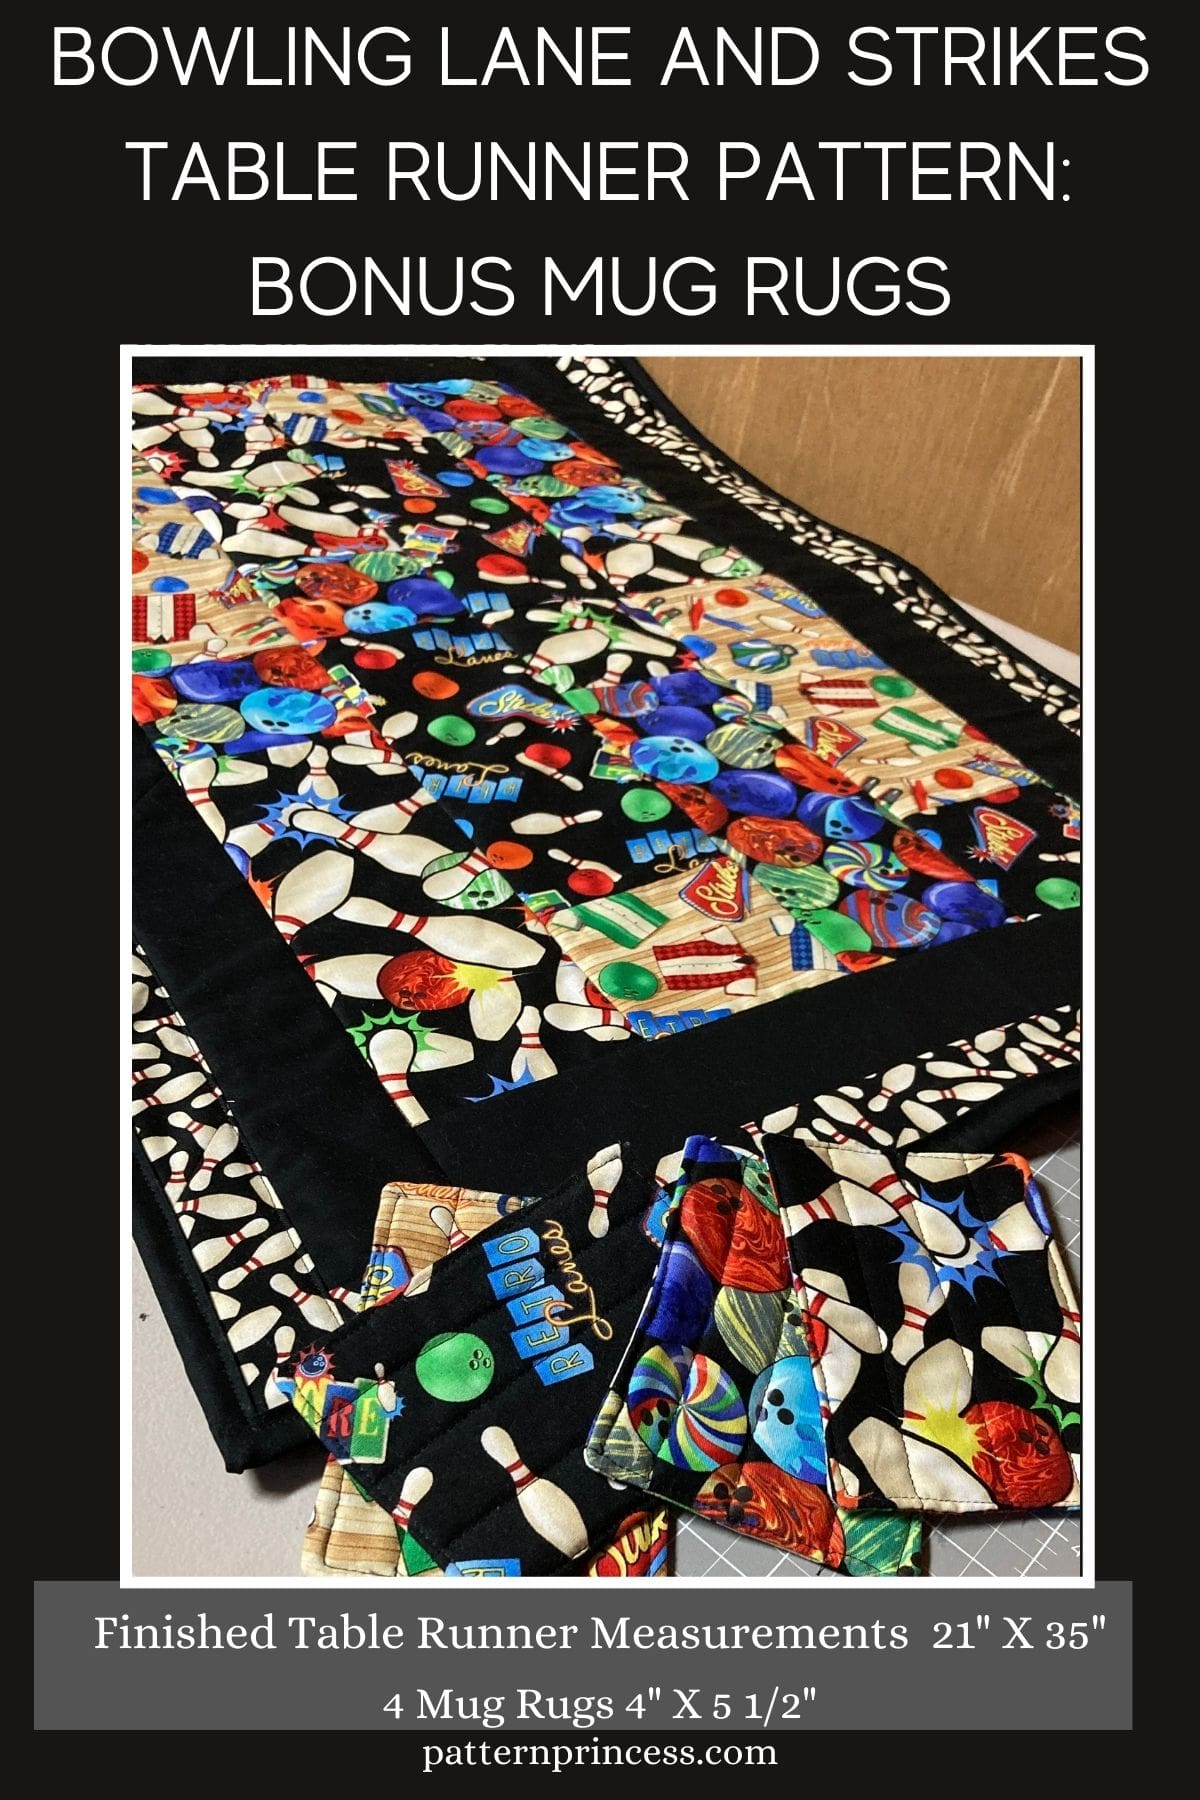
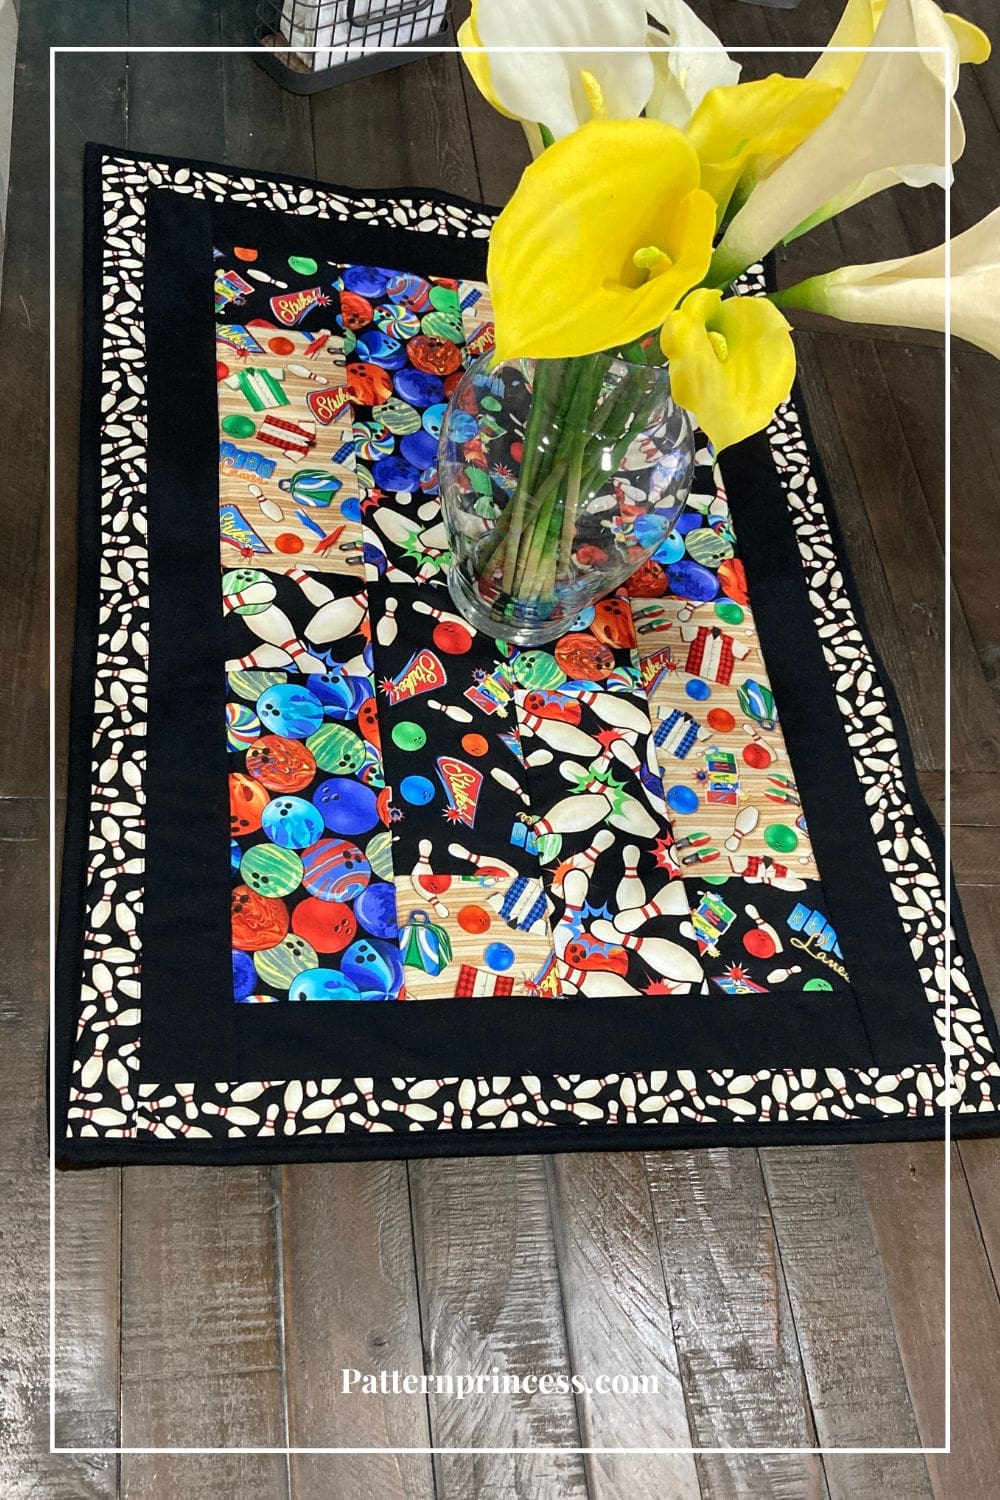
Finished Table Runner Measurements
Finished size 21 X 35 inches finished.
There will be 4 mug rugs when finished. Finished Mug Rug Measurements 4” X 5 ½” (The instructions are below the table runner instructions).
Fabric Requirements
- 4 Fat Quarters or 1 ¼ yards for center.
- 2 Fat Quarters or ½ yard for borders.
- Backing 23 X 38 inches
- Batting 23 X 38 inches (Additional Batting for the Mug Rugs 4 pieces of 4 ½” X 6”)
- Binding 2 ½ X 130 inches, ½ yard
Thread
Equipment and Tools
- Rotary Cutter
- Quilting Ruler
- Cutting Mat
- Rotating Cutting Mat
- Iron
- Ironing Board or Pressing Mat
- Pins
- Clips
- Sewing Machine
- Disappearing fabric marker
- My Favorite Quilting Supplies
Bowling Lane and Strikes Table Runner Notes
Sew fabric with right sides together using ¼-inch seam allowance. Unless otherwise noted.
Pin or clip your pieces together for easy sewing.
The directions for this quilt are for rotary cutting, machine piecing, machine quilting, and machine sewing on the binding.
Trim any overhanging fabric as needed throughout project.
Fabric Cutting Instructions
This table runner and four mug rugs are made using 4 ½ inch strips.
Begin by working on the center rectangle for the table runner.
- 4 Fat Quarters or 1 ¼ yards for center.
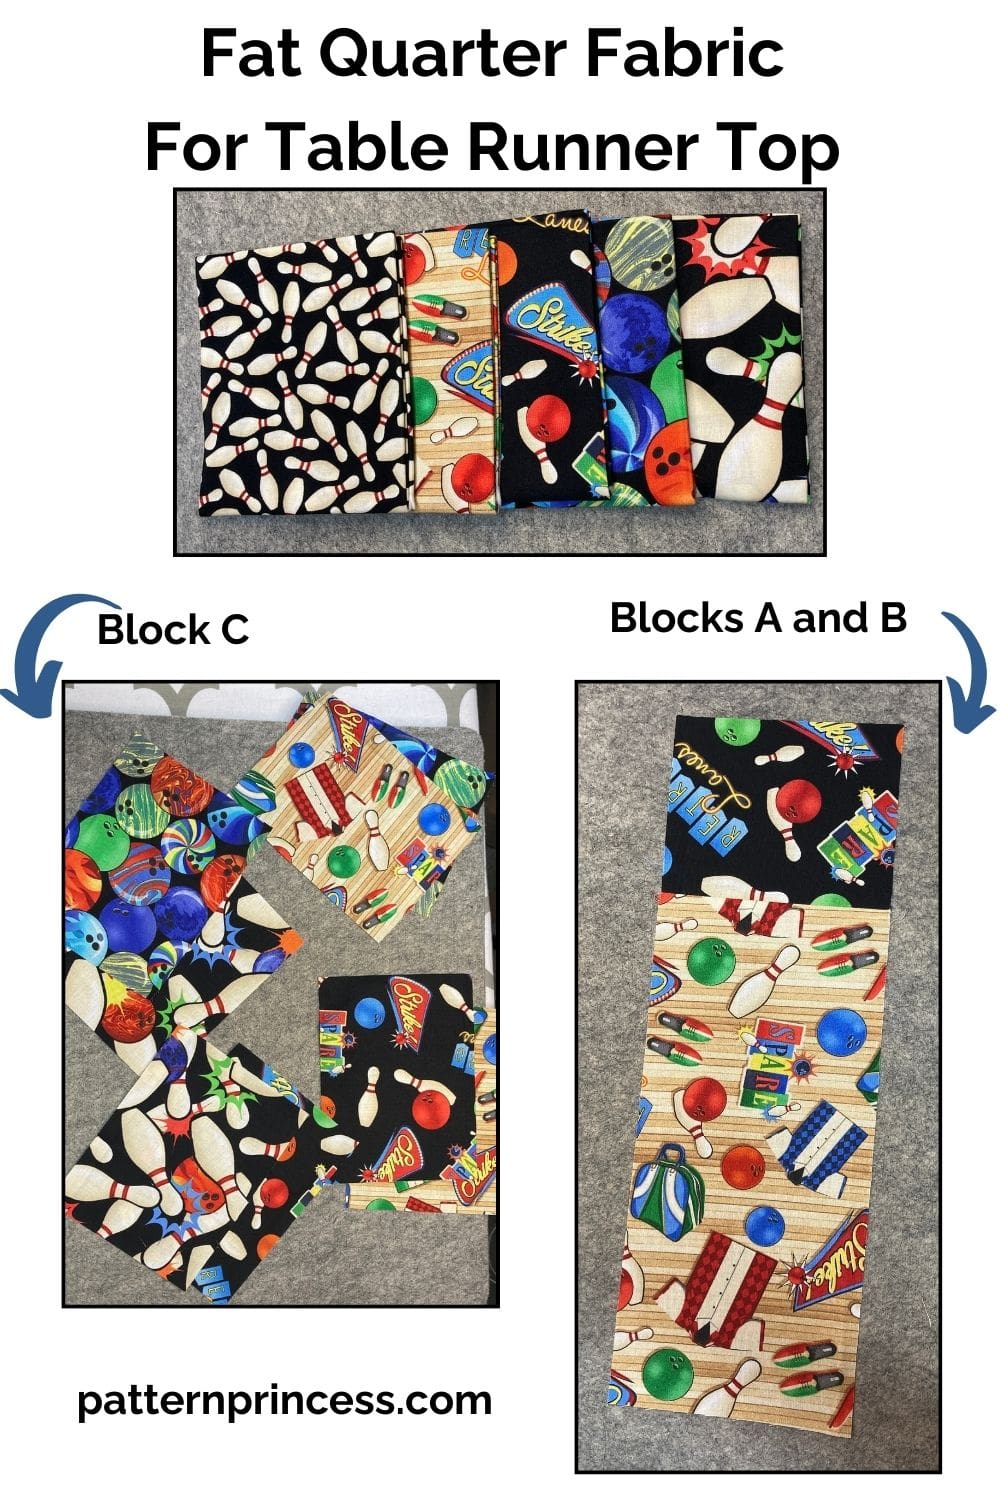
Use just four of the fat quarters for the center. Press your fat quarters and lay them on your cutting mat. I cut two prints at a time.
Step 1. Cut fabric.
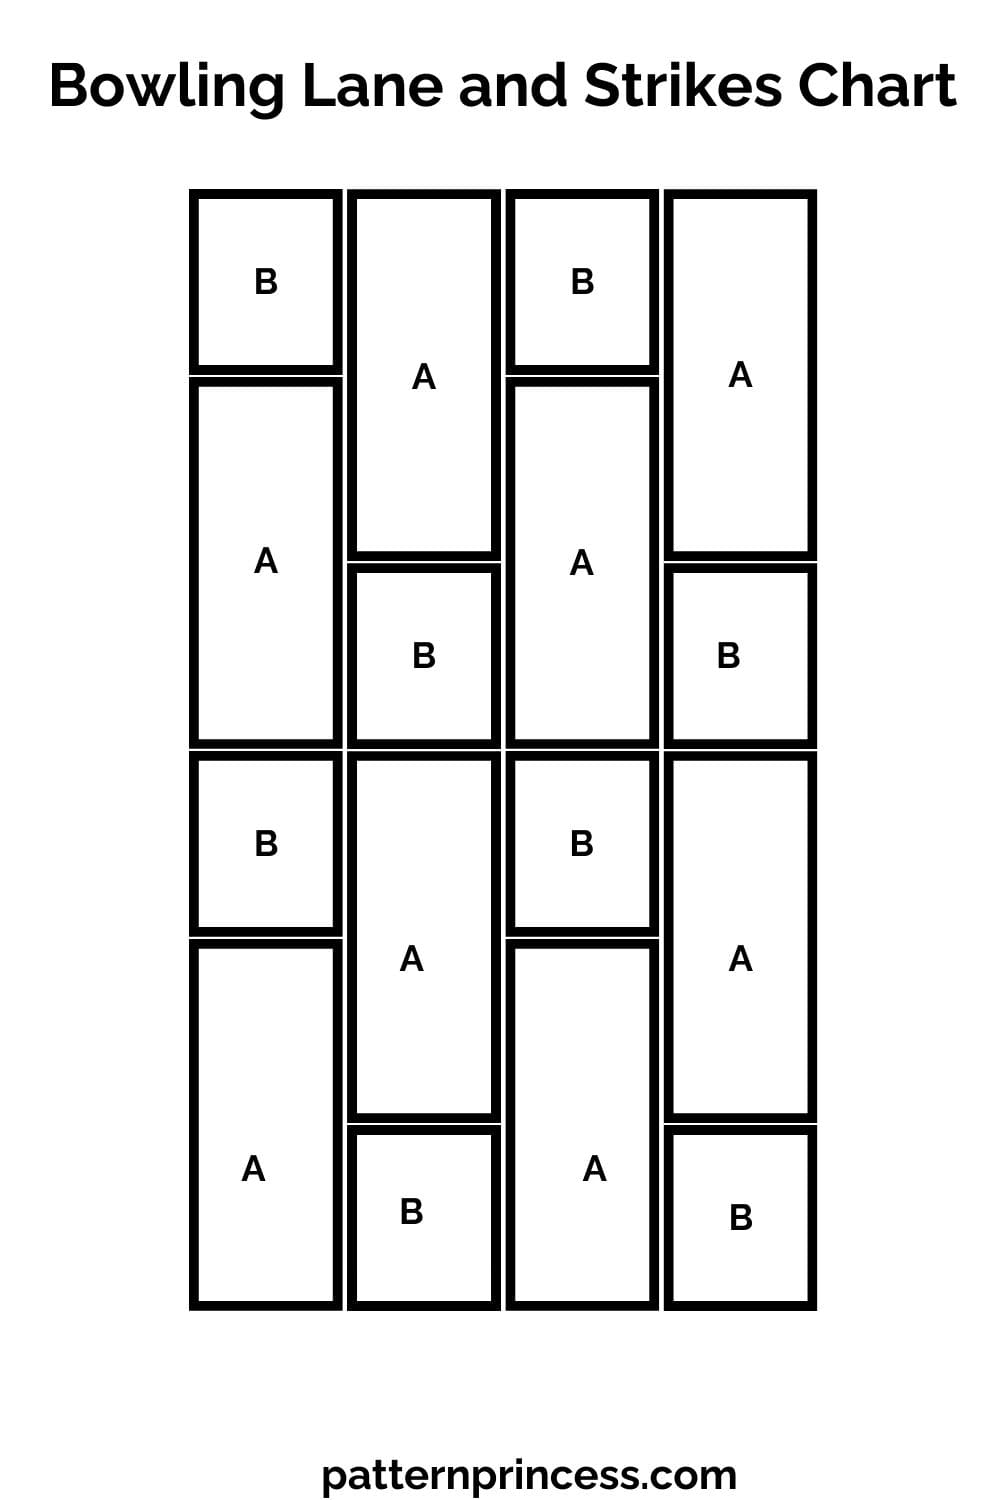
From each FQ, cut two long strips 4 1/2 inches wide x 21 inches long. (8 strips total).
Sub cut each strip into three pieces.
- Block A – 4 ½” X 10” (8 pieces)
- Block B – 4 ½” X 4” (8 pieces)
- Block C – 4 ½” X 6” (save this for the mug rugs, 8 pieces)
Step 2. Arrange blocks.
Using Blocks, A and B, make four rows placing two A, and two B strips in each row.
Refer to the chart to see how I placed my strips. Lay out all the blocks and move them around until you are happy with the layout and distribution of fabrics. Tip. Once I have the blocks in place, I take a photo. Then I can refer to this as I am sewing the pieces together.
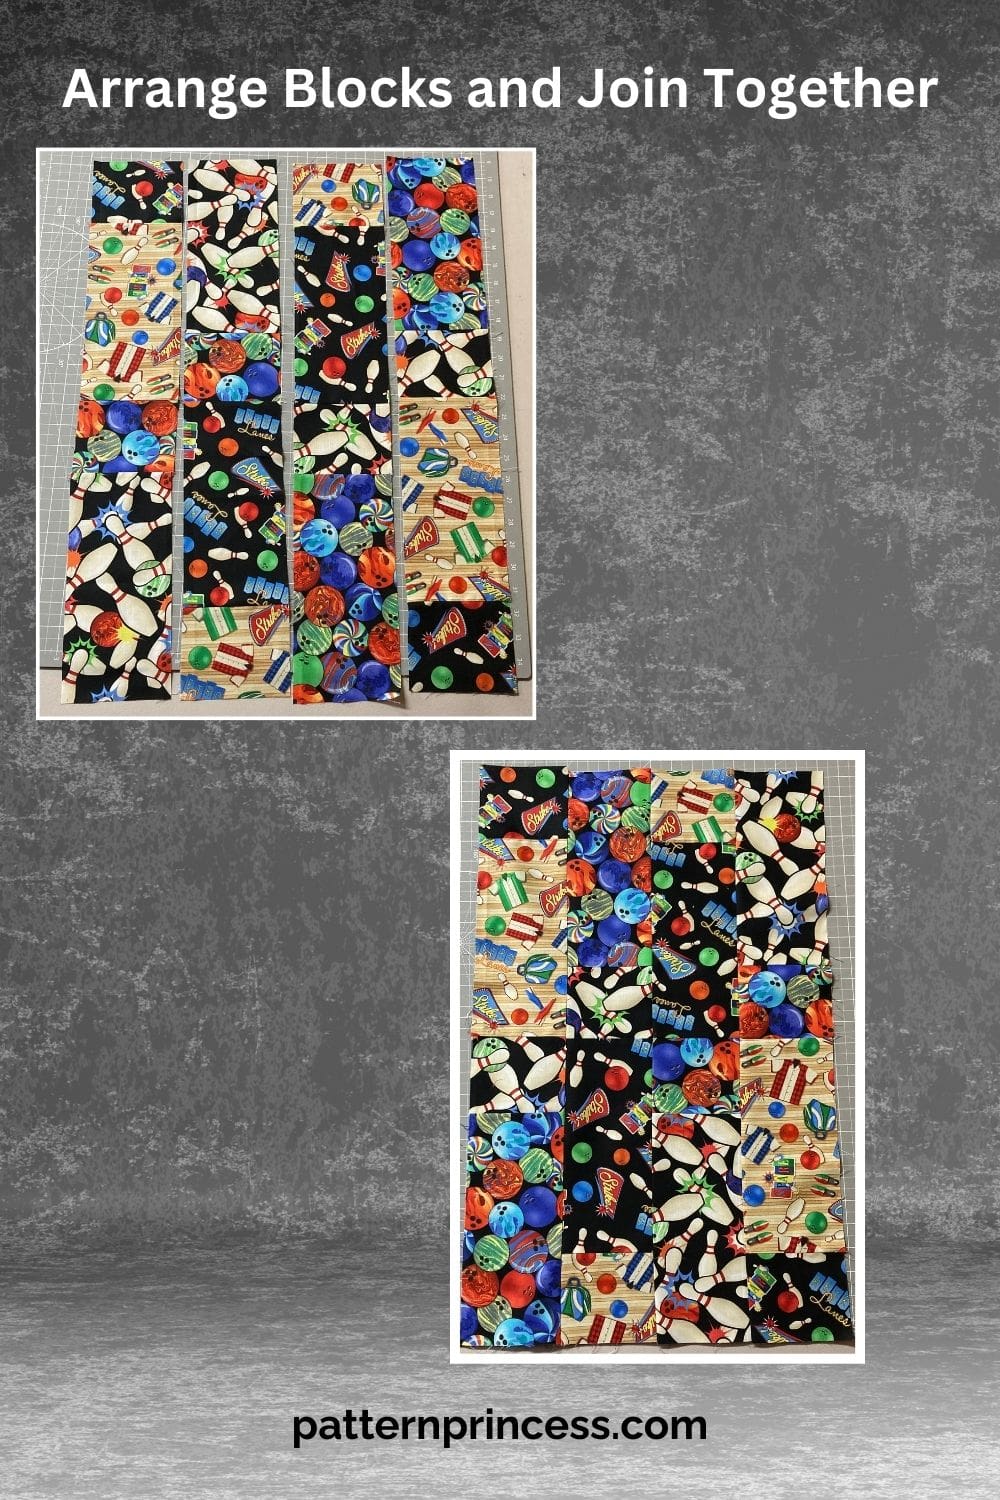
Step 3. Join blocks.
Start by joining all the blocks together in each column. Then join the columns together. Sew with the right sides together using ¼” seam allowance. Press the seams to one side or open.
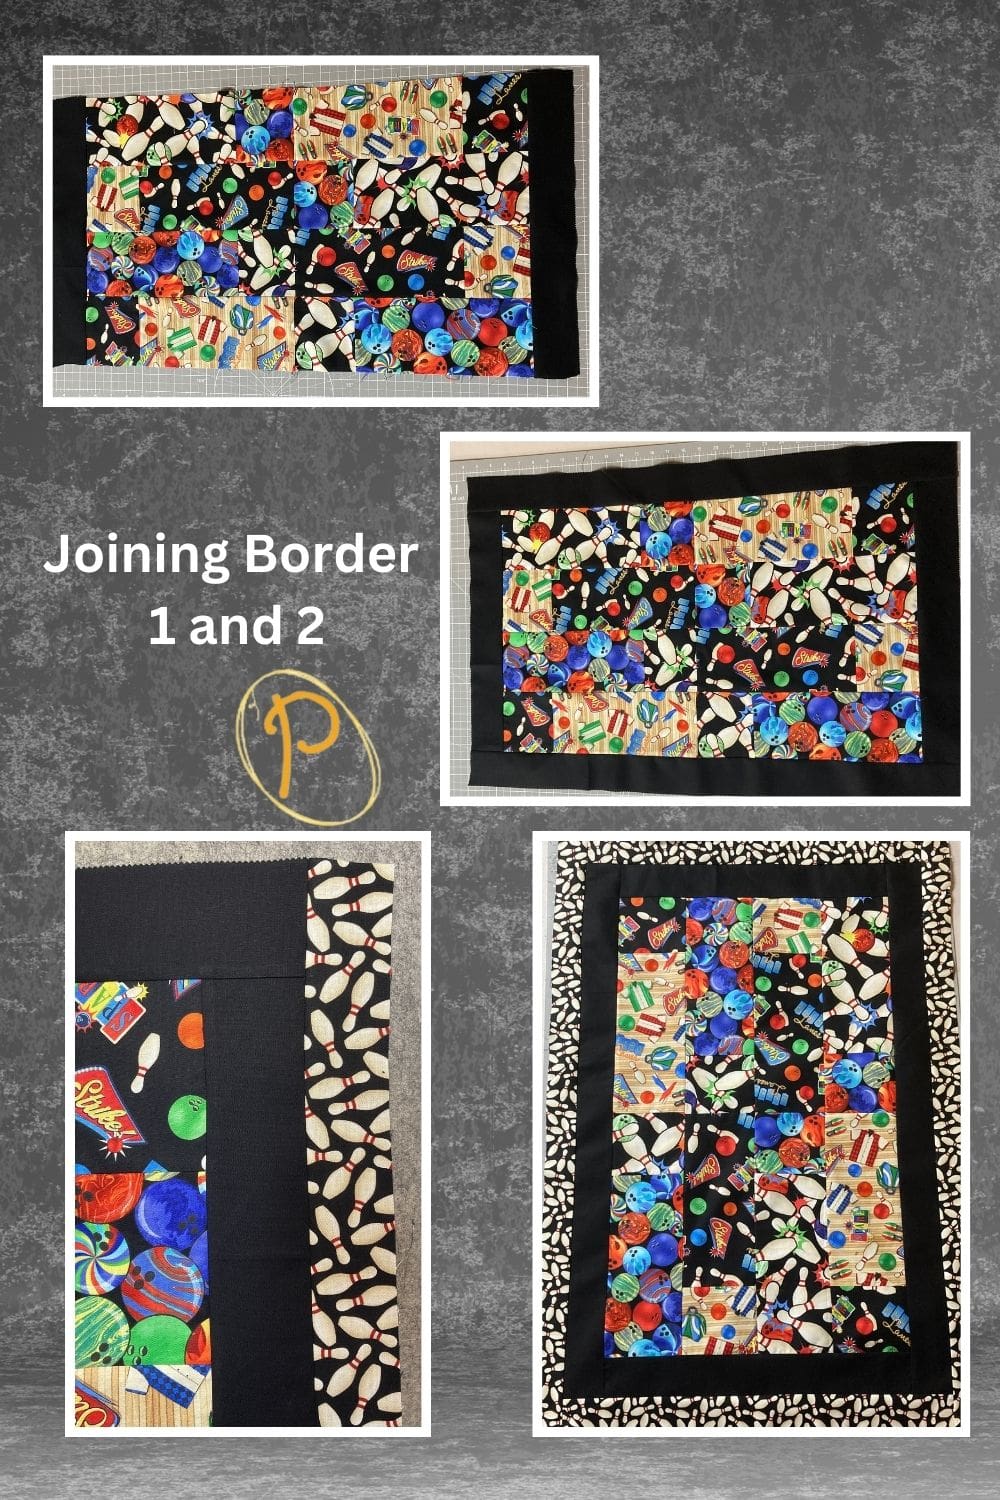
Step 4. Cut the first border fabric strips.
I used black fabric leftover from a jelly roll. Cut two for the side strips 2 ½” X 16 ½”, and two for the top and bottom strips 2 ½” X 31”. Tip. If you don’t have the length of fabric, you can make by joining 2 ½” strips of fabric together as you would to make your own binding. We have a blog post on how to make your own binding if you are new to quilting.
Step 5. Join the first border.
With the right sides together sew the 2 ½” X 16 ½” strips on the sides. Press the seams out. Next, with the right sides together sew the 2 ½” X 31” strips on the top and bottom. Press the seams out.
Step 6. Cut the second border fabric strips.
I used one of the fat quarters with bowling pin print. Cut two for the side strips 2 ½” X 21”, and two for the top and bottom strips 2 ½” X 35 1/2”.
Step 7. Join the second border.
With the right sides together sew the 2 ½” X 21” strips on the sides. Press the seams out. Next, with the right sides together sew the 2 ½” X 35 1/2” strips on the top and bottom. Press the seams out.
Step 8. Sandwich the quilt layers.
Prepare your backing and batting by cutting them to 23 X 38 inches. Working on a flat surface, lay your backing fabric face down with the batting on top, then the quilt top face up on top of the batting. Using safety pins, pin the layers together every 5 or 6 inches or so to hold the layers in place. Tip. The backing fabric and batting should be larger than the top of the table runner; about three inches on all sides.
Step 9. Sewing the layers together.
I sewed a straight line along the edges of the rows the length of the table runner. Then using a walking foot on my sewing machine, I sewed through all three layers using the seams as a guide.
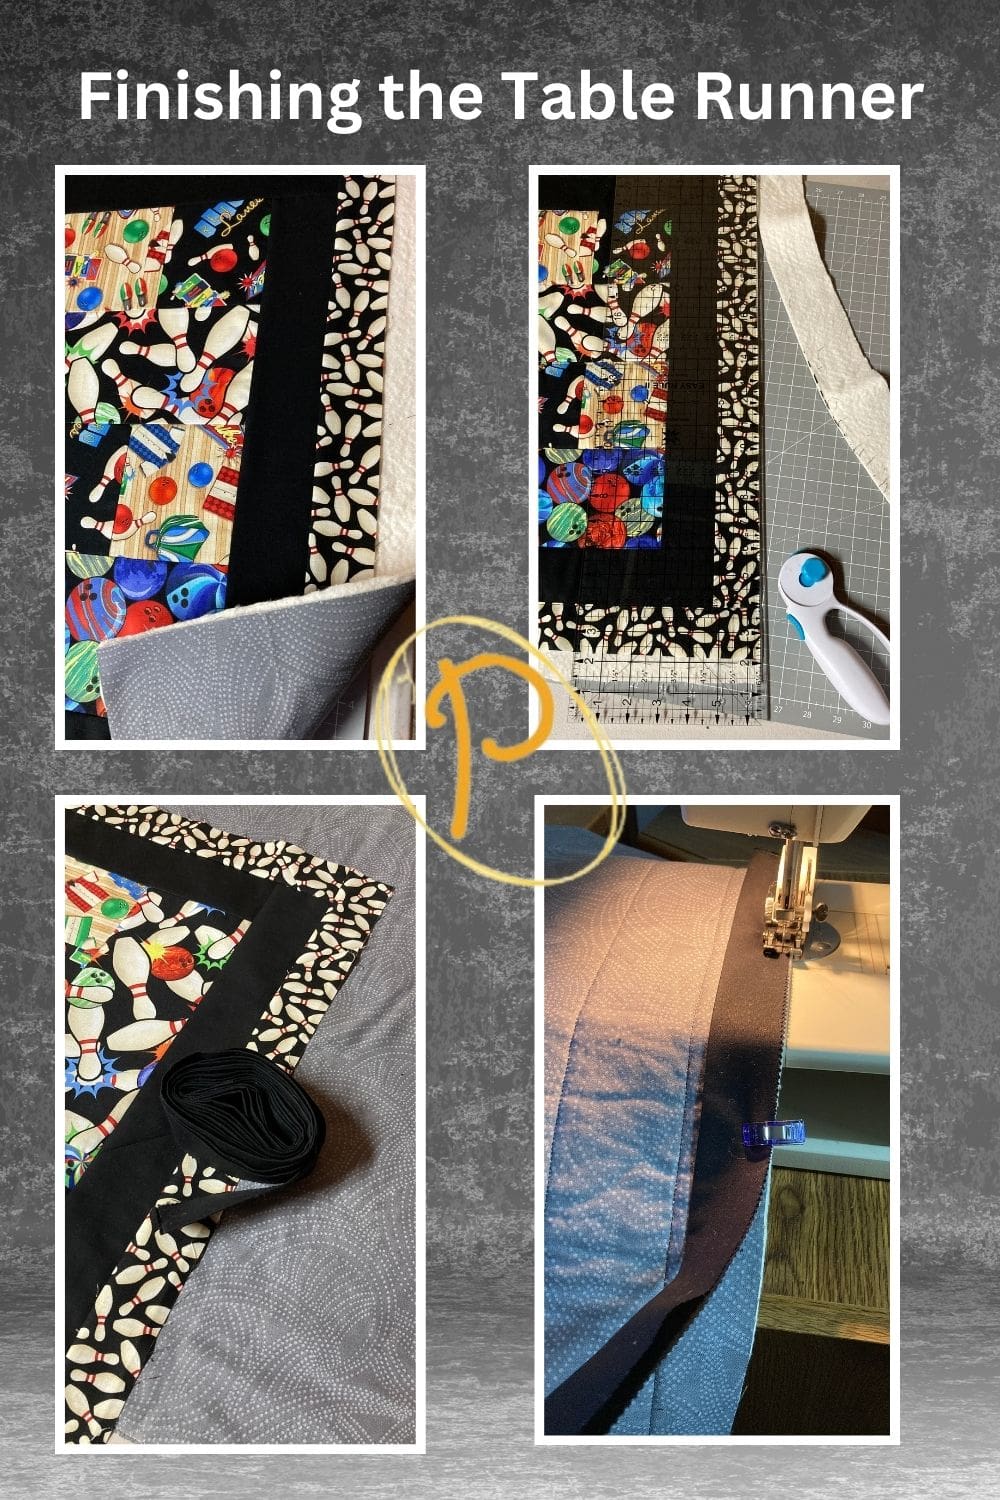
Step 10. Binding the table runner.
I made my own binding strip using black 4 jelly roll strips. Iron in half the length of the strip with the wrong sides together. Set this aside.
The next step is trimming away the excess backing and batting.
To trim the backing and batting, I use a large cutting mat, a longer ruler, and a rotary cutter. Lay the table runner quilt flat. Place the ruler along the edge of the quilt and use it as a guide to run your rotary cutter against it to trim the batting and backing fabric to the size of the top fabric. Do this on all four sides.
Pin the raw edge of the binding onto raw edge of the quilt back. I generally start in the middle of a side leaving approximately a 3” tail hanging. Note: This hanging part will be used to sew to the other end of the binding strip when you have finished sewing all four sides of the binding onto the quilt.
Sew the binding onto all four sides of the easy quilt making sure to miter the corners and join the binding.
Fold the binding over the edge and use clips to hold in place. Sew along the edge to secure the binding on the quilt top.
Once all the sides and corners are stitched, you are done with your Bowling Lane and Strikes Table Runner.
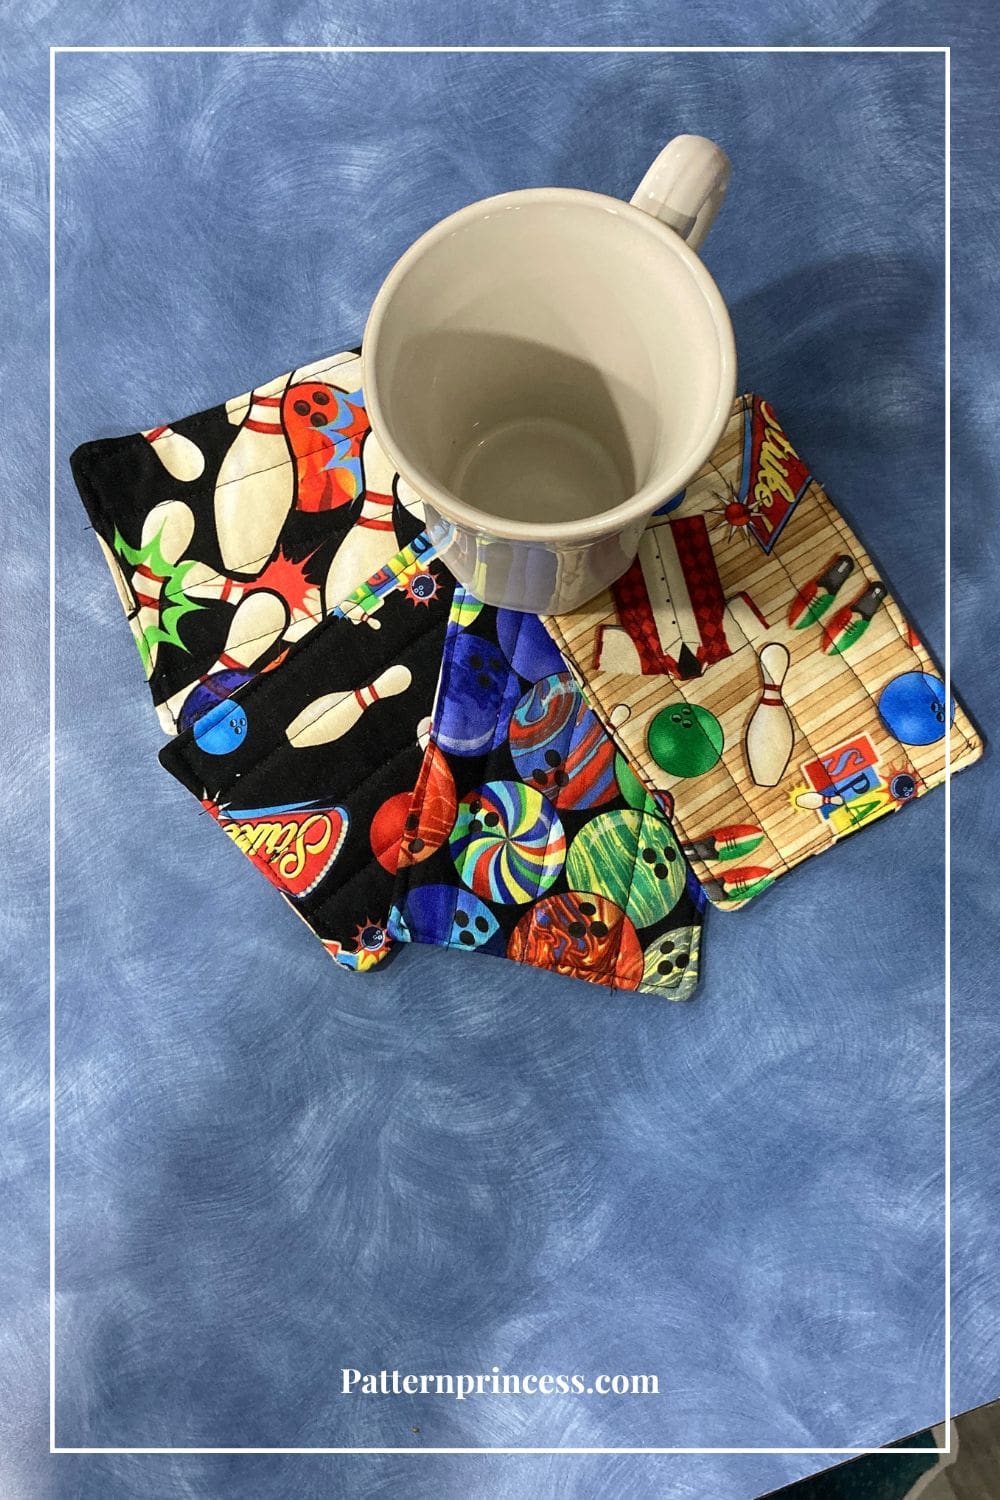
Bonus Mug Rugs Pattern
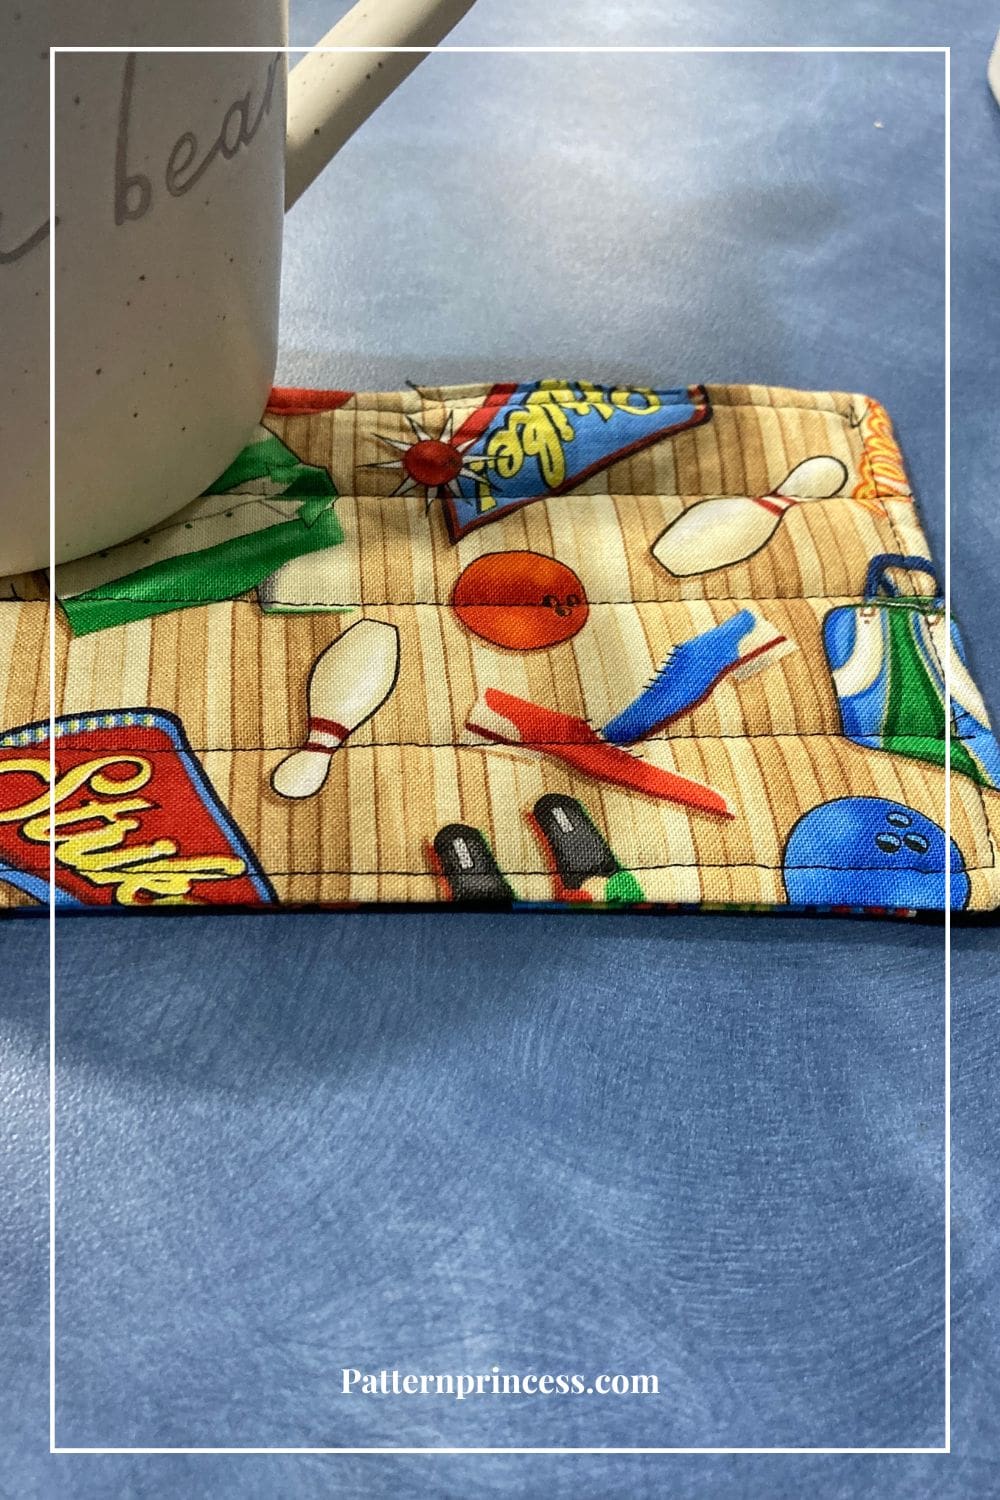
Finished Mug Rug Measurements 4” X 5 ½” (you will have 4 mug rugs)
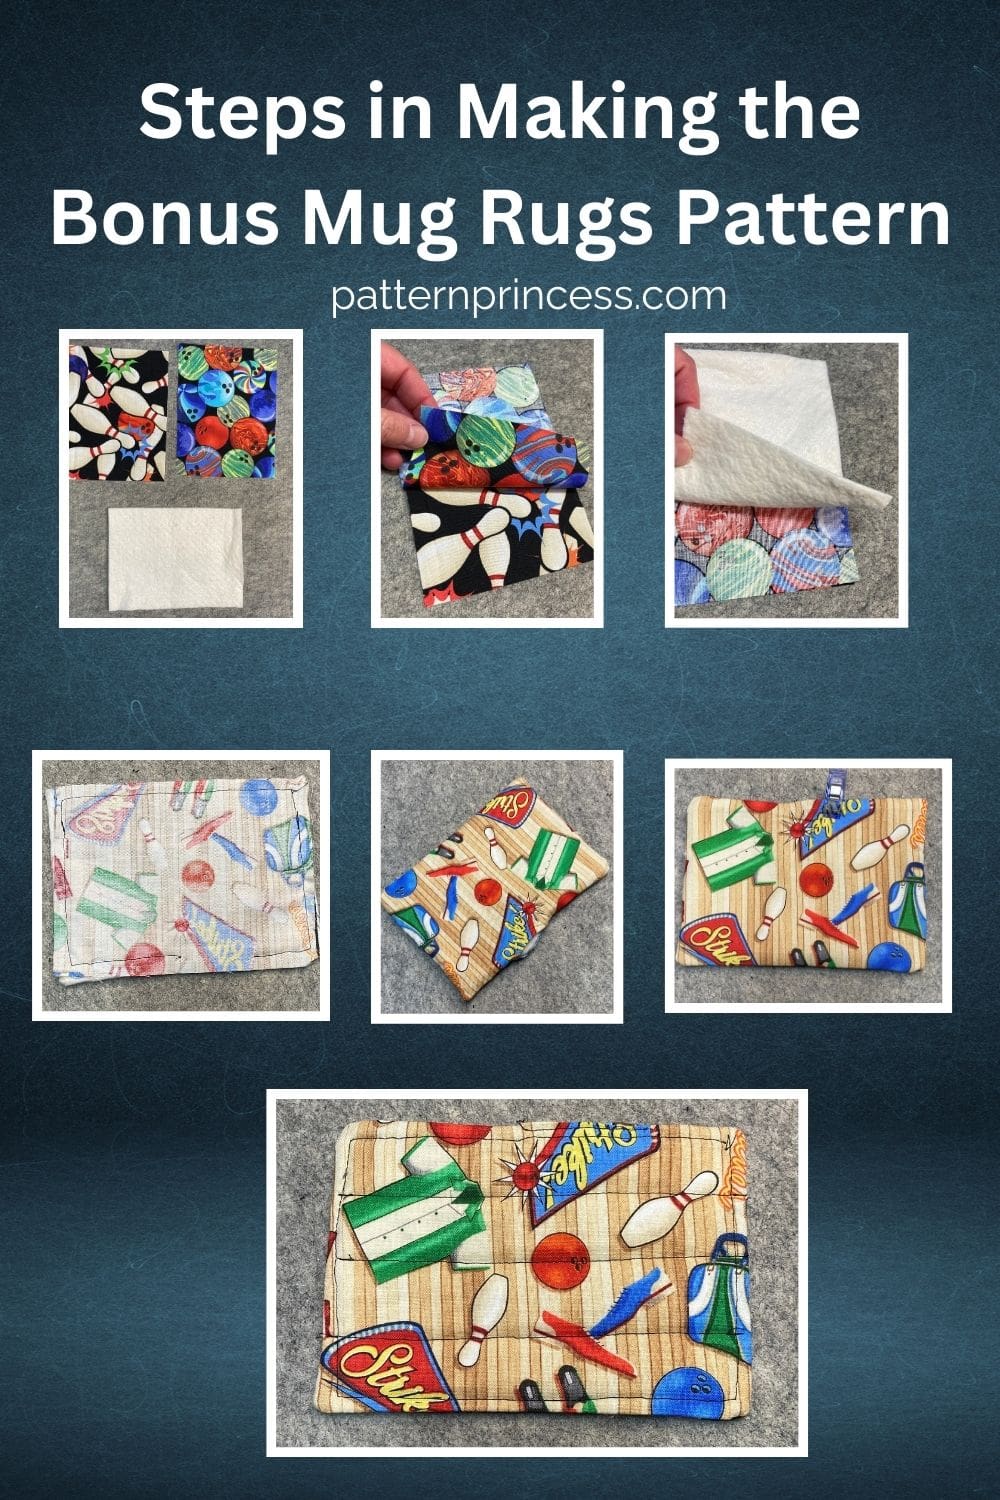
For the mug rugs, you will use the following rectangles that you set aside when cutting the strips for the table runner.
- Block C – 4 ½” X 6” (save this for the mug rugs, 8 pieces)
- Batting for the Mug Rugs 4 pieces of 4 ½” X 6”
Follow the steps for each of the four mug rugs.
Step 1.
Layer the pieces together, starting with the batting on the bottom, followed by the 2 pieces of cotton right sides together. The wrong side of the top fabric should be facing out.
Pin or add clips to secure your rectangle.
Step 2.
Sew around the square through all the layers using 1/4-inch seam allowance. Backstitch when you start and when you stop.
Leave a 2-inch opening for turning once you have sewn the coasters.
Step 3.
Trim the corners close to the stitching line to reduce bulk.
Turn the coaster inside out. Use a turning tool or a skewer to help push out the corners to a point. Be careful not to poke a hole in the fabric.
Step 4.
Press the coaster flat with the seam allowance of the open hole tucked inside. Place a few clips or pins to keep this seam in place.
Step 5.
Topstitch around the square 1/8-inch from the edge. Make sure to sew over the turning hole to close it.
Step 6.
Secure the fabric layers and batting by topstitching in straight lines across. I made mine 1-inch apart. Tip. Use a heat erase marker and a ruler to mark your lines and sew along the lines. Then just use the heat of the iron to erase the lines.
Trim the threads.
You have completed the Easy Quilted Mug Rug pattern.
We hope you loved making your table runner and mug rugs.
Sometimes, we have different free patterns available for download. Head on over to our free PDF printables page. It is a good idea to sign up for the newsletter, so you are notified when the free downloads are uploaded.
Last year, I made a few table runners and mug rugs. Explore our other free tutorials.
- Charming Quilted Square Tablecloth Pattern
- Americana Star Table Runner Quilt Pattern
- Americana Star Placemat Quilt Pattern
- Easy Beginner Quilted Coaster Pattern
- Easy Reversible Quilted Table Runner Pattern
- Afternoon Tea Four Patch Table Runner
- Rustic Charm Mini Quilt Table Topper Pattern

You can find Victoria crocheting, quilting, and creating recipes. She has cooked in restaurants for over 20 years, including many larger parties. She learned to crochet when she was just 11 years old and has been crocheting ever since; over 50 years now. Over 40 years ago, she loved her first class in sewing and continues to hone her skills in quilting. Many have enjoyed the handmade gifts over the years. In her professional career, she has worked in management in a wide variety of businesses including higher education as a dean of a division. All the while attending college part-time to achieve her doctorate in higher education with an emphasis in e-learning.