Last updated on July 4th, 2024 at 11:29 pm
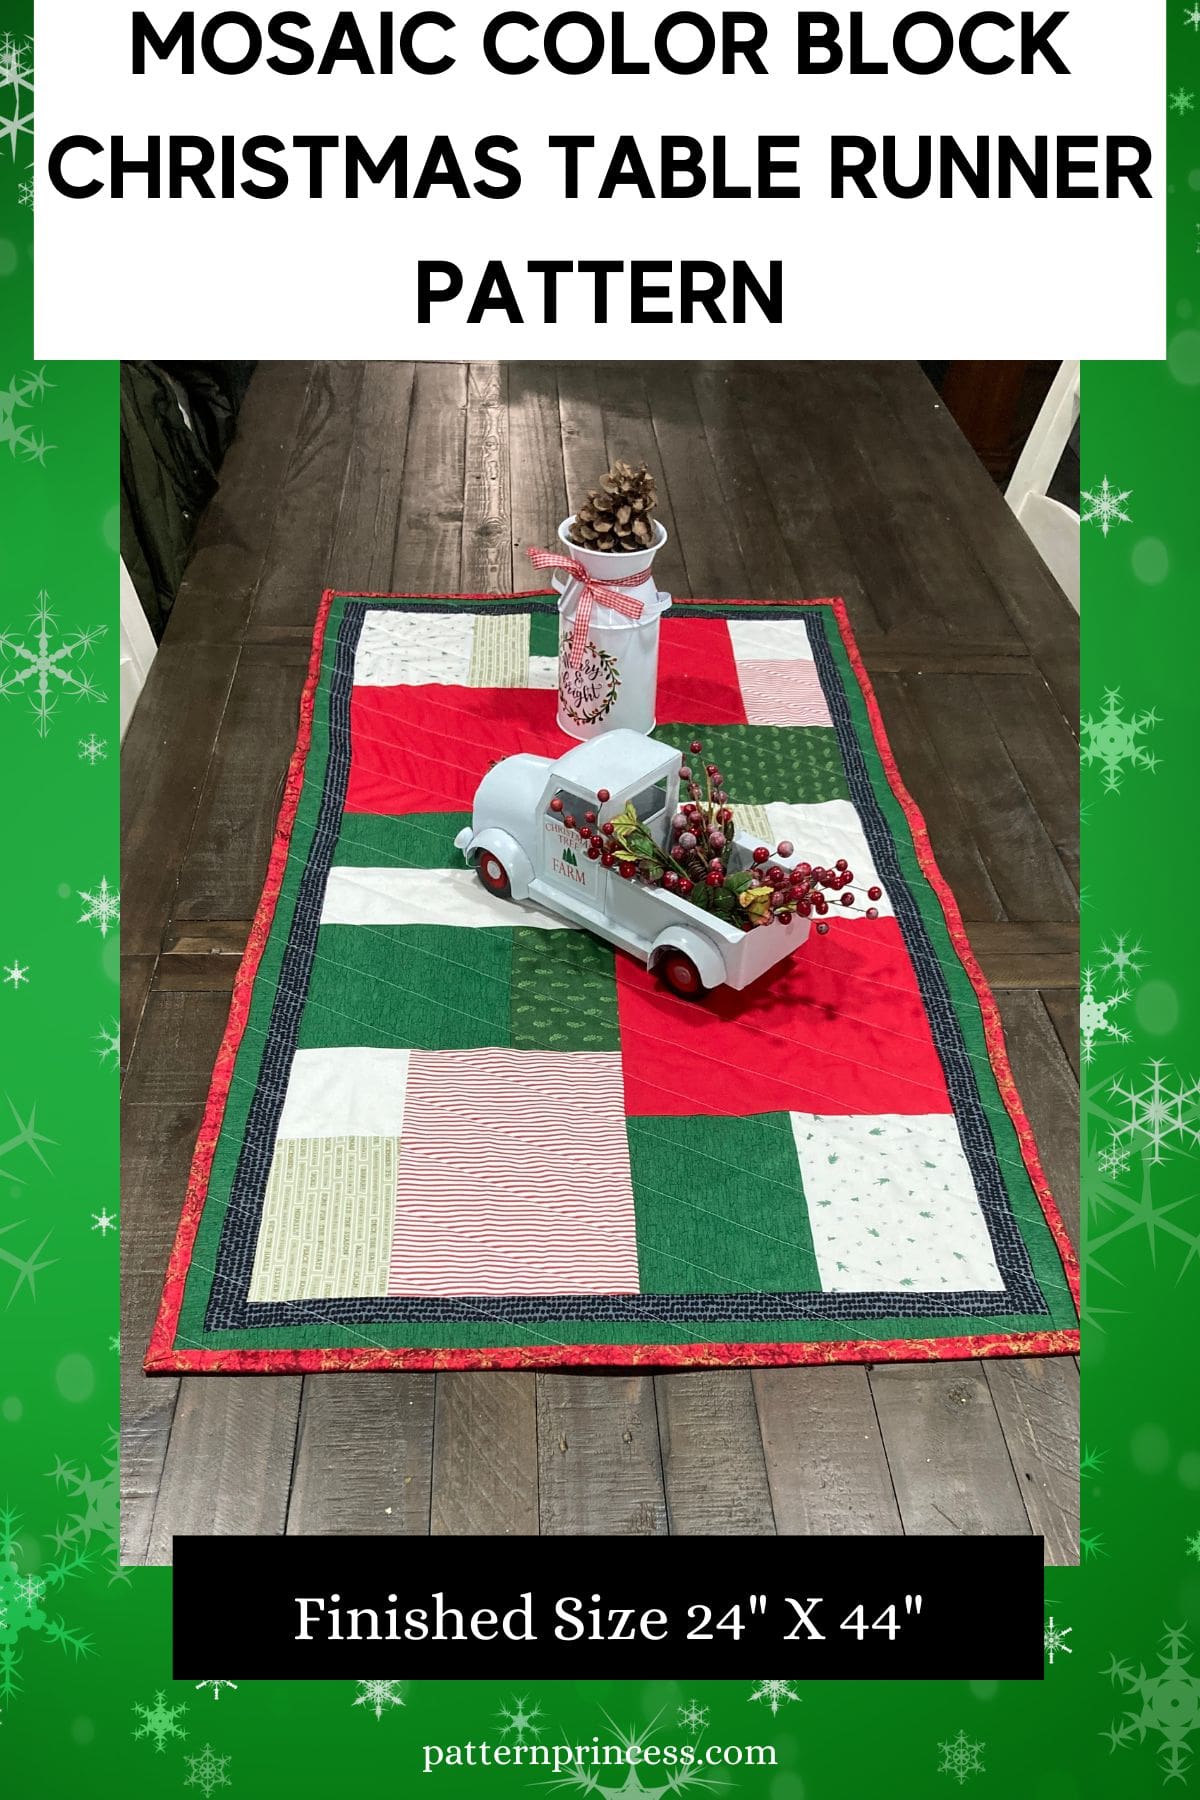
Unwrap the Magic: DIY Mosaic Color Block Christmas Table Runner Pattern. A festive, vibrant, and visually interesting centerpiece for your Holiday décor.
Tis the season to infuse your home with festive cheer and what better way to do so than with a touch of handmade holiday magic? Imagine a table adorned with a burst of colors, geometric patterns, and the spirit of Christmas woven into every stitch.
We’re thrilled to introduce our latest quilt pattern — the Mosaic Color Block Christmas Table Runner. This pattern uses fun Holiday fabric scraps. It’s a pattern that is really great for a beginner. There are no seams to match up. Just sew the squares and rectangles together, add two borders, quilt the layers together, and finish with a binding. An easy pattern to make in one weekend.
Post contains affiliate links, and we earn commissions if you shop through the links on this page. For more information, please read the disclosure section under the About Us page.
Why We Love this Table Runner Mini Quilt Pattern.
It is quite easy to make. Just join squares and rectangles together. Sew the larger block sections, then the two rows, and finally the two borders.
To make this easier to make, I chose my fabrics, then cut them out making sure to label each one with the size. Then I created six sections starting in the top left and just enjoyed the sewing time.
While this is made using Christmas color fabric, it is perfect for using any fabric colors or designs. Grab your favorite fabrics. This pattern is perfect for all your fabric scraps.
A very fun and easy sewing project.
Fabric Color Variety
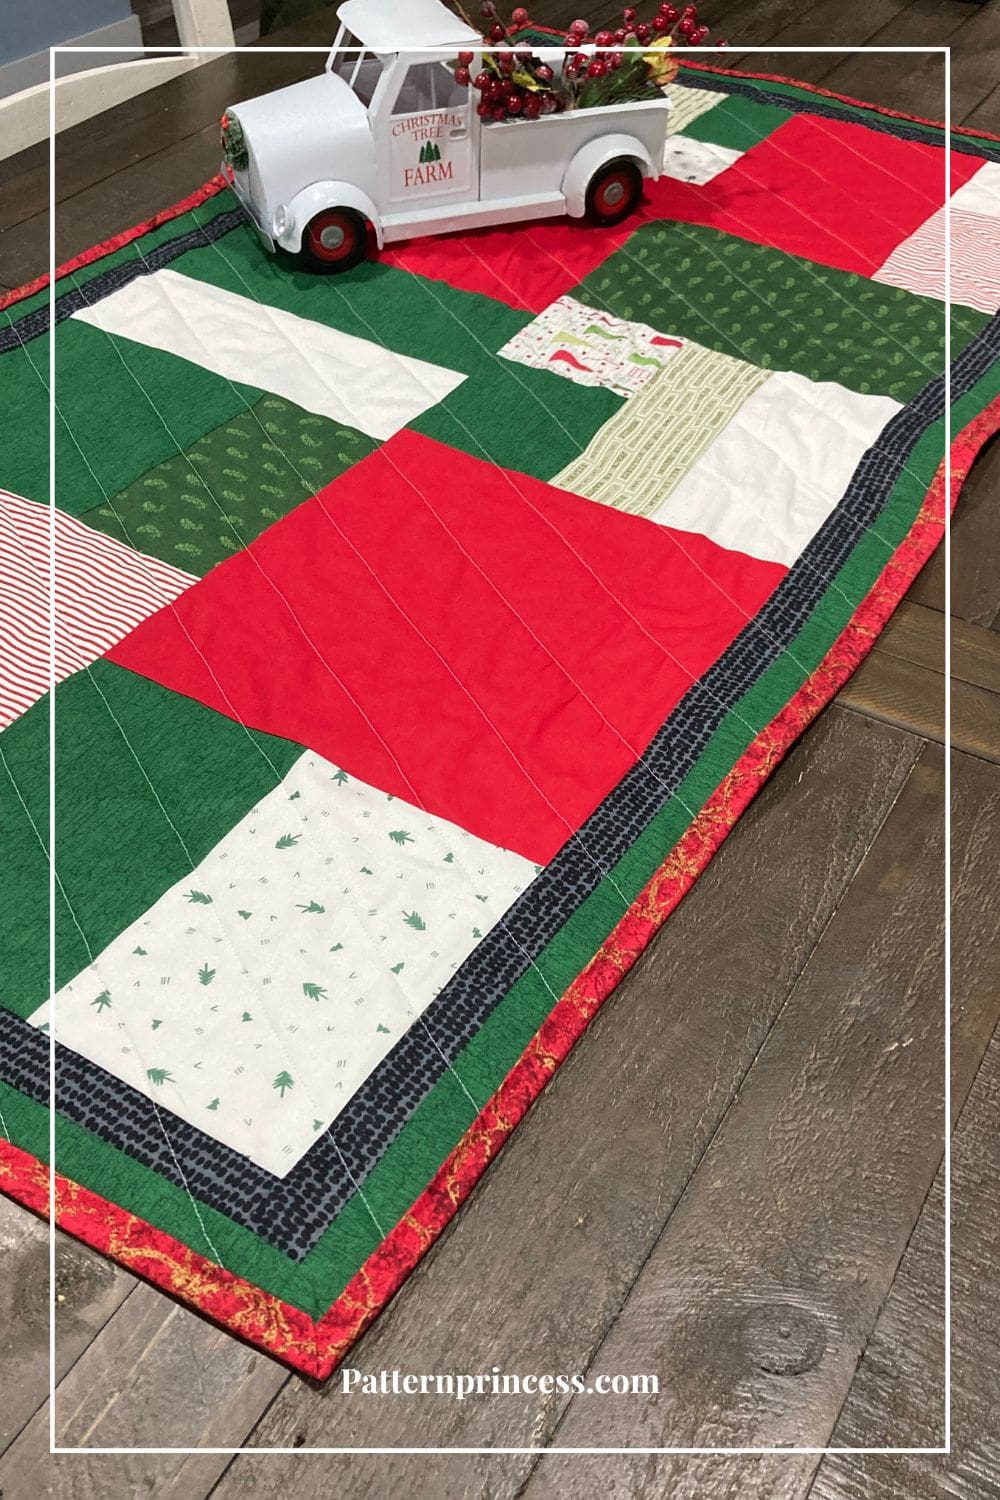
You can use a wide variety of Christmas colors, such as red, green, gold, silver, and white. These colors are arranged in blocks creating a visually appealing and festive look.
When choosing your fabric colors, there are a few things to keep in mind. A well-designed mosaic table runner achieves a balance between vibrant and more subdued colors to avoid overwhelming the visual senses. Contrast between colors and patterns could add depth and interest.
Size and Shape of the Table Runner
My daughter has a large farmhouse table that seats 8-10 people at once. Therefore, a larger table runner like this fits on her tablescape perfectly. However, if you have a smaller table, consider using just the top row or the bottom row of the pattern.
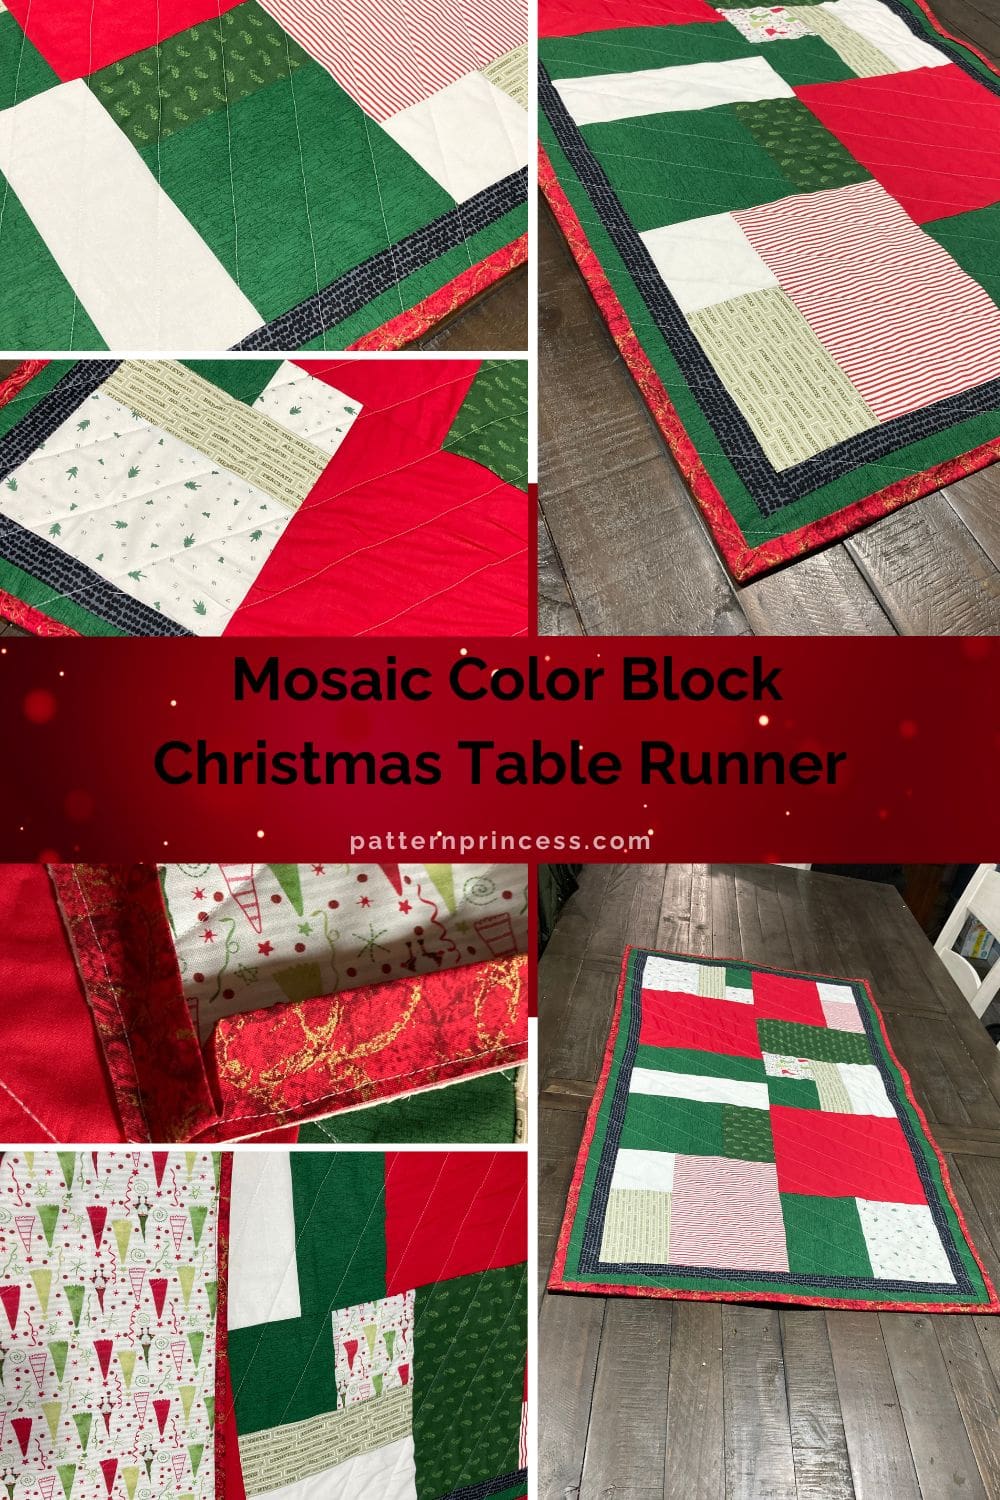
This quilting project is a lovely focal point for Holiday gatherings.
It might run along the center of the table, creating a focal point for holiday gatherings. Laying it over a sofa table, on an entertainment center, or other end table throughout the house is an easy way to create a Holiday theme. It enhances the festive atmosphere without clashing with other decorations.
Are table runners still trendy?
Yes, table runners have been a popular and versatile decor item for quite some time. They are used to add a decorative touch to dining tables, coffee tables, and other furniture.
However, the trends can vary regionally or based on individual preferences. Available in a diverse array of materials, colors, and styles. Spanning from traditional to contemporary, these versatile accents are frequently used to enhance and harmonize with the overall decor of a space. There are Some people may prefer a classic and timeless look, while others may gravitate toward more modern or eclectic styles.

Directions: Mosaic Color Block Christmas Table Runner Pattern
Quilting Skill Level
Easy, great for a beginner
Finished Table Runner Measurements
Finished size 24 X 44 inches finished.
Fabric Requirements
- Black Fabric for Border ¼ yard.
- Green Fabric for Squares and Border ¾ yard.
- Red Fabric for Squares and Binding ¾ yard.
- White or Red and White Fabric for Squares ¾ yard.
- Backing 27 X 47 inches
- Batting 27 X 47 inches
- Binding 2 ½ X 152 inches, ½ yard
Thread
Equipment and Tools
- Rotary Cutter
- Quilting Ruler
- Cutting Mat
- Rotating Cutting Mat
- Iron
- Ironing Board or Pressing Mat
- Pins
- Clips
- Sewing Machine
- Disappearing fabric marker
- My Favorite Quilting Supplies
Mosaic Color Block Christmas Table Runner Notes
Sew fabric with right sides together using ¼-inch seam allowance. Unless otherwise noted.
Pin or clip your pieces together for easy sewing.
The directions for this quilt are for rotary cutting, machine piecing, machine quilting, and machine sewing on the binding.
Trim any overhanging fabric as needed throughout project.
Begin by measuring, cutting the fabric pieces, and labeling with the size and number. I just use a scrap piece of paper, write the size on, and pin it to the fabric. It’s an easy way to stay organized and saves time when assembling.
Fabric Cutting Instructions
This table runner is made using 23 squares or rectangles in various sizes. Reminder, you can use varying shades of red, green, and white or printed fabric.
Find the size details for each block below.
Cut 1 of each size:
- 1 = 4 ½ X 4 inches, white fabric
- 2 = 6 ½ X 4 inches, red fabric
- 3 = 10 ½ X 7 inches, red fabric
- 4 = 6 ½ X 10 ½ inches, green fabric
- 5 = 8 X 4 inches, white fabric
- 6 = 8 X 3 inches, green fabric
- 7 = 4 X 4 ½ inches, red fabric
- 8 = 4 ½ X 4 ½ inches, green fabric
- 9 = 10 ½ X 10 ½ inches, red fabric
- 10 = 7 ½ X 5 ½ inches, white fabric
- 11 = 7 ½ X 5 ½ inches, green fabric
- 12 = 4 ½ X 3 inches, green fabric
- 13 = 3 ½ X 3 inches, white fabric
- 14 = 7 ½ X 3 inches, green fabric
- 15 = 7 ½ X 5 ½ inches, white fabric
- 16 = 10 ½ X 10 ½ inches, red fabric
- 17 = 4 X 10 ½ inches, green fabric
- 18 = 4 X 10 ½ inches, white fabric
- 19 = 7 X 4 inches, green fabric
- 20 = 7 X 7 inches, green fabric
- 21 = 4 ½ X 4 inches, white fabric
- 22 = 6 ½ X 4 inches, green fabric
- 23 = 10 ½ X 7 inches, red fabric
Here are the block details by fabric color:
Red
- 2 = 6 ½ X 4 inches, red fabric
- 3 = 10 ½ X 7 inches, red fabric
- 7 = 4 X 4 ½ inches, red fabric
- 9 = 10 ½ X 10 ½ inches, red fabric
- 16 = 10 ½ X 10 ½ inches, red fabric
- 23 = 10 ½ X 7 inches, red fabric
Green
- 4 = 6 ½ X 10 ½ inches, green fabric
- 6 = 8 X 3 inches, green fabric
- 8 = 4 ½ X 4 ½ inches, green fabric
- 11 = 7 ½ X 5 ½ inches, green fabric
- 12 = 4 ½ X 3 inches, green fabric
- 14 = 7 ½ X 3 inches, green fabric
- 17 = 4 X 10 ½ inches, green fabric
- 19 = 7 X 4 inches, green fabric
- 20 = 7 X 7 inches, green fabric
- 22 = 6 ½ X 4 inches, green fabric
White
- 1 = 4 ½ X 4 inches, white fabric
- 5 = 8 X 4 inches, white fabric
- 10 = 7 ½ X 5 ½ inches, white fabric
- 13 = 3 ½ X 3 inches, white fabric
- 15 = 7 ½ X 5 ½ inches, white fabric
- 18 = 4 X 10 ½ inches, white fabric
- 21 = 4 ½ X 4 inches, white fabric
Border 1 Black Fabric
- Cut (2) 1 1/2” X 20 1/2” strip for the sides.
- Cut (2) 1 1/2” X 42 1/2” strip for the top and bottom.
Border 2 Green Fabric
- Cut (2) 1 1/2” X 22 1/2” strip for the sides.
- Cut (2) 1 1/2” X 44 1/2” strip for the top and bottom.
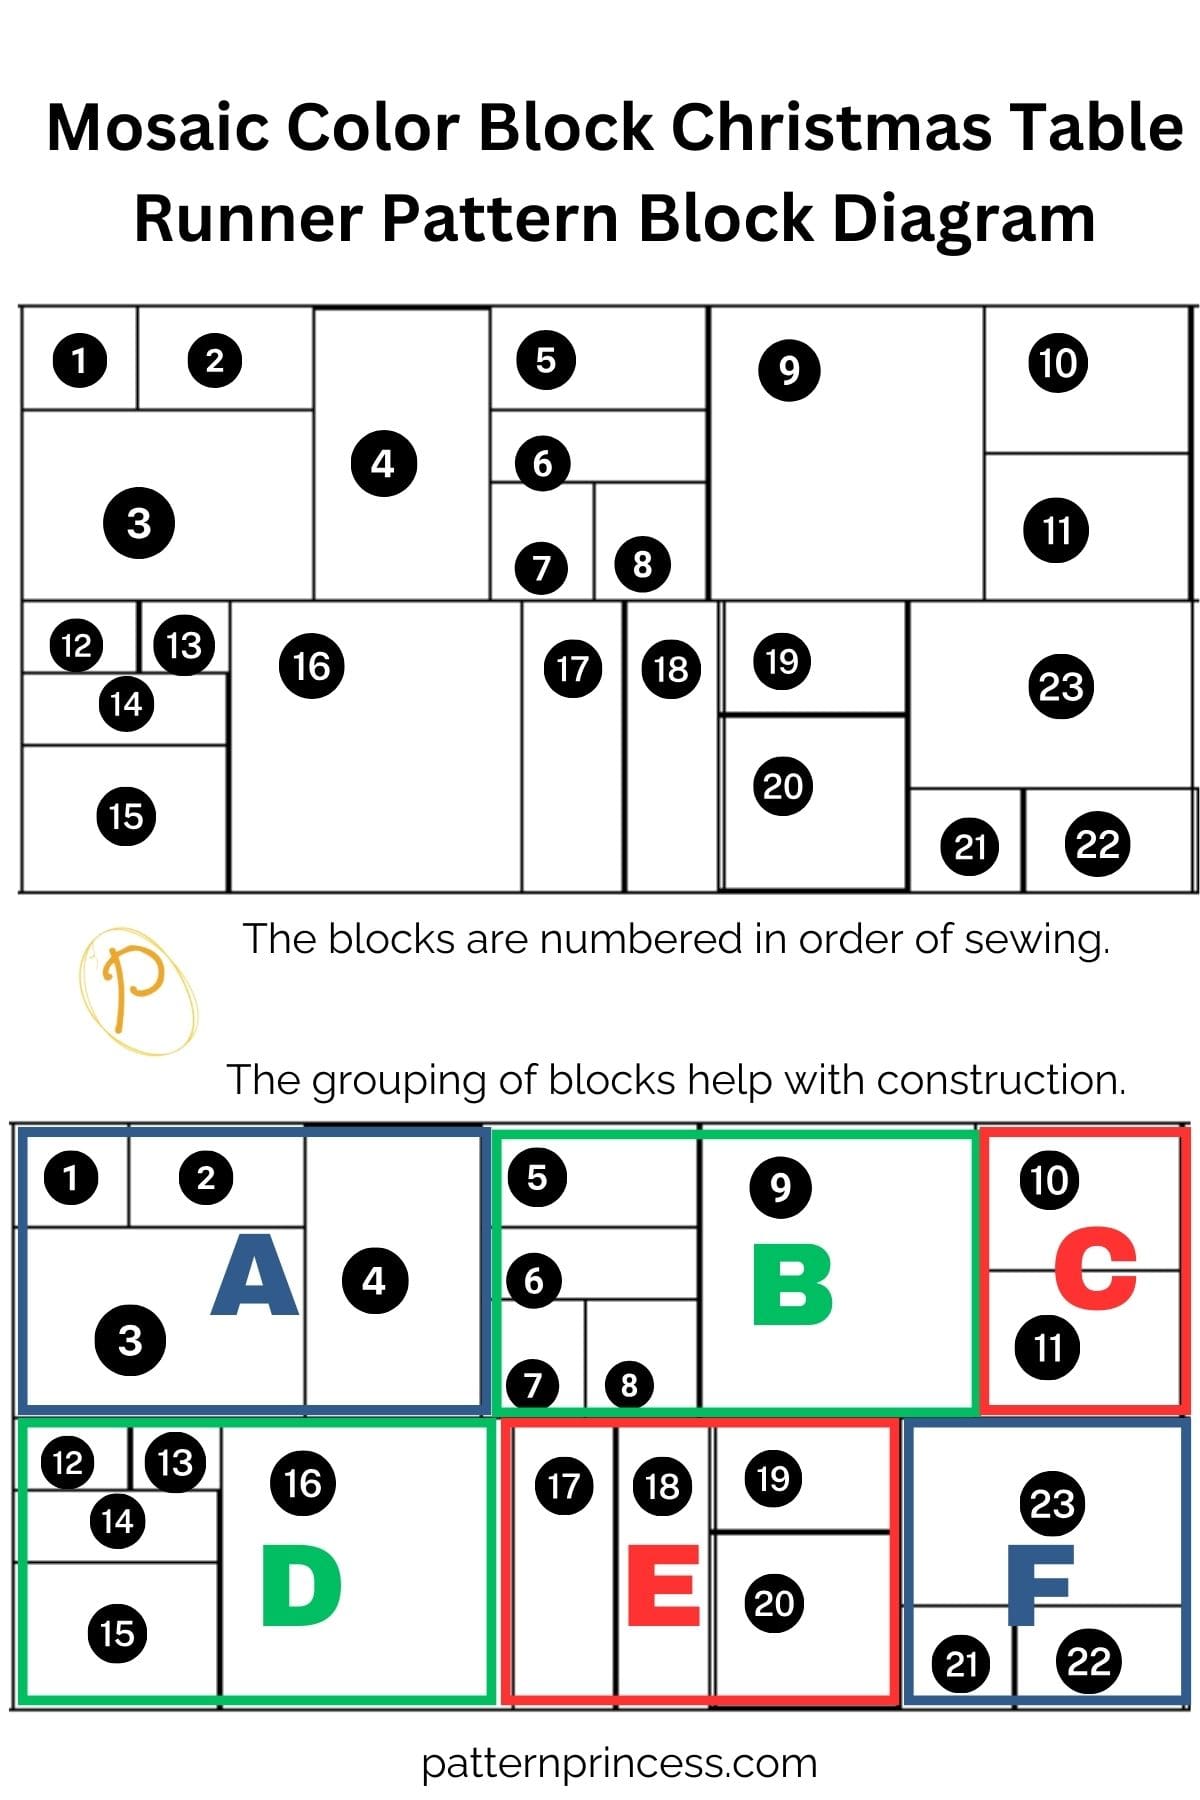
Diagram for assembling
The following diagram shows the placement of the squares and rectangles from 1-23. There are two rows. The next diagram shows the six sections used when joining the shapes, A-F.
Let’s Begin with Assembling the Six Sections
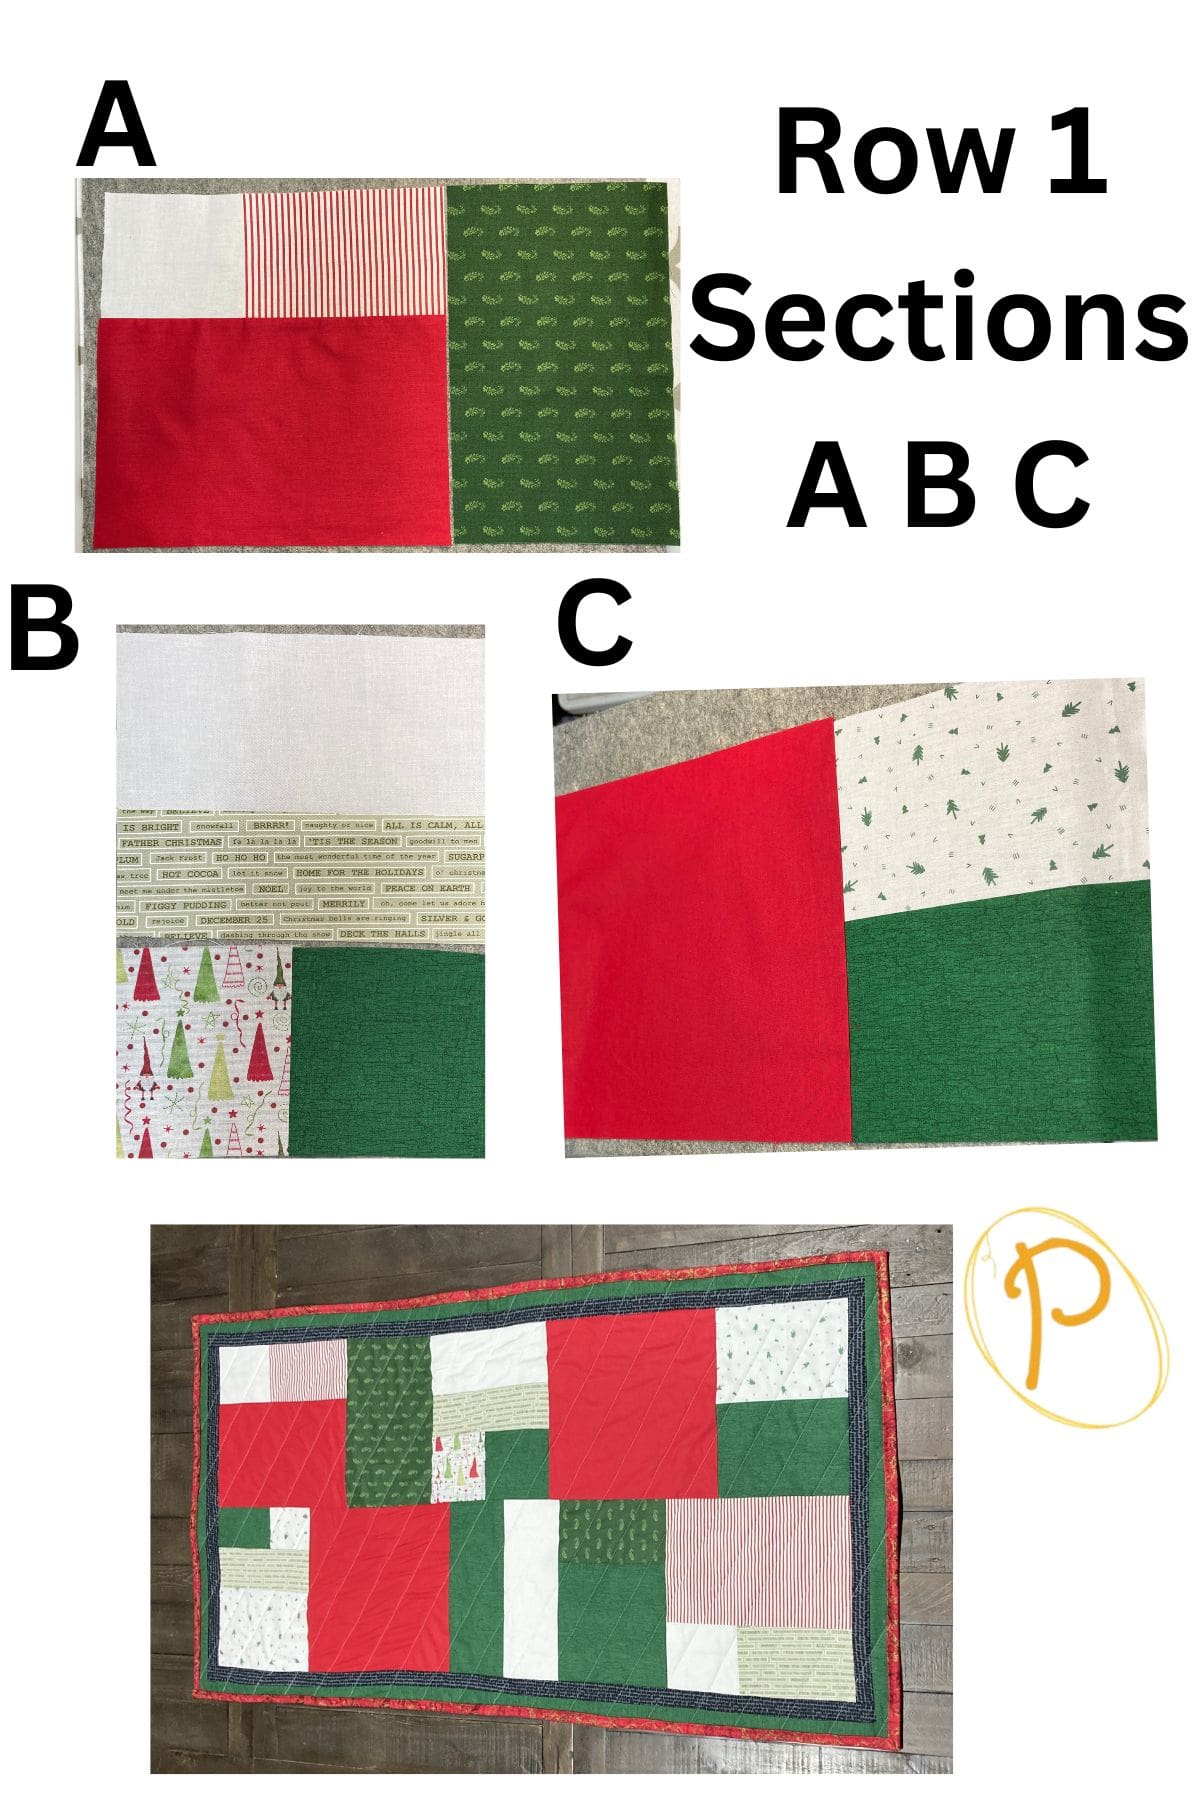
Section A
For section A, use the following pieces. Refer to the diagram to help with the assembly.
- 1 = 4 ½ X 4 inches, white fabric
- 2 = 6 ½ X 4 inches, red fabric
- 3 = 10 ½ X 7 inches, red fabric
- 4 = 6 ½ X 10 ½ inches, green fabric
Using pieces 1 and 2, join on the 4 inch sides with the right sides together using ¼ inch seam allowance. Press seams to the darker fabric.
Next join piece 3 to the bottom of the sections just sewed together. The white fabric on the left and the red fabric on the right, with piece 3 on the bottom. Refer the diagram. Press seam toward piece 3.
Finally, join the green piece 4 to the right side of the three sections just sewn. Press the seam to the green fabric.
Set this section aside and begin working on the next section.
Section B
For section B, use the following pieces. Refer to the diagram to help with the assembly.
- 5 = 8 X 4 inches, white fabric
- 6 = 8 X 3 inches, green fabric
- 7 = 4 X 4 ½ inches, red fabric
- 8 = 4 ½ X 4 ½ inches, green fabric
- 9 = 10 ½ X 10 ½ inches, red fabric
Beginning with rectangles 5 and 6, sew them together on the 8 inch side. Right sides together using the ¼ inch seam allowance. Press the seam to the green fabric. Set this aside.
Next, join pieces 7 and 8 on the 4 ½ inch side. Press the seam to the darker fabric.
Now place the first rectangle 5 and 6 pieces on top, and the rectangle with pieces 7 and 8 on the bottom with the green fabric on the right. Refer to the diagram. Sew together and press the seam to the green fabric.
Finally, sew the large square, piece 9 to the right side. Press the seam to the larger square.
Joining Section, A and B
Place section A on the left and B on the right as shown on the diagram. Sew using a ¼ inch seam allowance with right sides together.
Section C
For section C, use the following pieces. Refer to the diagram to help with the assembly.
- 10 = 7 ½ X 5 ½ inches, white fabric
- 11 = 7 ½ X 5 ½ inches, green fabric
Sew pieces 10 and 11 together on the 7 ½ inch side. Press the seam to the green fabric.
Finish the row by joining section C to the right side of Section B.
Set this row aside.
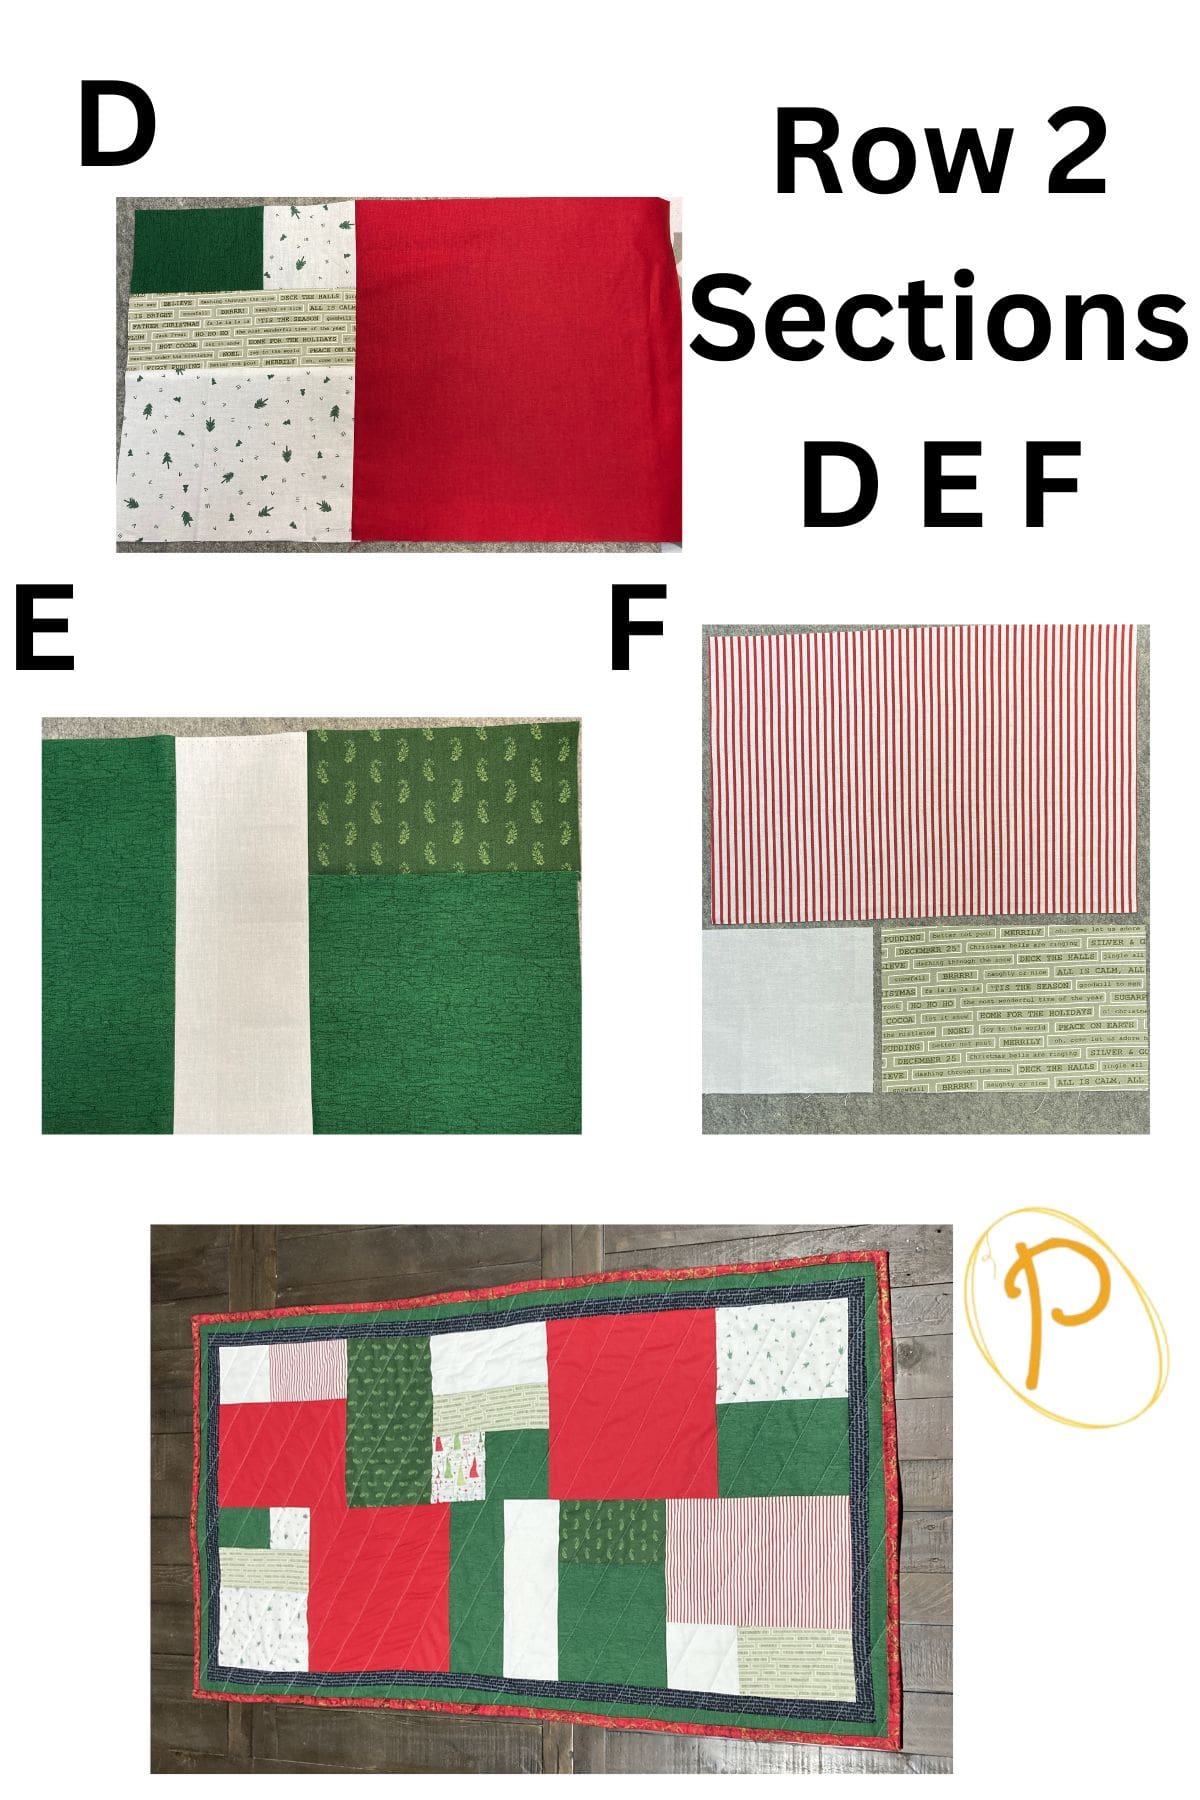
Begin Row 2 with Section D
For section D, use the following pieces. Refer to the diagram to help with the assembly.
- 12 = 4 ½ X 3 inches, green fabric
- 13 = 3 ½ X 3 inches, white fabric
- 14 = 7 ½ X 3 inches, green fabric
- 15 = 7 ½ X 5 ½ inches, white fabric
- 16 = 10 ½ X 10 ½ inches, red fabric
Begin by joining pieces 12 and 13 together on the 3 inch sides. Press the seam to the green fabric.
Add piece 14 to the 12 and 13 piece section with the white fabric to the top right side, as shown in the diagram. Press the seam to the green fabric.
Add the white piece 15 to the bottom of the green piece 14 pressing the seam to the green fabric.
Finally, sew the red piece 16 to the right side and press the seam to the red fabric.
Set this section aside and begin working on the next section.
Section E
For section E, use the following pieces. Refer to the diagram to help with the assembly.
- 17 = 4 X 10 ½ inches, green fabric
- 18 = 4 X 10 ½ inches, white fabric
- 19 = 7 X 4 inches, green fabric
- 20 = 7 X 7 inches, green fabric
Join rectangular pieces 17 and 18 on the 10 ½ inch sides. Press the seam to the green side. Set this aside.
Next, join pieces 19 and 20 along the 7 inch sides and press the seam to one side.
Finally, layout the two sections with the green fabric piece 17 on the left and white fabric piece 18 to the right. The other section of green fabrics 19 and 20 on the right side. Join this section to the white fabric. Press the seam to the green fabric.
Now join sections D and E together by the red fabric piece 16 and green fabric piece 17. Press the seam to the green fabric.
Set this aside and begin working on the last section.
Section F
For section F, use the following pieces. Refer to the diagram to help with the assembly.
- 21 = 4 ½ X 4 inches, white fabric
- 22 = 6 ½ X 4 inches, green fabric
- 23 = 10 ½ X 7 inches, red fabric
Sew pieces 21 and 22 together on the 4 inch side. Press the seam to the green fabric. Add the red piece 23 laying out as shown on the diagram with the white fabric on the bottom left and the green fabric on the bottom right. Press the seam to the red fabric.
Finish up the center of the table runner by joining section F to section E.
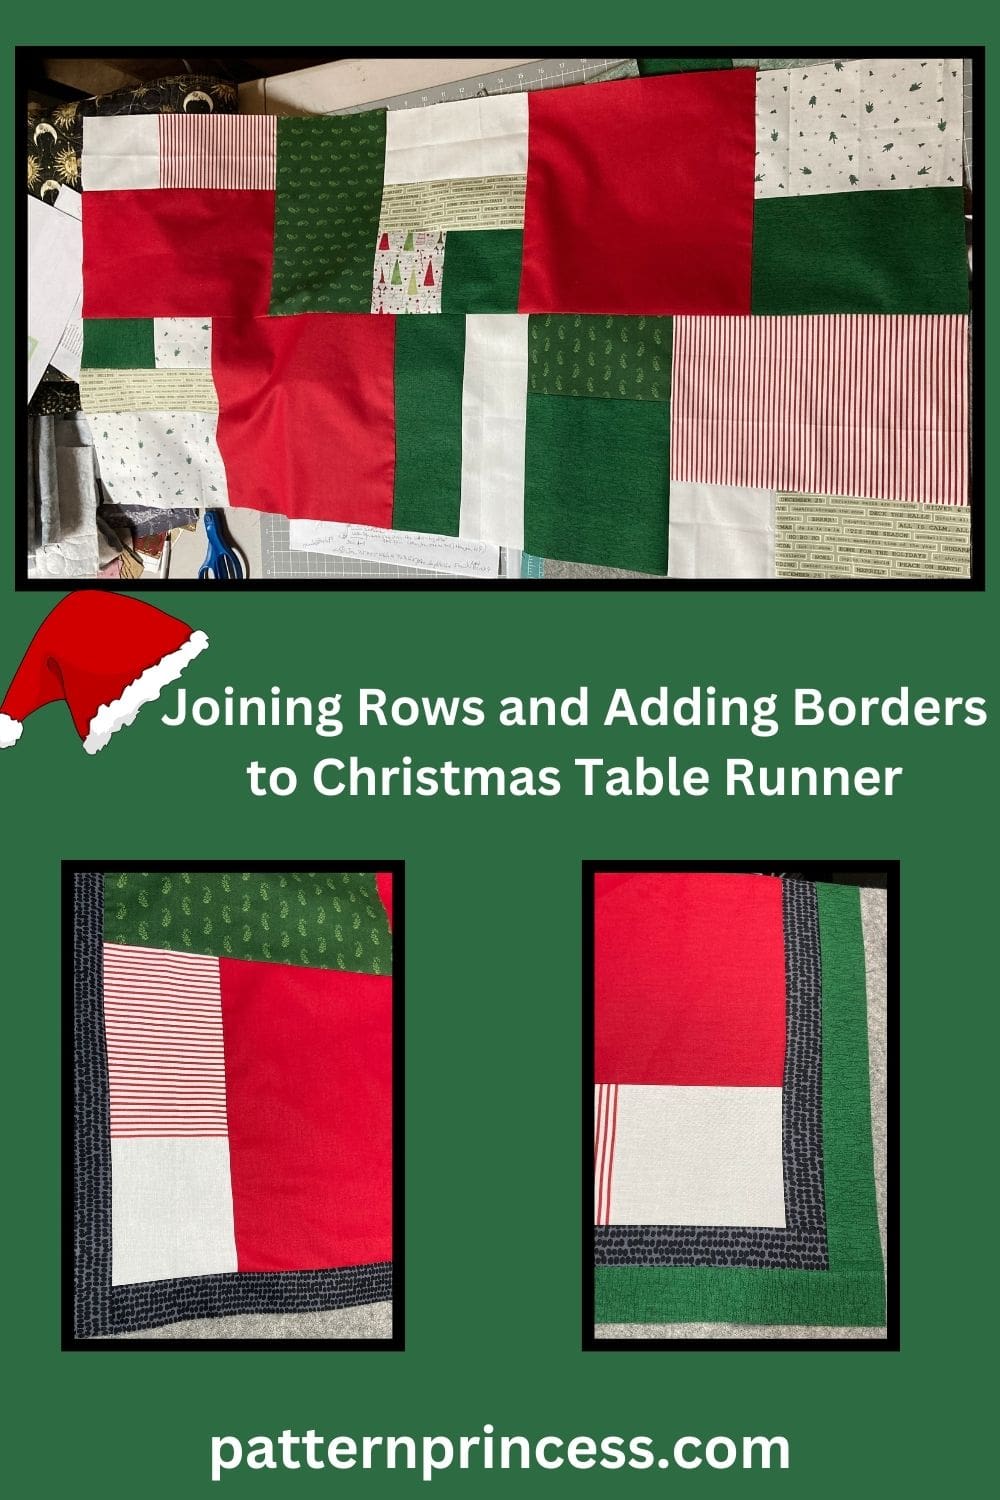
Join Rows 1 and 2 Together
Pin rows 1 and 2 together with right sides facing. Sew together using ¼ inch seam allowance. Press the seam to one side or open.
Adding the Borders
Border 1 Black Fabric
This border uses the following pieces:
Cut (2) 1 1/2” X 20 1/2” strip for the sides.
Cut (2) 1 1/2” X 42 1/2” strip for the top and bottom.
Sew the 1 1/2” X 20 1/2” strip to the sides of the mosaic squares and rectangles unit. Press the seams toward the strip.
Next, using the 1 1/2” X 42 1/2” strip, sew it on the top and bottom of the mosaic unit. Press the seams toward the strip.
Border 2 Green Fabric
This border uses the following pieces:
Cut (2) 1 1/2” X 22 1/2” strip for the sides.
Cut (2) 1 1/2” X 44 1/2” strip for the top and bottom.
Sew the 1 1/2” X 22 1/2” strip to the sides of the table. Press the seams toward the strip.
Lastly, using the 1 1/2” X 44 1/2” strip, sew it on the top and bottom of the table runner. Press the seams toward the strip.
Finishing the Mosaic Color Block Christmas Table Runner Quilt
It’s time to make the quilt sandwich with the backing, batting, and the mini quilt top. For this you will be using the following fabric pieces.
- The quilt top you just finished creating.
- Backing Fabric 1 ½ yard or a 27” X 47” rectangle
- Batting Fabric 27” X 47” rectangle
The backing fabric and batting should be a few inches larger all the way around than the quilt top. This helps to make sure that if there is any slippage of the top of the table runner that there is still enough backing to cover it.
Lay the backing fabric on a flat solid surface with the right side down and facing out. Smooth out any wrinkles. Use painters’ tape or masking tape to secure the edges of the fabric. This will help hold it in place and reduce the chance of a wrinkle developing as you place the next two layers.
Next, center the batting on top of the backing fabric smoothing out any wrinkles.
Finally, place the table runner top on the batting, centering it with the right side up. Smooth out any wrinkles.
Pinning the Layers Together
Once you have the top fabric all smoothed out, baste all three layers together using large safety pins. Use a good quality 1 ½” stainless steel pin for this.
Put a pin in each corner and around the entire quilt, about every 5-6 inches or so, through all three layers.
This holds things in place, so they don’t move around while you are sewing the layers together using a quilting design of your choice.
Alternatively, you could use fabric spray glue to baste the layers together rather than pinning.
Sew the layers together in your desired pattern. I sewed angled lines every 2” inches. To make things easier, I marked the sewing lines with a fabric marker that disappears with the heat of the iron. Pro Tip. I made the mistake of starting on one end and working to the middle, then turning it, and sewing from the other end and sewing lines to the middle. When sewing the last two lines, it was difficult to not have any puckering of the fabric. Therefore, start in the middle and work to the end. Lesson learned.
Trim the Batting and Backing Fabric Before Binding the Edges
The next step is trimming away the excess backing and batting. Then adding binding on the edges.
To trim the backing and batting, I use a large cutting mat, a longer ruler, and a rotary cutter. Lay the table runner quilt flat. Place the ruler along the edge of the quilt and use it as a guide to run your rotary cutter against it to trim the batting and backing fabric to the size of the top fabric. Do this on all four sides.
Binding the Edges
It’s now time for the binding. You will need a 2 ½” X 152” strip. I used red fabric that I cut into 4, 2 ½” strips the width of fabric. Join the strips together, fold in half with the wrong sides together and iron. If you are newer to quilting, we have a tutorial on how to make your own binding.
Once the strips are sewn together, fold in half lengthwise with wrong sides together and press.
Pin the raw edge of the binding onto raw edge of the quilt top. I generally start in the middle of a side leaving approximately a 3” tail hanging.
Note: This hanging part will be used to sew to the other end of the binding strip when you have finished sewing all four sides of the binding onto the quilt.
Sew the binding onto all four sides of the easy quilt making sure to miter the corners and join the binding.
I use a walking foot for this as it helps all the layers slide under the sewing foot without the fabric bunching.
Fold the binding over the edge and use clips to hold in place. Sew along the edge to secure the binding. Alternatively, you can hand sew the binding onto the back of the table runner.
Once all the sides and corners are stitched, you are done.
We hope you loved making your own mosaic color block Christmas table runner.
Here are a few other free quilt patterns for you to make.

You can find Victoria crocheting, quilting, and creating recipes. She has cooked in restaurants for over 20 years, including many larger parties. She learned to crochet when she was just 11 years old and has been crocheting ever since; over 50 years now. Over 40 years ago, she loved her first class in sewing and continues to hone her skills in quilting. Many have enjoyed the handmade gifts over the years. In her professional career, she has worked in management in a wide variety of businesses including higher education as a dean of a division. All the while attending college part-time to achieve her doctorate in higher education with an emphasis in e-learning.