Last updated on July 4th, 2024 at 11:18 pm
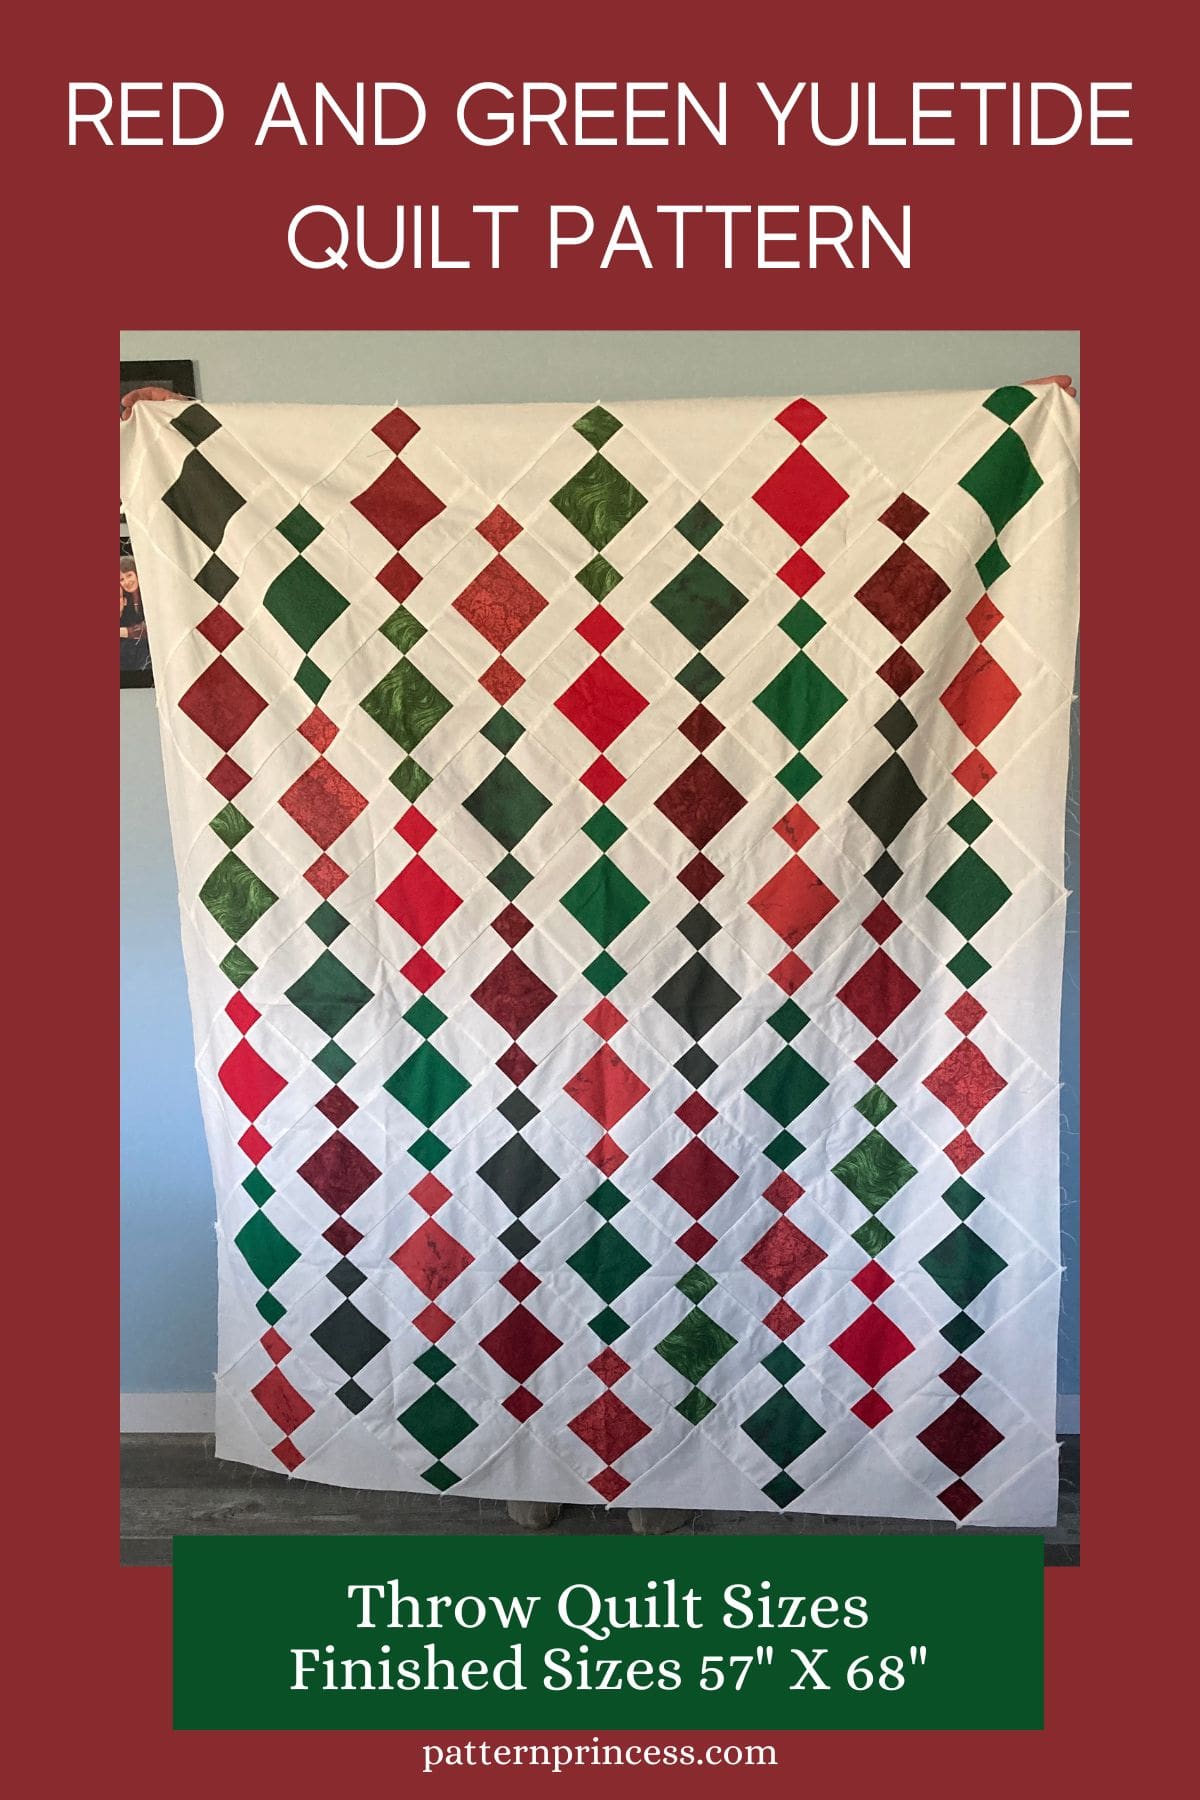
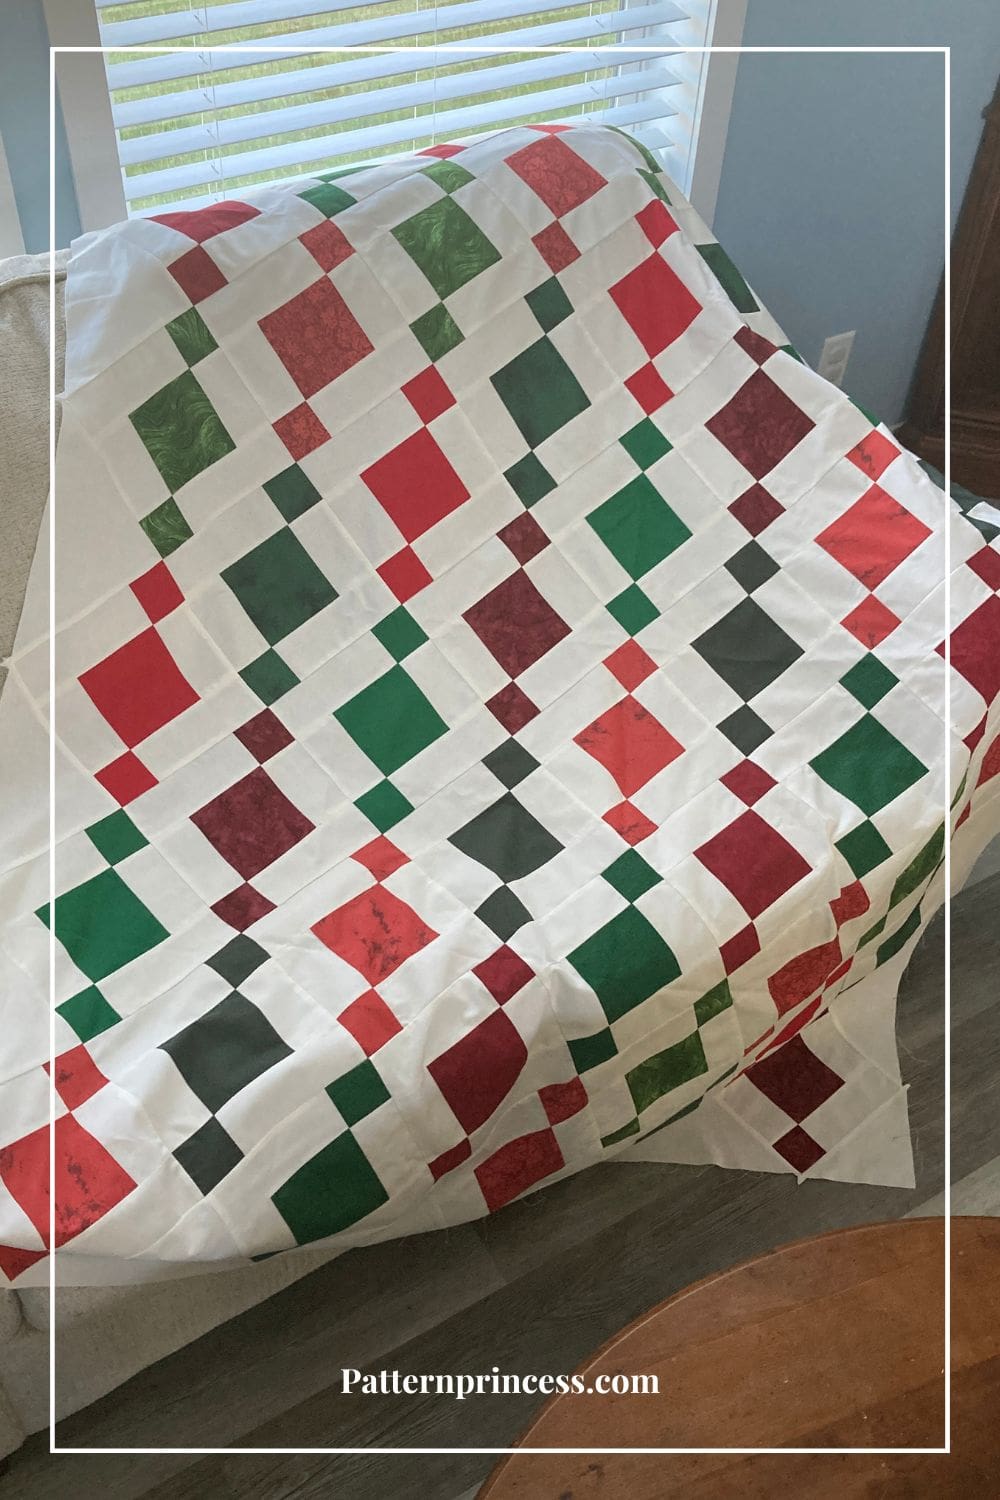
I’m excited to introduce my latest creation: the Red and Green Yuletide Quilt Pattern. This pattern is inspired by the classic chandelier quilt also known as the bead quilt design.
It brings together ten vibrant shades of reds and greens to create a stunning, eye-catching piece that’s perfect for Christmas.
For years, every time I saw a chandelier quilt, I fell in love with it. Each one was so stunning. I was determined that one day I would make one too.
As the festive season approaches, there’s no better way to add a touch of festive charm to your home than with a beautiful Holiday quilt.
Quilt size: 57 X 68 Inches.
Scrappy Quilt
This quilt is perfect to use up your stash or fabric scraps to add variety and interest to your quilt. I didn’t have any Christmas fabric, but I had some fat quarters just waiting for a sewing project.
I used 10 fat quarters: 5 different shades of red prints and 5 different shades of green fabrics. Additionally, I had a new package of jelly roll strips that worked perfectly for the rectangles around each block. It was so easy to work with the fat quarters and strips that I had all my pieces cut out and ready to sew together in less than two hours.
This was so much fun to sew a Christmas theme blanket. I can’t wait to use this during the Festive Holiday Season to help create a mood of Holiday Cheer.
Chandelier Quilt Block or String of Beads Quilt Block
The Chandelier quilt is a delightful pattern that combines simplicity with modern design elements. It features cascading diamonds set at a 45° angle normally on a light-colored background. However, I have seen versions with a black background and bright colored squares for the quilt blocks set on point. The entire quilt top is made using one type of quilt block
Normally, a chandelier quilt block is made using a 5-inch center square. Full disclaimer, I found this out after I made this quilt top. There was a post on Pinterest showing a chandelier quilt and that blog post showed the bandelier quilt block using a 4 ½ X 4 ½ inch center square. So, that is what I did for this quilt.
Once I found out how easy this quilt is to make, I was inspired to make another. When I did an online search, I found this YouTube video from Jenny Doan of Missouri Star where she made a lovely “Chandelier” quilt. She used charm packs. Which I thought was brilliant.
Upon further research, I also found that the Chandelier Quilt is also known as the String of Beads Quilt. Another great video is the Donna Jordan’s Beads Quilt.
Therefore, my next Chandelier quilt will be using charm packs.
However, this smaller quilt block works nicely for a Holiday table runner that I am working on. Now that you know a bit about why I ended up making this size quilt block, let’s get to this lovely pattern.
This pattern is part of the 2024 Christmas in July Make Along.
A whole month full of free patterns to kick start the handmade holiday season. The make along includes crochet, knitting, and sewing projects.
Directions: Red and Green Yuletide Quilt Pattern
Quilting Skill Level
Easy – Confident Beginner
Finished Quilt Measurements
57 X 68 Inch Throw Quilt
This quilt uses 50, 8-inch finished quilt blocks.
Fabric Requirements
For the quilt top you will need:
10 fat quarters this can be all the same color, or each one can be a different color and print.
I had quite a few fat quarters (FQ) of fabric to use up. To give this quilt a fun and scrappy look, I used 5 FQ in different shades of green and 5 FQ in different shades of red.
3 ½ yards of background fabric in a neutral color. I used part of a jelly roll in Kona Snow along with 1 ¾ yards of matching Kona Snow fabric. The jelly roll strips worked nicely for making the blocks, while the fabric worked well for the corner triangles and triangles on each side of the diagonal rows.
Backing Fabric
61 X 72 inches. The backing fabric will be slightly larger than the quilt top. This will be trimmed after quilting.
Batting
61 X 72 inches. 2 yards of 108” or 4 yards of 44” pieced.
Binding
2 ½ X 262 inches. ¾ yard cut into 7 – 2 ½ inch strips and pieced together.
Pattern Notes
Choose any contrasting or complimenting colors of fabric. However, this pattern works nicely with a solid light-colored background. I have seen this quilt with a dark colored background and lighter squares, which looks nice too.
All sewing in this tutorial uses ¼” seam allowance.
All fabric is sewn right sides together unless otherwise noted.
The directions for this quilt are for rotary cutting, machine piecing, and machine quilting. For the binding, I often use the sewing machine to sew it on the top, fold the folded edge to the back and hand sew onto the back. However, if desired, you can use your sewing machine for the binding to the front and back as well.
Accurate cutting and sewing enhances your final product. Pin your pieces together before sewing them to ensure proper seam alignment. Nest your seams.
Materials and Equipment/Tools
- Thread
- Rotary Cutter
- Quilting Ruler
- Cutting Mat
- Rotating Cutting Mat
- Iron
- Ironing Board or Pressing Mat
- Pins
- Clips
- Sewing Machine
Get Your Ad Free Printable PDF Pattern in our Etsy Shop
Fabric Cutting Instructions
This pattern uses 50, 8-inch finished quilt blocks.
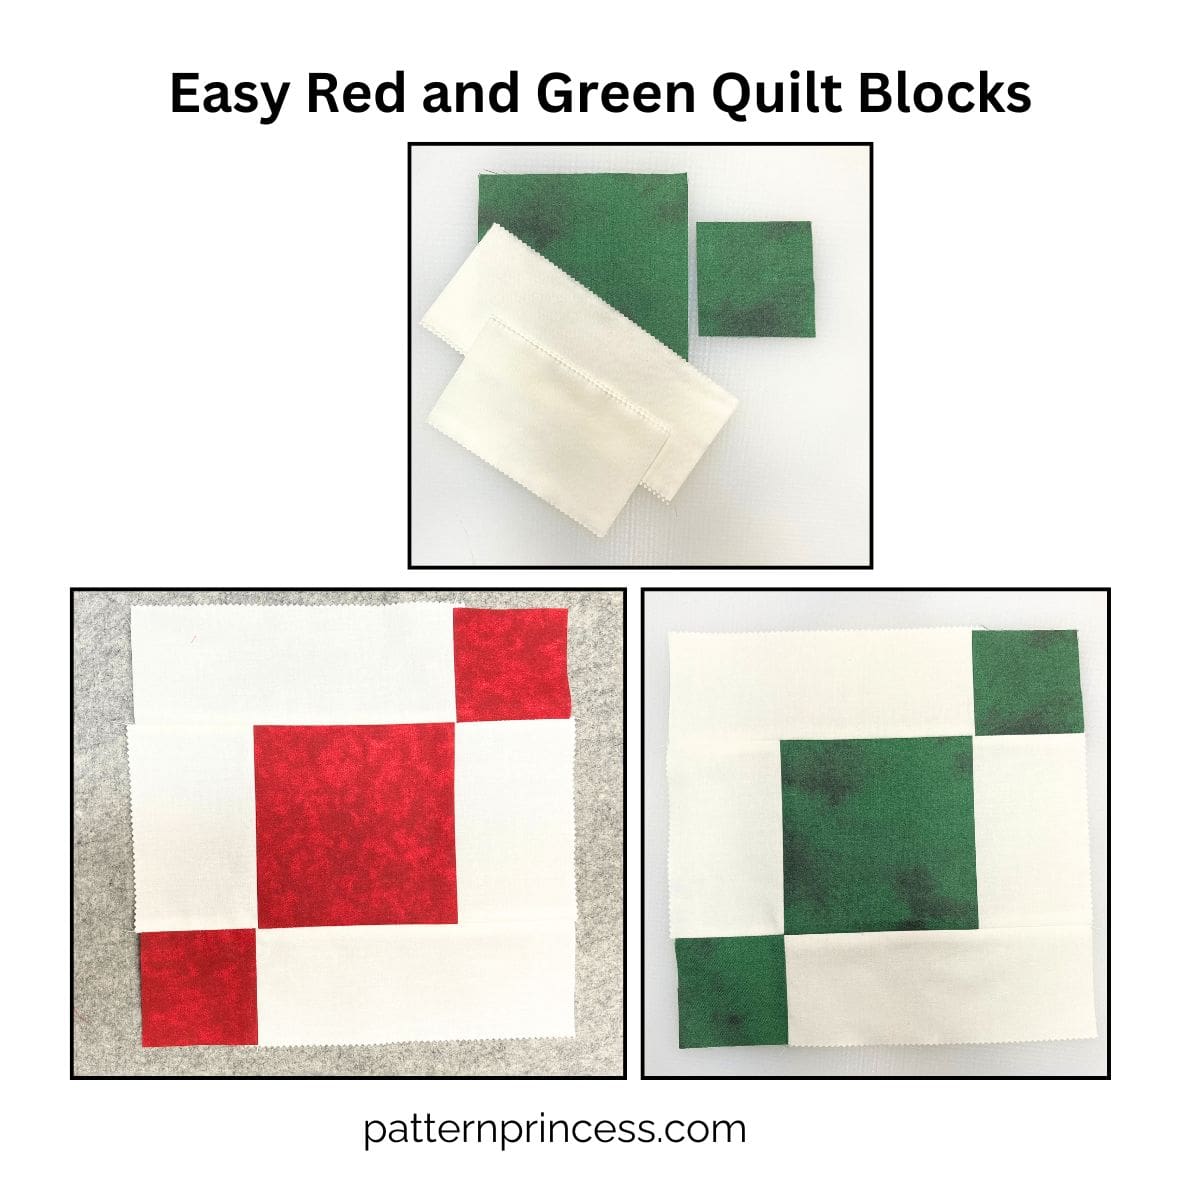
For each chandelier block you will need
- A = 1, 4 ½ X 4 ½ inch unit of colored fabric
- B = 2, 2 ½ X 2 ½ inch units of the same-colored fabric used in unit A.
- C = 2, 2 ½ X 4 ½ inch units in a light background color
- D = 2, 2 ½ X 6 ½ inch units in a light background color
This quilt consists of 50, 8 X 8 inch finished, 8 ½ X 8 ½ inch unfinished quilt blocks.
Cutting Instructions for 50 Chandelier blocks
- 50, 4 ½ X 4 ½ inch units
- 100, 2 ½ X 2 ½ inch units
- 100, 2 ½ X 4 ½ inch units in a background color
- 100, 2 ½ X 6 ½ inch units in a background color
If using the 10 FQ fabric, cut the set of units below for each FQ.
- A = 5, 4 ½ X 4 ½ units
- B = 10, 2 ½ X 2 ½ units
- C = 10, 2 ½ X 4 ½ inch units in a background color
- D = 10, 2 ½ X 6 ½ inch units in a background color
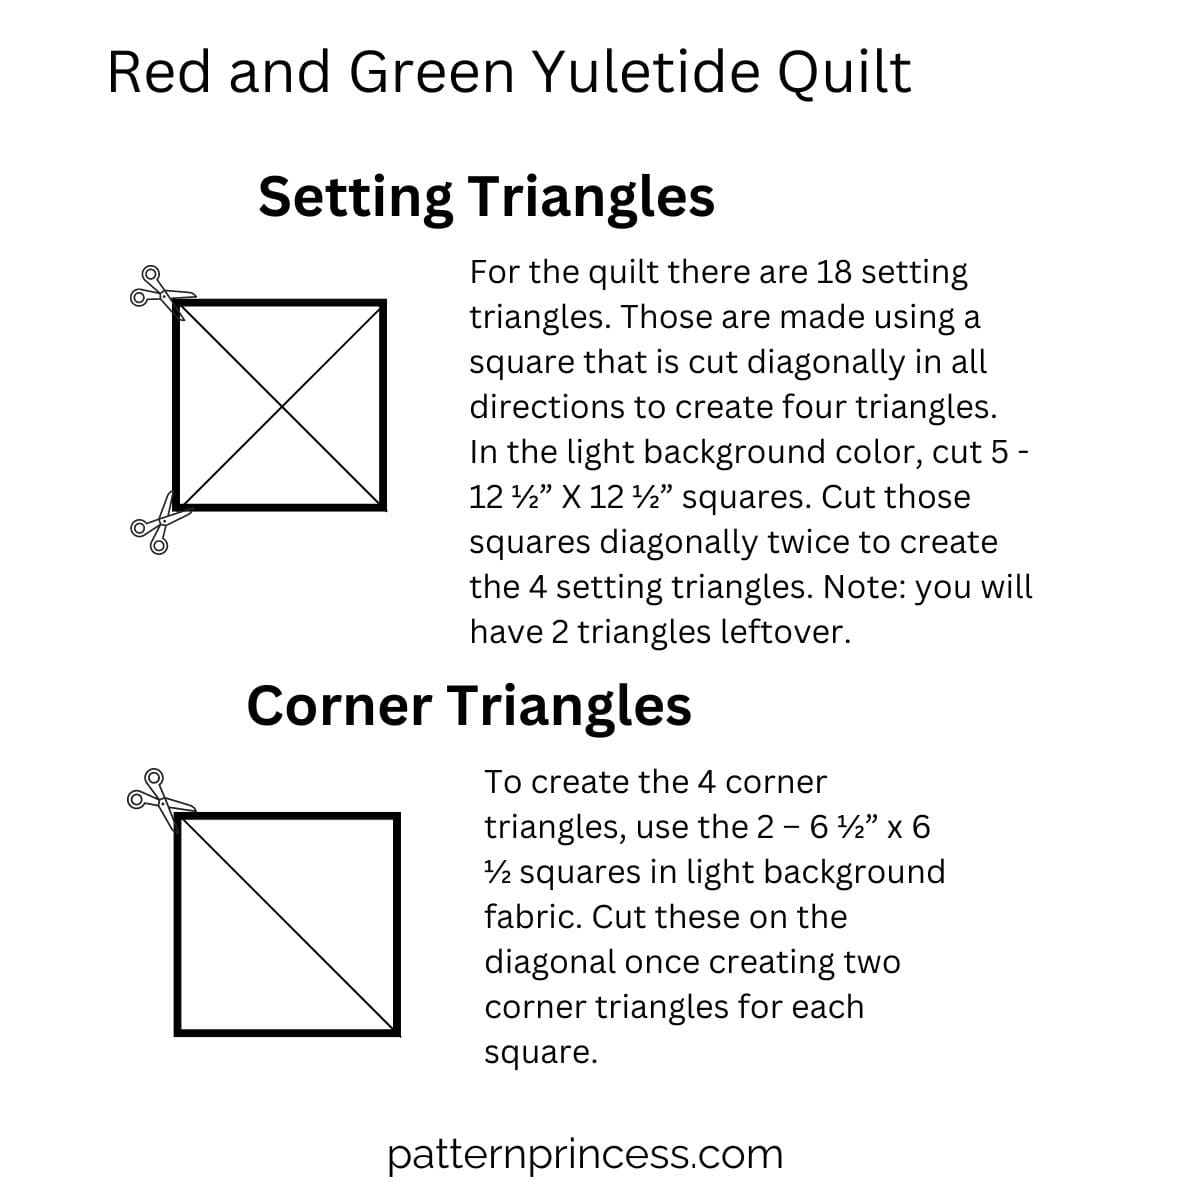
Setting Triangles
For the quilt there are 18 setting triangles. Those are made using a square that is cut diagonally in all directions to create four triangles.
In the light background color, cut 5 – 12 ½” X 12 ½” squares. Cut those squares diagonally twice to create the 4 setting triangles. Note: you will have 2 triangles leftover.
Corner Triangles
To create the 4 corner triangles, use the 2 – 6 ½” x 6 ½ squares in light background fabric. Cut these on the diagonal once creating two corner triangles for each square. Repeat this process for the other square.
Make the Blocks
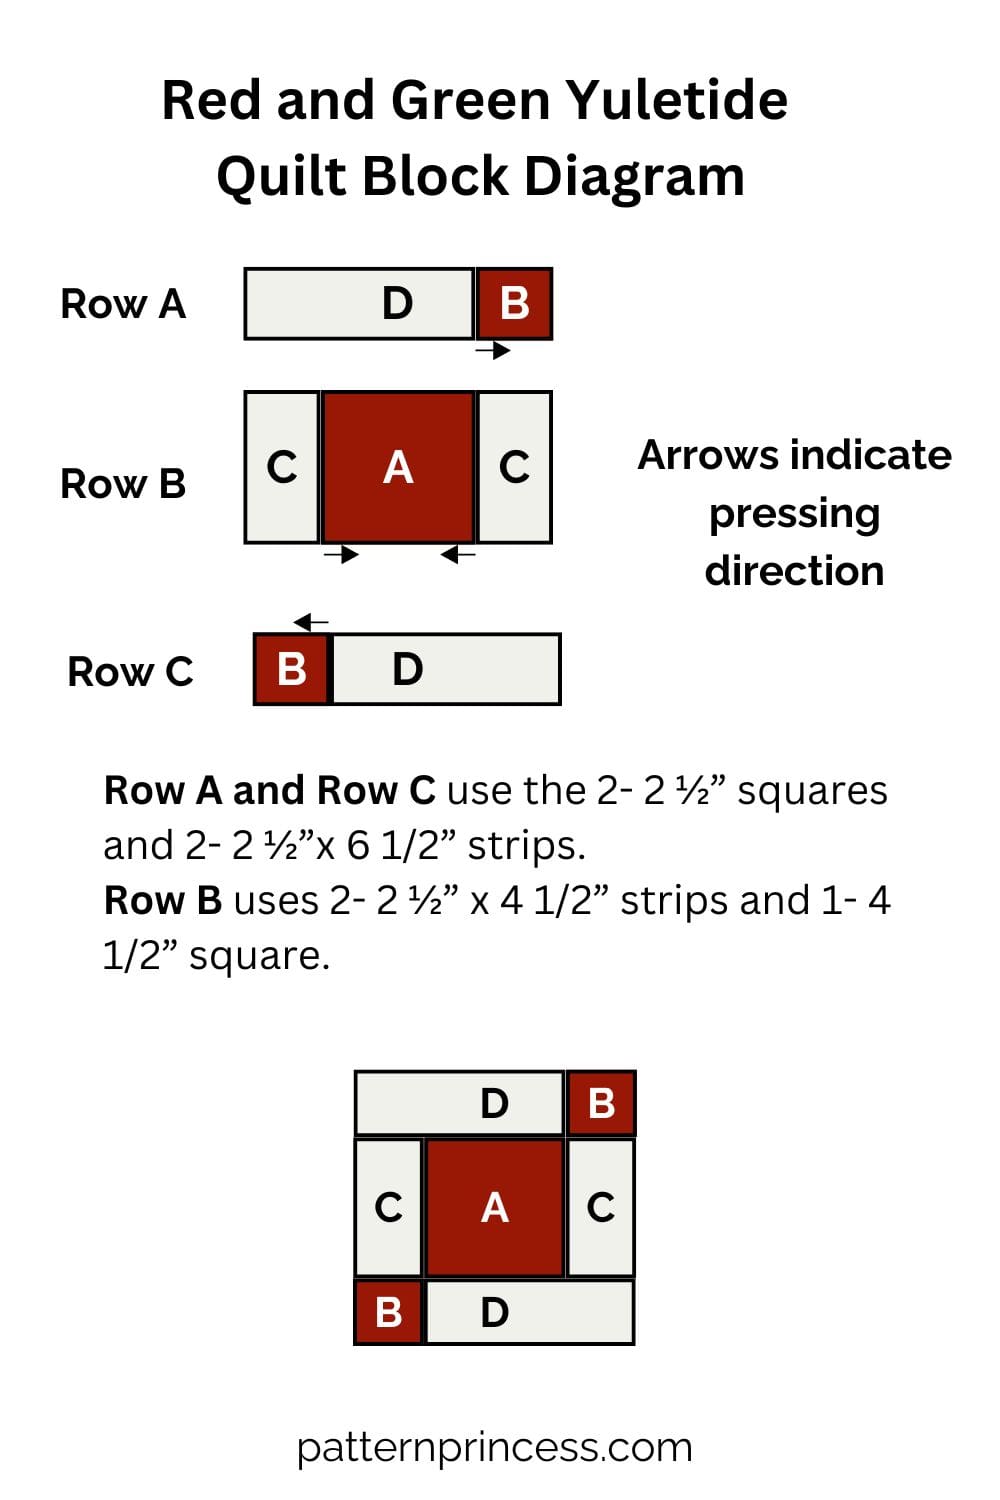
Each block has three rows.
- Row A and Row C use the 2- 2 ½” squares and 2- 2 ½”x 6 1/2” strips.
- Row B uses 2- 2 ½” x 4 1/2” strips and 1- 4 1/2” square.
*Use a ¼” seam allowance for all seams.
*Sew with right sides together.
Step 1. Gather your fabric units. To make 1 block, use the following fabric pieces:
- A = 1, 4 ½ X 4 ½ inch unit of colored fabric
- B = 2, 2 ½ X 2 ½ inch units of the same-colored fabric used in unit A.
- C = 2, 2 ½ X 4 ½ inch units in a background color
- D = 2, 2 ½ X 6 ½ inch units in a background color
Step 2. With the right sides together, begin by sewing the two 2 ½ X 4 ½ inch units to either side of the one 4 ½ X 4 ½ inch unit using ¼” seam allowance. Press the seams to the colored fabric.
Step 3. Next, sew one 2 ½ X 6 ½ inch background fabric to a 2 ½ X 2 ½ inch colored fabric. Right sides together using ¼” seam allowance. Press the seams to the colored squares. Repeat this step.
Step 4. Arrange the three strips into three rows as shown in the diagram. Sew the bottom strip to the middle strip making sure to nest the seams. Right sides together using ¼” seam allowance. Repeat this process to sew the top strip onto the middle strip. Press the seams open or to one side if you prefer.
Each Quilt Block should measure 8 ½ X 8 ½ inches unfinished.
Step 5. Repeat steps 1-4 to make all 50 blocks.
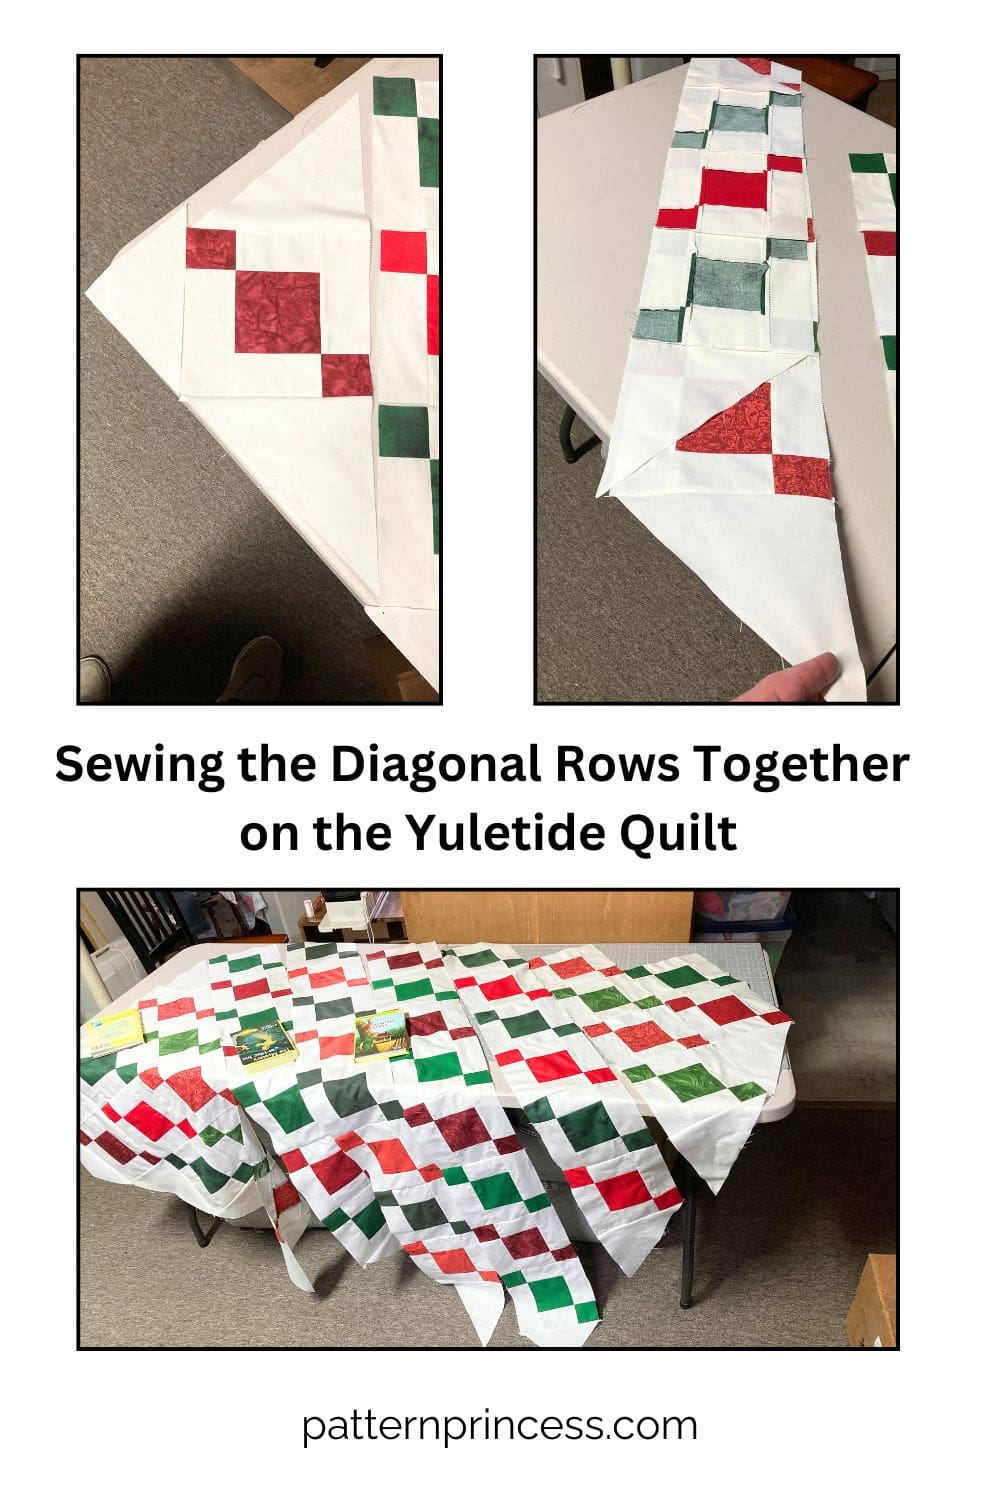
Sew the Rows Together of the Red and Green Yuletide Quilt
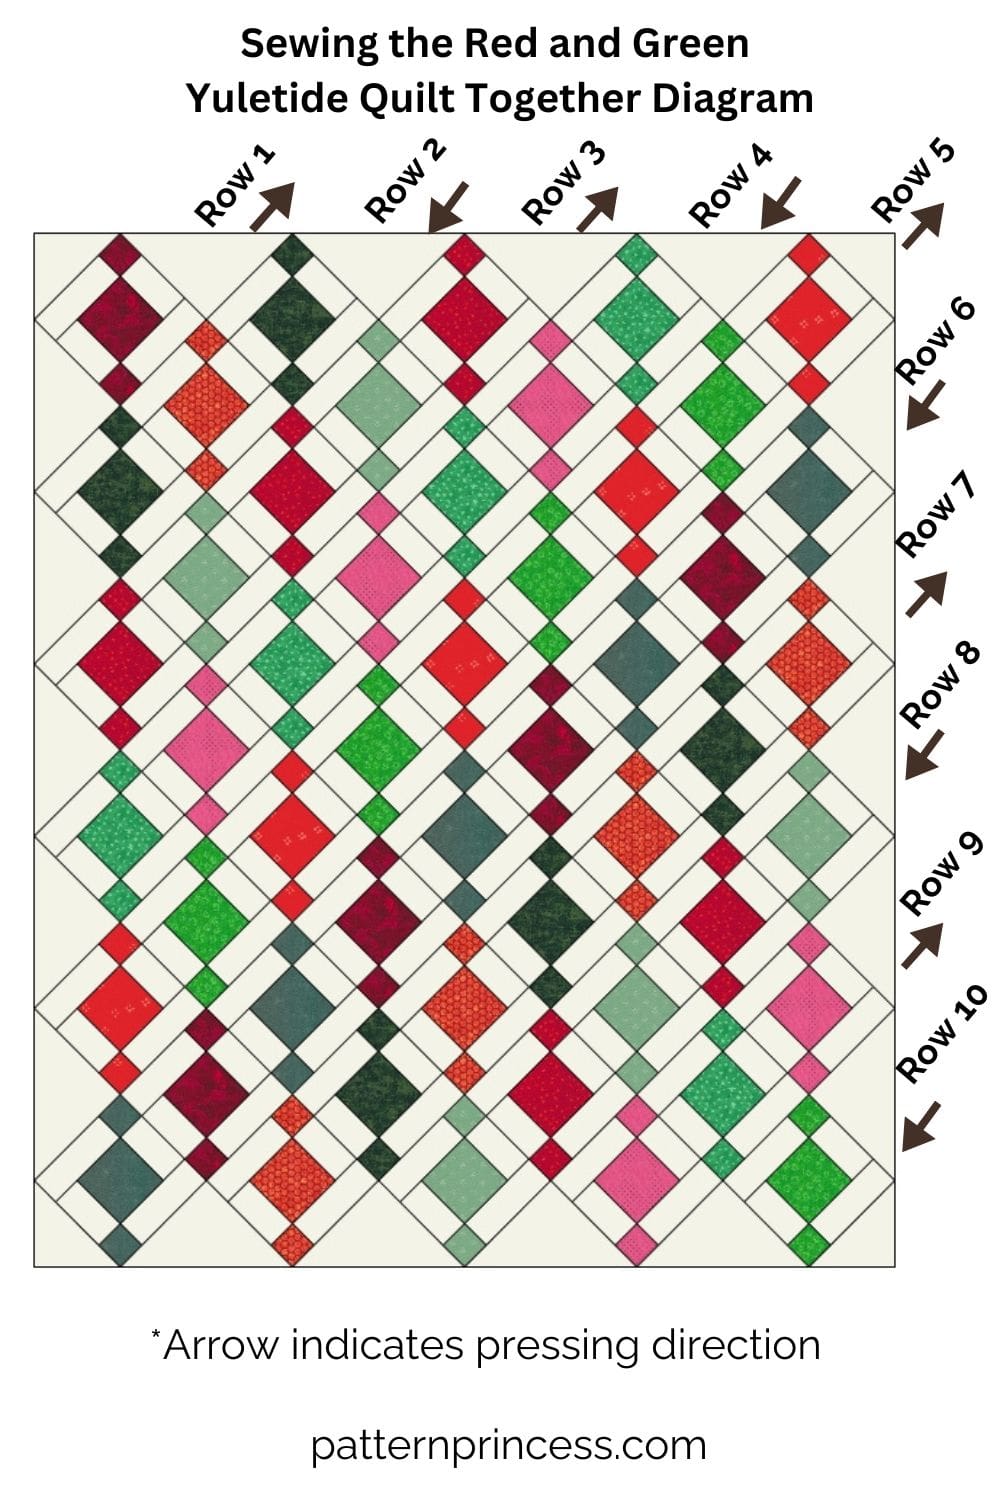
You will sew the blocks on point for this quilt pattern. That means you will sew the rows at a 45° angle that than horizontal rows.
For this example, there are 10 rows total. In the diagram, I have labeled each row with a number. The arrow indicates the pressing direction. This helps nest the seams.
Number of Blocks in Each Row
Here is how many blocks are in each row:
- Top left is a corner triangle made from the background fabric 6 ½” X 6 ½” square cut diagonally.
- Row 1: Setting triangle, 1 block, setting triangle
- Row 2: Setting triangle, 3 blocks, setting triangle
- Row 3: Setting triangle, 5 blocks, setting triangle
- Row 4: Setting triangle, 7 blocks, setting triangle
- Row 5: Setting triangle, 9 blocks, corner triangle
- Row 6: Corner triangle, 9 blocks, setting triangle
- Row 7: Setting triangle, 7 blocks, setting triangle
- Row 8: Setting triangle, 5 blocks, setting triangle
- Row 9: Setting triangle, 3 blocks, setting triangle
- Row 10: Setting triangle, 1 block, setting triangle
- Bottom right is the last corner triangle.
Once you finish the quilt top, you can create the quilt sandwich using the quilt top, batting, and backing fabric. Quilt as desired and sew on the binding.
Layer the Top, Batting, and Back
Backing Fabric
61 X 72 inches. The backing fabric will be slightly larger than the quilt top. This will be trimmed after quilting.
Batting
61 X 72 inches. 2 yards of 108” or 4 yards of 44” pieced.
Sandwich the quilt backing fabric, batting, and the quilt top.
Begin by placing the backing fabric on a flat solid surface, right side down facing out. Smooth out any wrinkles. Use painters’ tape to secure the edges of the fabric down. This will help hold it in place and reduce the chance of a wrinkle developing as you place the next two layers.
Next, center the batting on top of the backing fabric smoothing out any wrinkles.
Finally, place the quilt top on the batting, centering it with the right side up. Smooth out any wrinkles.
Baste the Quilt Together and Quilt the Layers Together
Once you have the top fabric all smoothed out, baste all three layers together using large safety pins. Use a good quality 1 ½” stainless steel pin for this.
Put a pin in each corner and around the entire quilt about every 5-6 inches or so through all three layers.
This holds things in place, so they don’t move around while you are sewing the layers together using a quilting design of your choice. Optionally, you can use a glue basting spray to secure the layers.
Trim the Batting and Backing Fabric
Once the layers are quilted together in your desired design, it is time to trim the batting and backing. For this, I use a large cutting mat, a longer ruler, and a rotary cutter.
Lay the quilt flat. Place the ruler along the edge of the quilt and use it as a guide to run your rotary cutter against to trim the quilt batting and backing to the size of the quilt top. Do this on all four sides.
Sew the Binding to the Quilt
First, prepare the binding strips. I used the leftover jelly roll strips to make my quilt binding.
Make the binding strips. Piece together 7 jelly roll strips and fold in half wrong sides together the length of the strip. Press.
You can find a tutorial for making binding on the website.
Pin the raw edge of the binding onto raw edge of the quilt top. I generally start in the middle of a side leaving approximately a 3” tail hanging.
Note: This hanging part will be used to sew to the other end of the binding strip when you have finished sewing all four sides of the binding onto the quilt.
Sew the binding onto all four sides of the easy quilt making sure to miter the corners and join the binding. Pro Tip. I find that a walking foot works nicely for this and helps all the layers slide under the sewing foot easier. Less bunching of fabric.
Sewing the Binding to the Quilt Back
You can use your sewing machine to sew the binding on the back of the quilt. However, I often hand-stitch the folded edge onto the back of the quilt.
Once all the sides and corners are stitched, you are done.
It is ready to use or give as a gift or use.
We hope that you have enjoyed this lovely quilt pattern.
If you love free patterns, check out our other designs to inspire your next project.

You can find Victoria crocheting, quilting, and creating recipes. She has cooked in restaurants for over 20 years, including many larger parties. She learned to crochet when she was just 11 years old and has been crocheting ever since; over 50 years now. Over 40 years ago, she loved her first class in sewing and continues to hone her skills in quilting. Many have enjoyed the handmade gifts over the years. In her professional career, she has worked in management in a wide variety of businesses including higher education as a dean of a division. All the while attending college part-time to achieve her doctorate in higher education with an emphasis in e-learning.