Last updated on March 27th, 2026 at 09:13 am
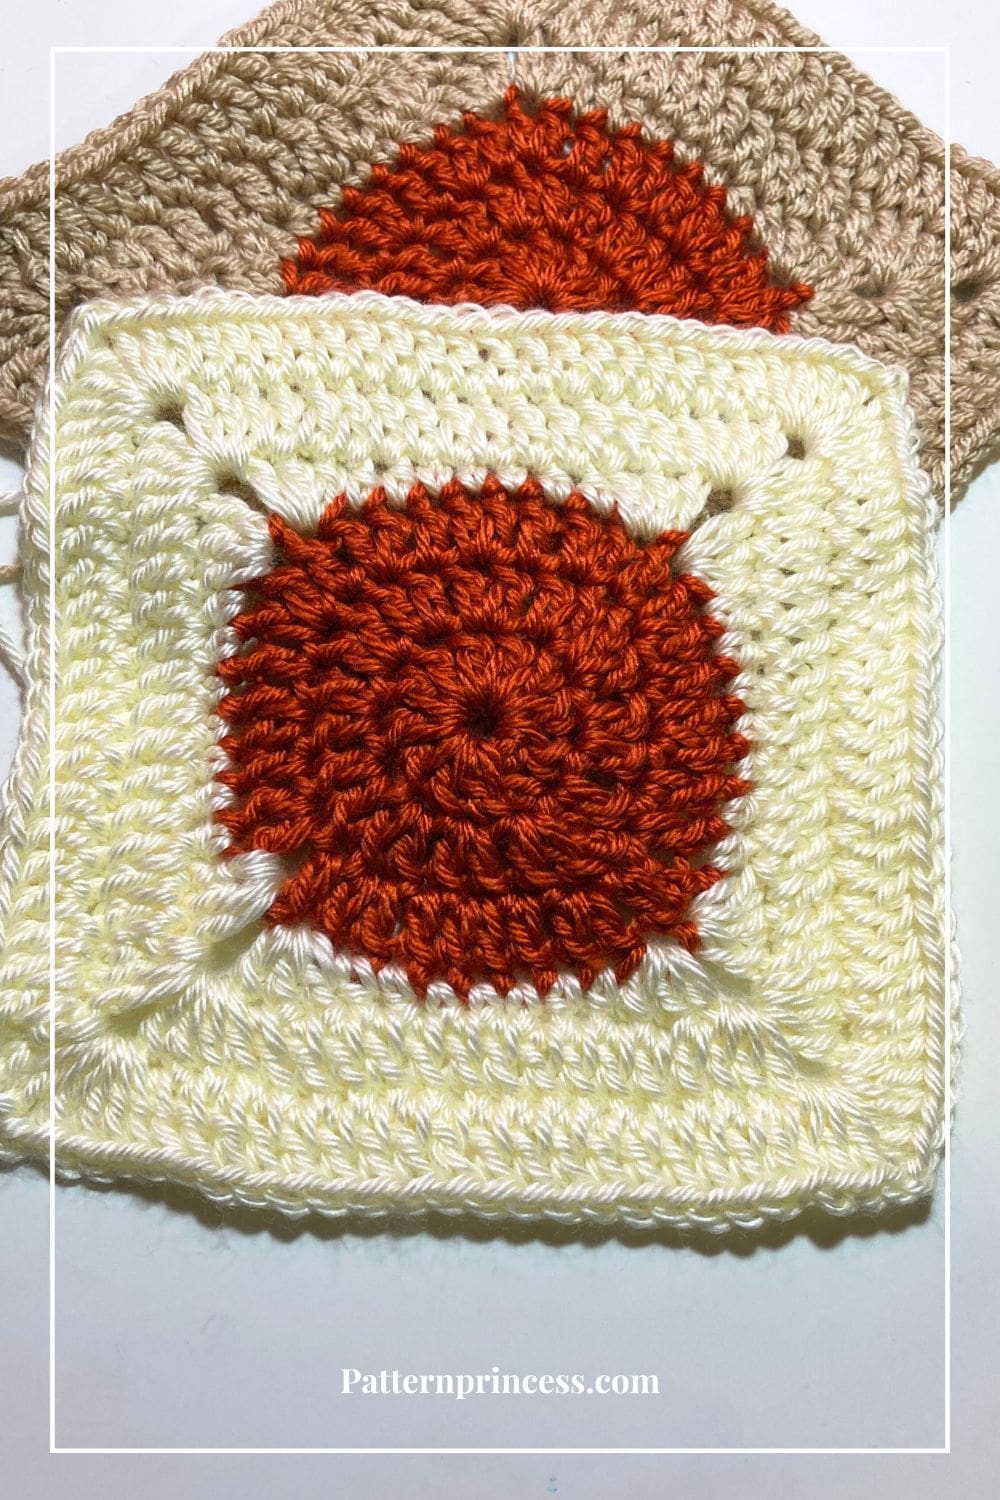
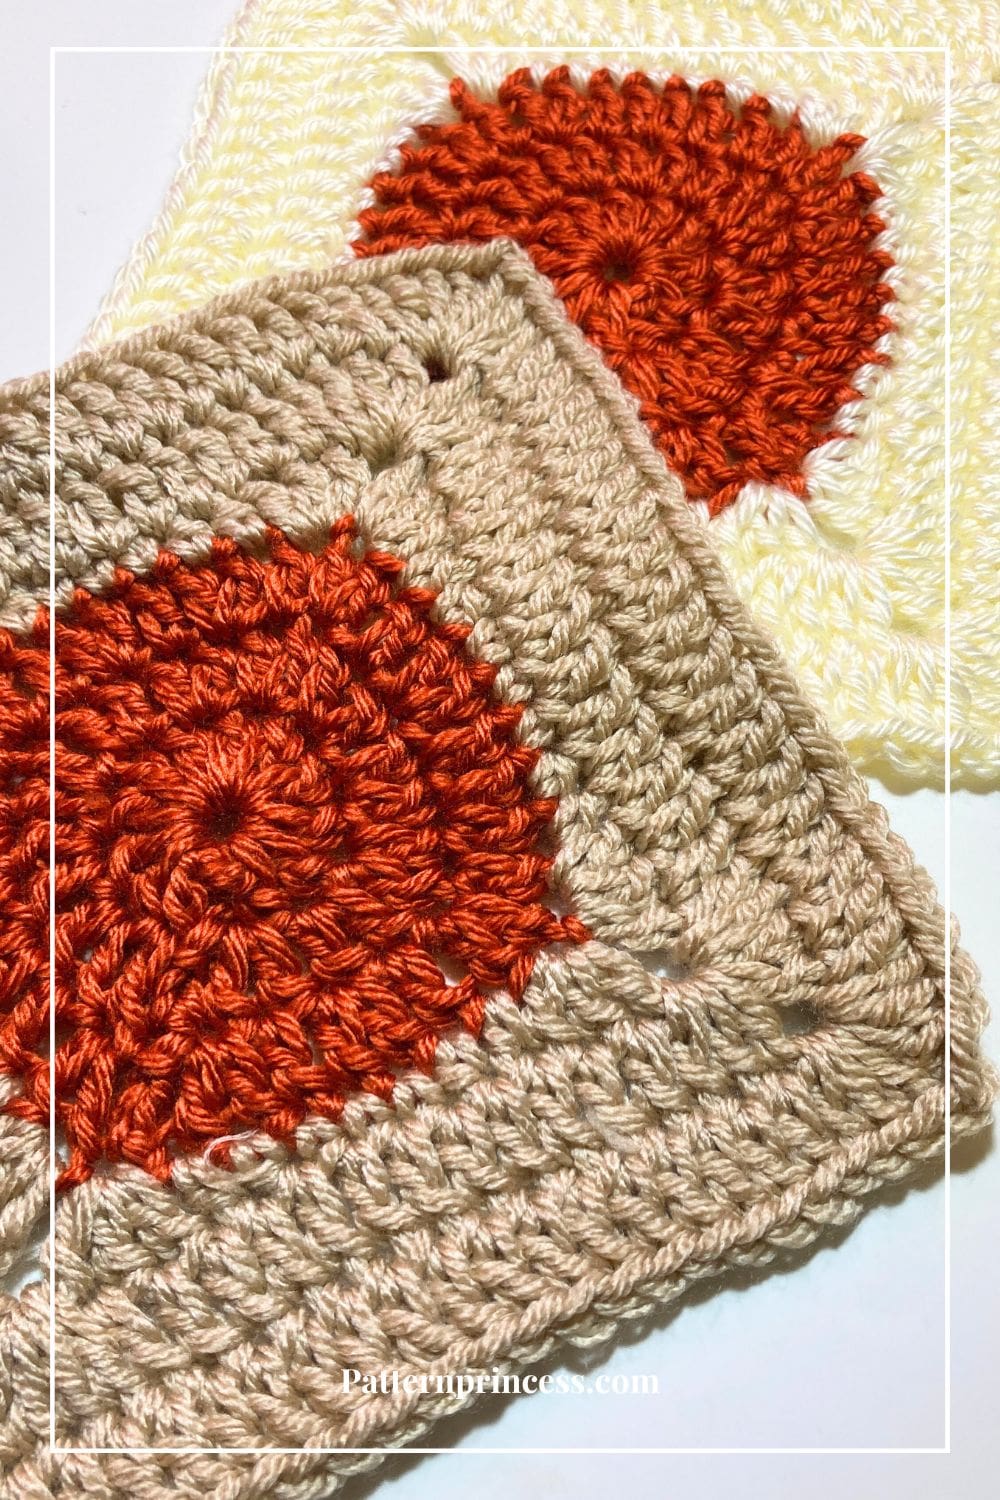
Learn how to turn a circle into a square with this free pattern. It’s a great way to turn circular motifs into a usable shape that’s much easier to join with other blocks.
Whether you’re using a single color or experimenting with scrap yarn and different colors for each round, this method offers endless creative possibilities. Use your favorite colors to make something you love.
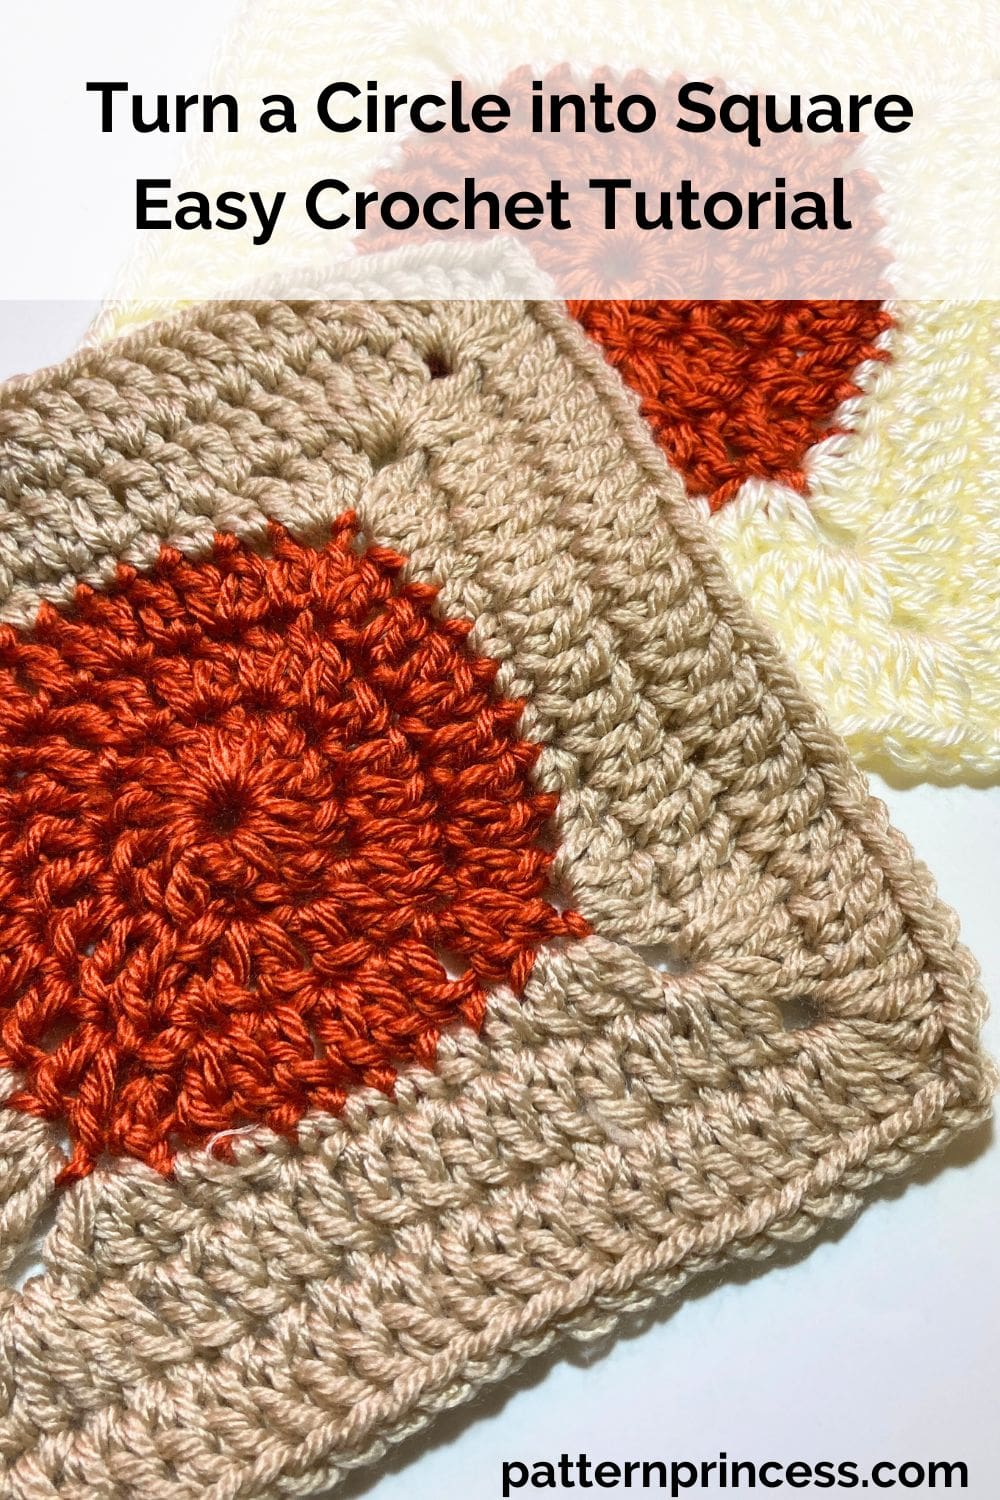
Photo Tutorial and Video Tutorials to Help with the Pattern
This easy crochet tutorial shows you exactly how to do make a square from a circle made in just three rounds for the circle. And three more rounds to square the granny square.
We have photos and video tutorials for both left and right hand crocheters to help you master this technique. It’s perfect for projects like baby blankets, pillows, or any time you want a smooth, modern square design.
Instead of using granny clusters, we’ll use double crochet stitches to build out from the center crochet circle and square off your piece with corners and flat edges.
However, if you want to use granny clusters, we have a free pattern for squaring a crochet circle to square too and the center circle uses puff stitches for something a little different.
Versatile Granny Square Pattern
Make a few or enough for a blanket. This pattern is simple enough for beginners but polished enough for experienced crocheters who want to create a solid, seamless look. By the end, you’ll have a beautiful square that’s ready to block, join, and use in your next handbag, hat, shawl, scarf, or granny square blanket or another cozy home project.
Learning how to turn a circle into a square is a handy technique that opens the door to endless creative possibilities. I see this as more of a guideline than an exact pattern. Once you get the basic pattern down you can make it bigger, play with colors and join the squares in different ways.
Get Your Ad Free Printable PDF in our Etsy Store
Directions: Turn a Circle into Square Easy Crochet Tutorial
Skill Level
This stitch is perfect for a confident beginner.
The hardest part is bringing the hook through all the loops.
Size
For the sample shown in the video, I used a medium weight yarn, and I completed three rounds using double crochet stitches for the beginning center circle. Then I worked three more rounds to square off the circle.
The sample finished size is 7” X 7”.
Gauge
This will depend on the yarn and crochet hook you choose for your project. My gauge today is 4″ x 4″ (10cm x 10cm) 13 sc x 14 r.
Materials
Yarn. While you can use any yarn weight for this pattern, I suggest a worsted weight yarn to practice. Less than 100 yards for each square.
Crochet hook size that matches your yarn weight.
Crochet Hook Size I 5.5mm
Scissors
Tapestry needle
Abbreviations
- CH = Chain
- DC = Double Crochet
- HDC = Half Double Crochet
- SC = Single Crochet
- SK = Skip
- SL ST = Slip Stitch
- SP = Space
- ST = Stitch
- STs = Stitches
- TR = Treble Crochet
- [ ] = Repeat Between
Pattern Notes
This stitch works well with any weight yarn.
Written in US crochet terms.
To keep your circle flat, however many stitches you start with in round 1 is the amount you need to increase stitches by in the subsequent rounds. For example, we started with 12 stitches, round 2 there should be 4 stitches, round 3 there should be 36, and so on.
We have a full blog post dedicated to How to Crochet Round Circles for Beginners
Crochet Stitches
Chain Stitch (CH ST)
Begin the chain stitch by making a slip knot on the crochet hook. Leave about a 5-inch tail on the yarn. This will be weaved in later.
Next snug up the yarn loop that is on the crochet hook; while it should be firm, it should also be loose enough to slide on the hook with ease.
Keeping the loop on the hook, insert the hook in the stitch, wrap the yarn over the crochet hook from back to front. Draw the yarn through the loop. Yarn over again and draw the yarn through both loops that are currently on the hook. (The first chain stitch is complete).
HOW TO CROCHET THE CHAIN STITCH video tutorial
Double Crochet (DC)
Yarn over, insert the hook through both loops and pull up a loop. Next, yarn over and pull through two loops on the hook. Lastly, yarn over again and pull through the last two loops on the hook.
HOW TO CROCHET THE DOUBLE CROCHET STITCH video tutorial
Half Double Crochet (HDC)
Yarn over, insert the hook through both loops of the next stitch and pull up a loop. Yarn over and pull through all three loops on the hook. For height, this stitch is between the single crochet and double crochet.
HOW TO CROCHET THE HALF DOUBLE CROCHET STITCH video tutorial
Single Crochet (SC)
Insert the hook, pull up a loop. Yarn over and pull through the two loops on the hook.
HOW TO CROCHET THE SINGLE CROCHET STITCH video tutorial
Treble Crochet Stitch
Yarn over twice, insert the hook through both loops and pull up a loop. Next, yarn over and pull through two loops on the hook. Yarn over again and pull through the next two loops. Lastly, yarn over again and pull through the last two loops on the hook.
TREBLE CROCHET AND TREBLE CROCHET TWO TOGETHER OFTEN WRITTEN AS TR2Tog video tutorial
Solid Granny Circle Square
Begin with Creating the Circle
Two Methods to Begin a Circle
The first thing we do is make a circle to crochet round 1 in. This can be done using one of two methods.
- Use a magic ring to form a circle. If you are new to crochet, here is a tutorial on How to Crochet the Magic Circle (magic ring).
- Chain 4 or 5 stitches and slip stitch back into the first chain to form a circle.
There are pros and cons to each method. Using the magic ring allows you to pull the center closed after crocheting the first round of stitches. However, it may not have as much strength as creating the circle with chain stitches.
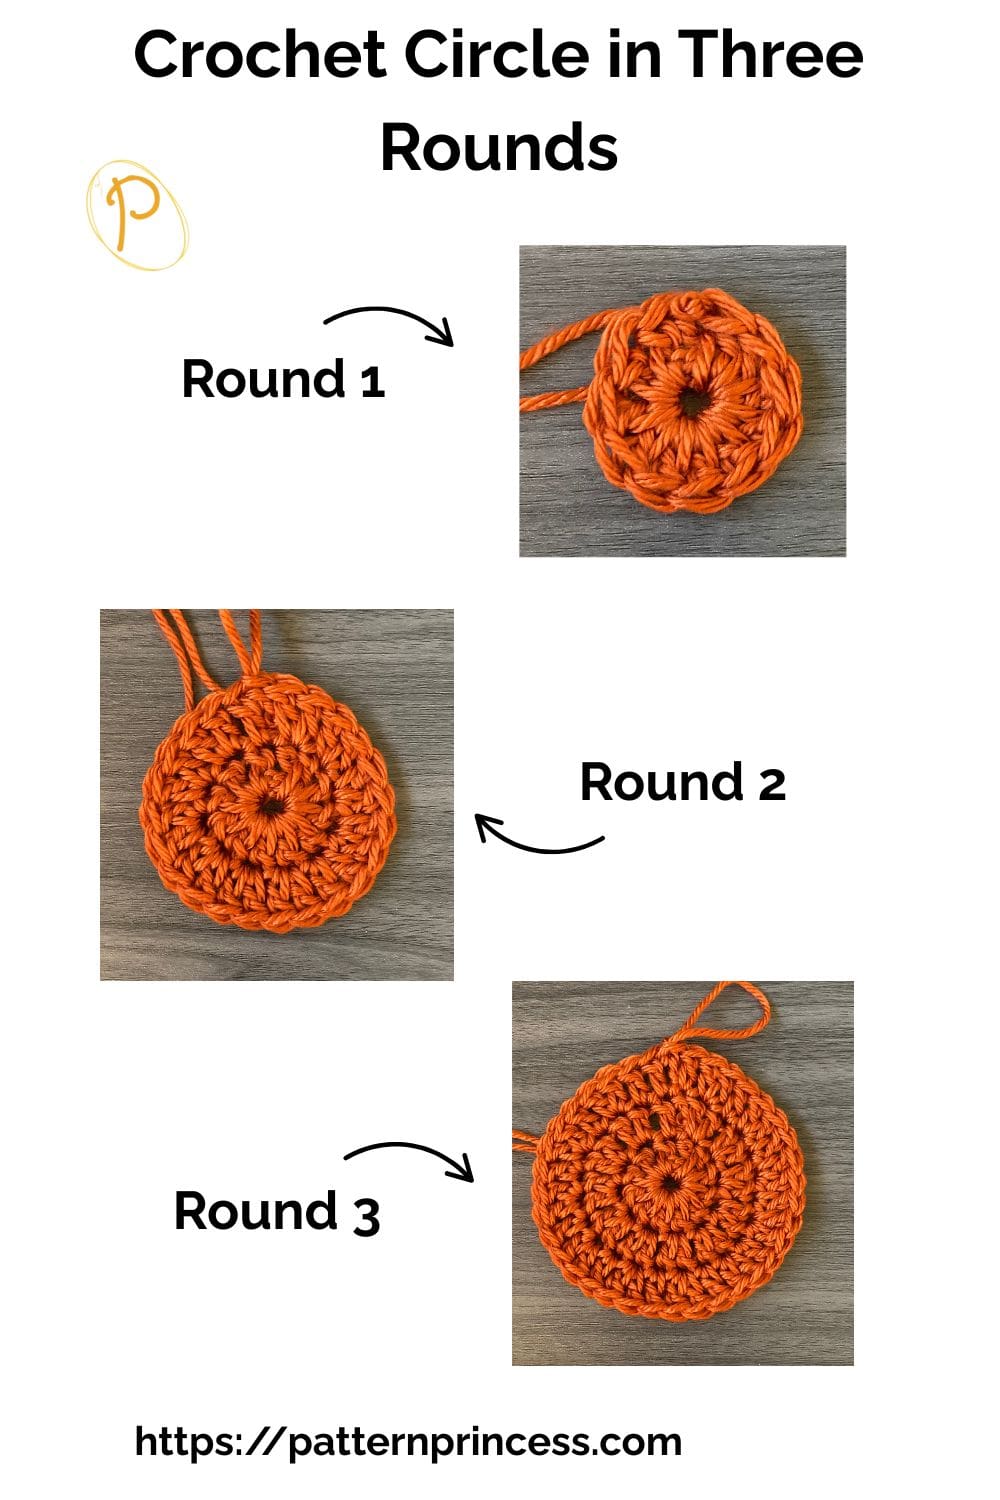
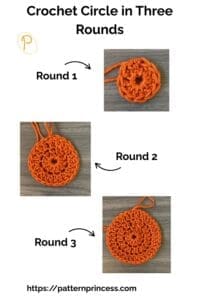
Round 1
In magic ring, CH 3 (Counts as first DC). Work 11 more DC in the circle. Join with a SL ST into the 3rd CH of the starting CH 3. (12)
Round 2
CH 3 (Counts as first DC). DC in same ST as CH 3, 2 DC in each ST around. Join with a SL ST into the top CH of the starting CH 3. (24)
Round 3
CH 3 (Counts as first DC). DC in the same ST, DC in next ST. [2 DC in next ST , 1 DC in next ST] Repeat between [ ] around. End with a SL ST into the top CH of the first CH 3. (36)
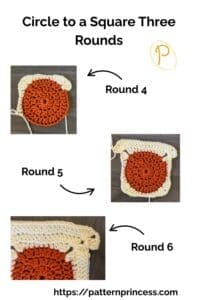
Turning the Circle into a Square
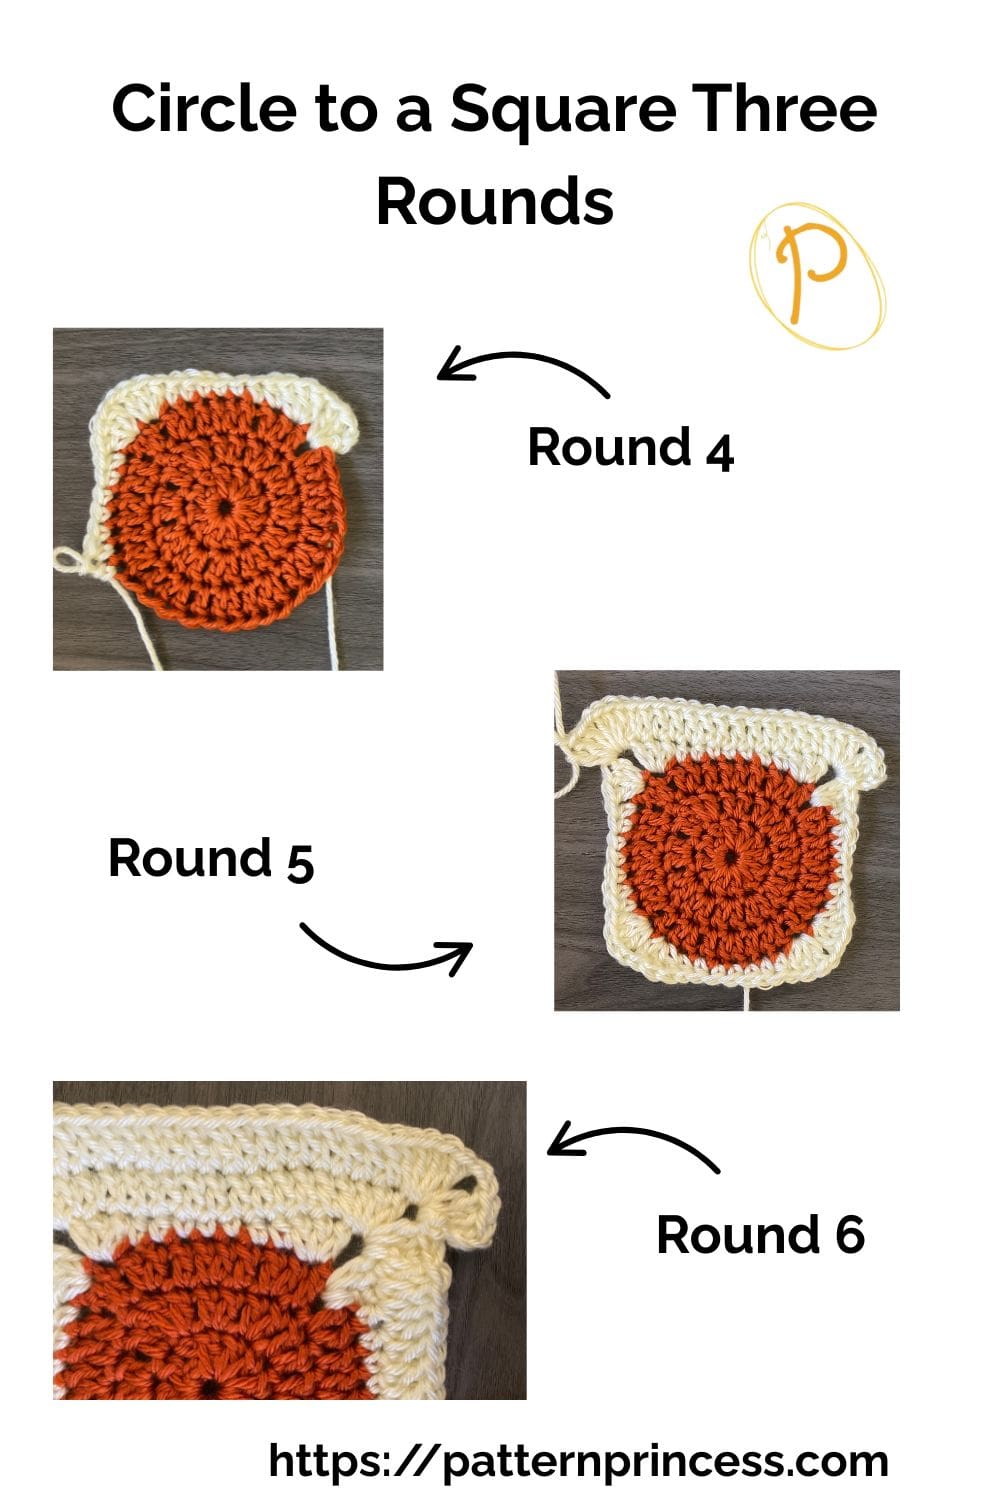
Round 4
Attach new color
CH 3 (Counts as DC). 2C in the same ST, CH 1, 3 DC in the next ST, HDC in each of the next 2 STs, SC in each of the next 3 STs, HDC in each of the next 2 STs. [3 DC in the next ST, CH 1, 3 DC in the next ST, HDC in each of the next 2 STs, SC in each of the next 3 STs, HDC in each of the next 2 STs]. Repeat between [ ] 2 more times. Join with a SL ST to the top ST of the starting CH 3.
Note. Not counting the corner stitches, you should have crocheted 7 stitches along your circle between the corners. The corners are worked into 2 stitches 3 DC, CH 1 in one ST and 3 DC in the next ST.
Round 5
SL ST into the next corner CH 1 SP. CH 3 (Counts as DC). Work (2 DC, CH 1, 3 DC) in the corner SP. [DC in each of the next 13 STs until you reach the next corner then work (3DC, CH 1, 3DC)]. Repeat between [ ] 2 times. End with a DC in the next 13 STs and a SL St into the top CH of the starting CH 3.
Note. Not counting the corner stitches, you should have crocheted 13 stitches along your straight edge side; 3 DC, CH 1, 3 DC in each corner space.
Round 6
SL ST into the next corner CH 1 SP. CH 3 (Counts as DC). 2 DC, CH 2, 3 DC in the corner CH 1 SP. DC in each of the next 19 STs until the next corner. In the corner CH 1 SP work (3DC, CH 2, 3 DC). Continue working a DC in each ST of the straight edge and (3DC, CH 2, 3 DC) in each corner CH 1 SP. End with a SL ST into the top CH of the starting CH 3.
Rounds 7 and Beyond
Repeat round 6. Continue adding rounds if you wish to have a larger granny square. Just keep working a DC into each ST, which will increase by 6 each round, on the Straight edge. And working (3DC, CH 2, 3 DC) in each corner CH SP.
Finishing
Use the tapestry needle to weave in the yarn tails on the back side of the work. I like to weave back and forth 3 to 5 times. Cut off the excess yarn.
Video Tutorials
Video Tutorial How to Crochet Flat Round Circles
Video Tutorials for Squaring the Circle Using a Solid Granny
How to Join the Granny Squares
Video Tutorial on the Invisible Joining Method
Once you’ve made a few of these squares, it’s time to turn them into something beautiful!
Blocking Squares
Blocking your granny squares is an important step that helps your finished pieces look neat, professional, and uniform in size.
It evens out the stitches, defines the shape, and makes joining squares much easier—especially when you’ve used different stitch styles like circles and granny clusters.
Simply pin your squares to the correct dimensions on a blocking mat, lightly spray with water or steam, and let them dry completely.
A little time spent blocking goes a long way toward giving your project that polished, finished look!
We have a whole blog post dedicated to helping explain How to Block Crochet Spray, Wet, or Steam Blocking
We hope you have enjoyed making your granny square with a circular center. Once you get the hang of it, they are so much fun to make.
Turn a Circle into Square Easy Crochet Tutorial
Equipment
- Crochet hook size that matches your yarn weight.
- Crochet Hook Size I 5.5mm
- Scissors:
- Tapestry Needle
Materials
- Yarn. While you can use any yarn weight for this pattern I suggest a worsted weight yarn to practice. Less than 100 yards for each square.
Instructions
Two Methods to Begin a Circle
- The first thing we do is make a circle to crochet round 1 in. This can be done using one of two methods.Yarn. While you can use any yarn weight for this pattern
- Use a magic ring to form a circle. If you are new to crochet, here is a tutorial on How to Crochet the Magic Circle (magic ring).
- Chain 4 or 5 stitches and slip stitch back into the first chain to form a circle.
- There are pros and cons to each method. Using the magic ring allows you to pull the center closed after crocheting the first round of stitches. However, it may not have as much strength as creating the circle with chain stitches.
Round 1
- In magic ring, CH 3 (Counts as first DC). Work 11 more DC in the circle. Join with a SL ST into the 3rd CH of the starting CH 3. (12)

Round 2
- CH 3 (Counts as first DC). DC in same ST as CH 3, 2 DC in each ST around. Join with a SL ST into the top CH of the starting CH 3. (24)
Round 3
- CH 3 (Counts as first DC). DC in the same ST, DC in next ST. [2 DC in next ST , 1 DC in next ST] Repeat between [ ] around. End with a SL ST into the top CH of the first CH 3. (36)
- Turning the Circle into a Square
Round 4
- Attach new color
- CH 3 (Counts as DC). 2C in the same ST, CH 1, 3 DC in the next ST, HDC in each of the next 2 STs, SC in each of the next 3 STs, HDC in each of the next 2 STs. [3 DC in the next ST, CH 1, 3 DC in the next ST, HDC in each of the next 2 STs, SC in each of the next 3 STs, HDC in each of the next 2 STs]. Repeat between [ ] 2 more times. Join with a SL ST to the top ST of the starting CH 3.
- Note. Not counting the corner stitches, you should have crocheted 7 stitches along your circle between the corners. The corners are worked into 2 stitches 3 DC, CH 1 in one ST and 3 DC in the next ST.
Round 5
- SL ST into the next corner CH 1 SP. CH 3 (Counts as DC). Work (2 DC, CH 1, 3 DC) in the corner SP. [DC in each of the next 13 STs until you reach the next corner then work (3DC, CH 1, 3DC)]. Repeat between [ ] 2 times. End with a DC in the next 13 STs and a SL St into the top CH of the starting CH 3.
- Note. Not counting the corner stitches, you should have crocheted 13 stitches along your straight edge side; 3 DC, CH 1, 3 DC in each corner space.
Round 6
- SL ST into the next corner CH 1 SP. CH 3 (Counts as DC). 2 DC, CH 2, 3 DC in the corner CH 1 SP. DC in each of the next 19 STs until the next corner. In the corner CH 1 SP work (3DC, CH 2, 3 DC). Continue working a DC in each ST of the straight edge and (3DC, CH 2, 3 DC) in each corner CH 1 SP. End with a SL ST into the top CH of the starting CH 3.
Rounds 7 and Beyond
- Repeat round 6. Continue adding rounds if you wish to have a larger granny square. Just keep working a DC into each ST, which will increase by 6 each round, on the Straight edge. And working (3DC, CH 2, 3 DC) in each corner CH SP.
Finishing
- Use the tapestry needle to weave in the yarn tails on the back side of the work. I like to weave back and forth 3 to 5 times. Cut off the excess yarn.
Notes
Abbreviations
- CH = Chain
- DC = Double Crochet
- HDC = Half Double Crochet
- SC = Single Crochet
- SK = Skip
- SL ST = Slip Stitch
- SP = Space
- ST = Stitch
- STs = Stitches
- TR = Treble Crochet
- [ ] = Repeat Between

You can find Victoria crocheting, quilting, and creating recipes. She has cooked in restaurants for over 20 years, including many larger parties. She learned to crochet when she was just 11 years old and has been crocheting ever since; over 50 years now. Over 40 years ago, she loved her first class in sewing and continues to hone her skills in quilting. Many have enjoyed the handmade gifts over the years. In her professional career, she has worked in management in a wide variety of businesses including higher education as a dean of a division. All the while attending college part-time to achieve her doctorate in higher education with an emphasis in e-learning.
This worked exactly as written, thanks!