Last updated on March 23rd, 2025 at 03:33 pm
Introducing our delightful “Whimsical Springtime Bunnies Table Runner Quilt Pattern”. It’s a charming creation that brings the joy of spring into your home.
This enchanting pattern features the whimsy of adorable bunnies set against the backdrop of colorful wild grasses in a watercolor artistic look. This charming pattern perfectly complements any table setting with the beautiful bright colors in pastel.
The color combination just says happy spring to me. It is so welcomed after a long winter.
Beginner-Friendly Table Runner Pattern
The timeless pattern consists of three snowball quilt blocks measure 12″ finished. The snowball is a simple block to make. It just takes four small squares and one large square. Sew a smaller square on each corner of the larger square and trim. You will have corner triangles. Press those open and you have a quilt square ready to make into a large flower. Just sew four snowball blocks together to form the large flower.
While this tablecloth uses three of these 12 inch flowers sewn together, you can make mini quilts by using just one of the large flowers. The three large floral blocks are surrounded by a sashing and three borders.
Perfect for beginners, this pattern offers a fantastic opportunity to hone your quilting skills while crafting a beautiful piece for your home.
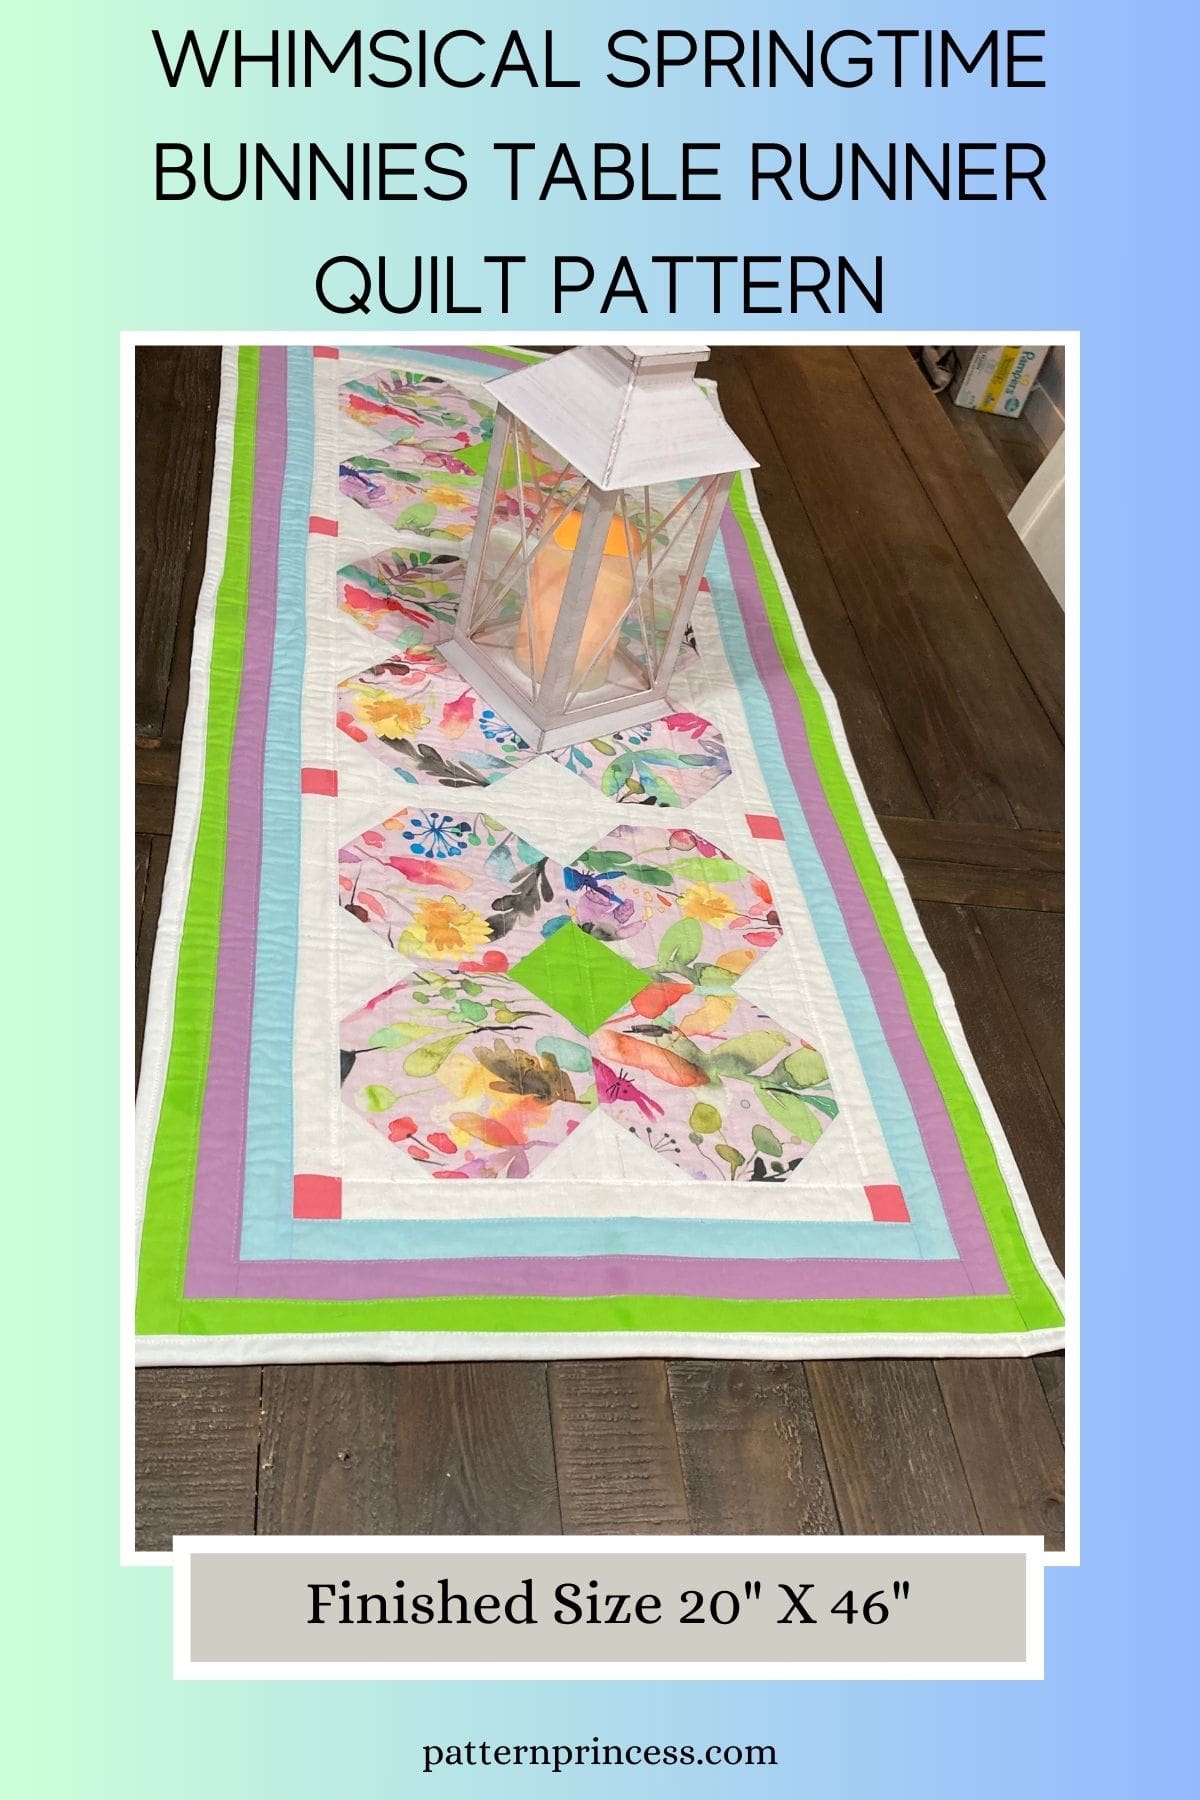
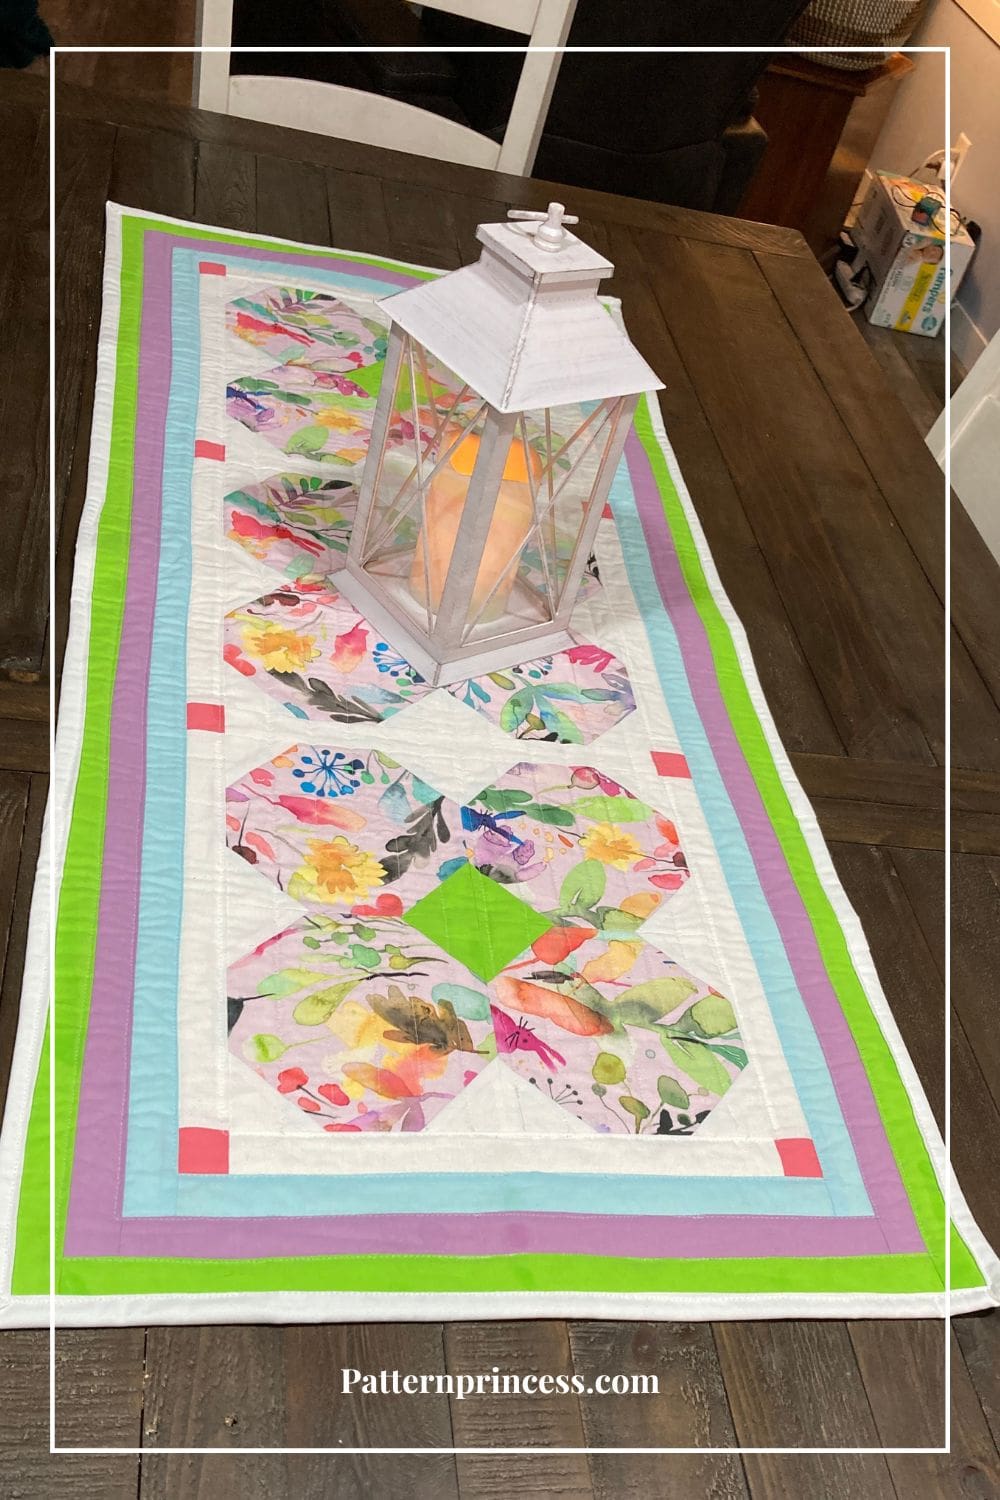
At 20 X 46 inches finished, it is the right size for many table tops. This table runner is not only a delightful addition to your spring decor but also a wonderful project to showcase your creativity.
This project is the perfect combination of quilting and home décor. I love how it turned out. If you’re looking for a quick project to make, this is it.
Quilting Blog Hop
This pattern is part of a quilting blog hop hosted by Just Let Me Quilt and Moosestash Quilting. You can find all the patterns by the featured quilt designers on the White Rabbit Blog Hop Challenge. There are so many creative ideas for quilted designs and sewing projects.
Since I have not done much applique at this point in my quilting journey, I chose to search for some fabric that had bunnies. When I saw this watercolor pastel with bunnies scattered throughout the colorful wildflowers, I fell in love with it and knew just want to do with it.
Check out our free PDF printables page often, we have free pattern downloads. However, to access them, you will need to sign up for the newsletter.
**Look closely to see the cute bunnies they blend in with the watercolors**
It is just perfect to bring in spring colors for Easter sewing projects. It will look lovely for our Easter dinner. My daughter has a large farmhouse style dining room table and this will be the perfect size. I need to keep the Holiday theme going and decorate with an Easter basket filled with a few Easter eggs.
I just love the look of this beautiful table runner.

Directions: Whimsical Springtime Bunnies Table Runner Quilt Pattern
Quilting Skill Level
Easy, great for a beginner
Finished Table Runner Measurements
Finished size 20 X 46 inches finished.
Fabric Requirements
- Wildflower Floral Bunny Fabric 1/2 a yard. This would work nicely if you had a few fat quarters in your fabric collections.
Fabric Details: Wildflowers meadow Spring garden Floral Watercolor Multicolored Pink Medium Fabric by ninola-design from Spoonflower.
- White Fabric 3/4 a yard.
- Green Fabric ½ a yard pieced, or 1 1/3 yards to be able to cut the longer borders without piecing.
- Pink Fabric1/8 a yard or 8, 1 ½ X 1 ½ inch squares.
- Light Blue Fabric ½ a yard pieced, or 1 1/3 yards to be able to cut the longer borders without piecing.
- Lavender Fabric ½ a yard pieced, or 1 1/3 yards to be able to cut the longer borders without piecing.
- Backing 22 X 48 inches
- Batting 22 X 48 inches
- Binding 2 ½ X 147 inches, ½ yard
- Thread

Equipment and Tools
- Rotary Cutter
- Quilting Ruler
- Cutting Mat
- Rotating Cutting Mat
- Iron
- Ironing Board or Pressing Mat
- Pins
- Clips
- Sewing Machine
- Disappearing fabric marker
- My Favorite Quilting Supplies
Main Fabric Used for the Flower Petals
Wild grasses Watercolor Floral Large Fabric by Ninola-design for Spoonflower Fabrics.
Get this Fabric from Spoonflower on Etsy
Whimsical Springtime Bunnies Table Runner Notes
Sew fabric with right sides together using ¼-inch seam allowance. Unless otherwise noted.
Pin or clip your pieces together for easy sewing.
The directions for this quilt are for rotary cutting, machine piecing, machine quilting, and machine sewing on the binding.
Trim any overhanging edges as needed throughout project.
Fabric Cutting Instructions
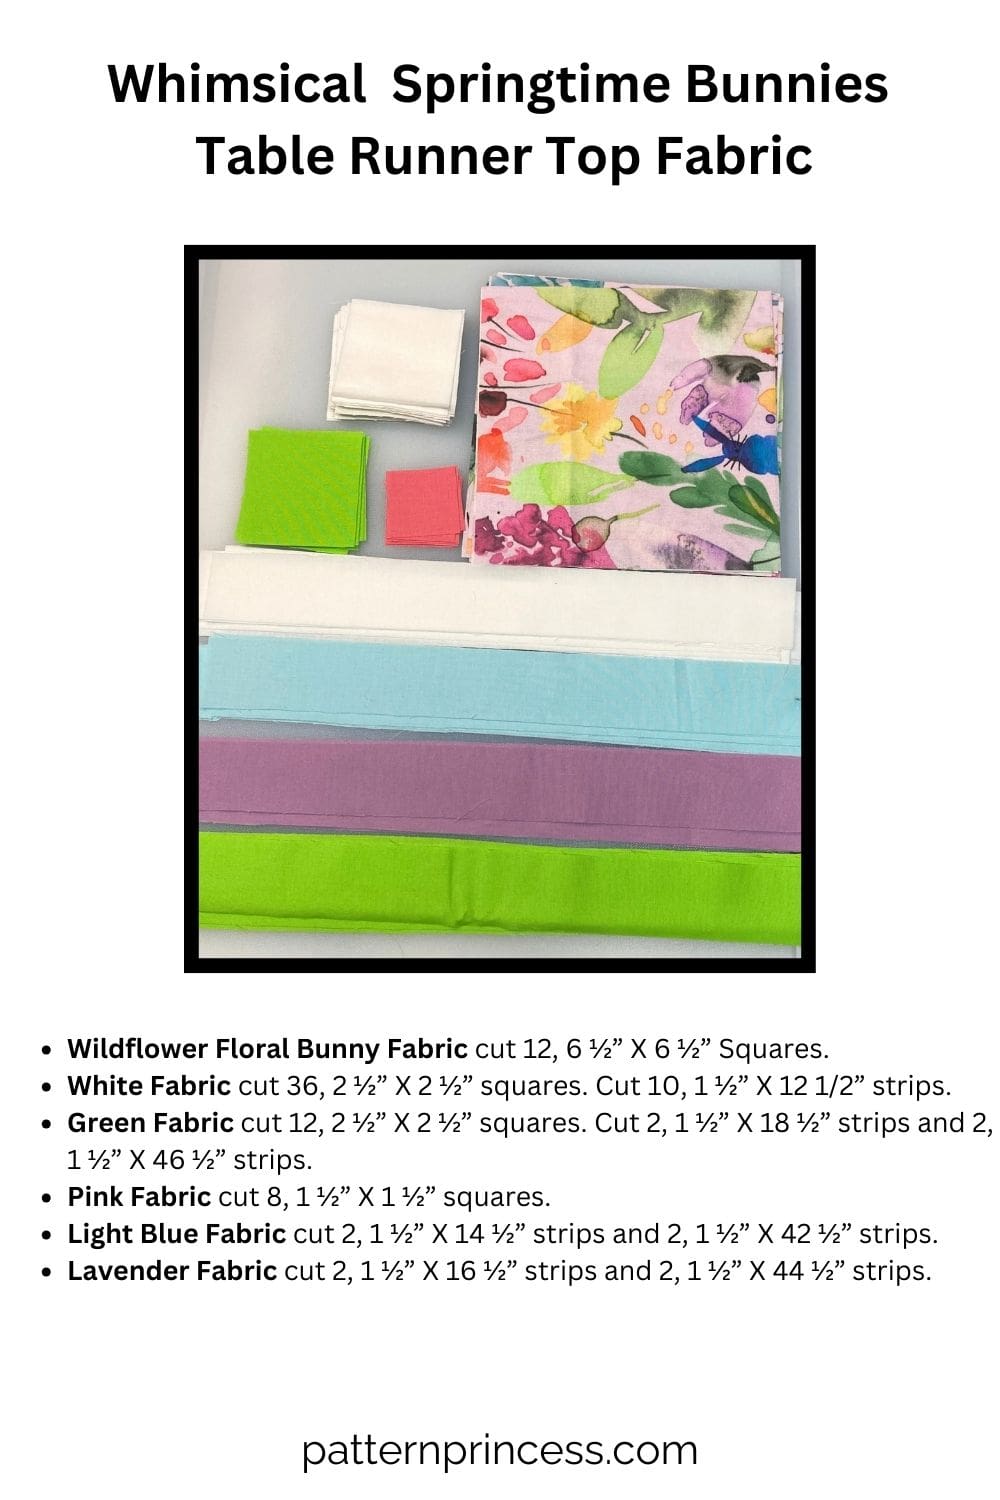
Table Runner Top Fabric
Wildflower Floral Bunny Fabric cut 12, 6 ½” X 6 ½” Squares.
White Fabric cut 36, 2 ½” X 2 ½” squares. Cut 10, 1 ½” X 12 1/2” strips.
Green Fabric cut 12, 2 ½” X 2 ½” squares. Cut 2, 1 ½” X 18 ½” strips and 2, 1 ½” X 46 ½” strips.
Pink Fabric cut 8, 1 ½” X 1 ½” squares.
Light Blue Fabric cut 2, 1 ½” X 14 ½” strips and 2, 1 ½” X 42 ½” strips.
Lavender Fabric cut 2, 1 ½” X 16 ½” strips and 2, 1 ½” X 44 ½” strips.
Start with the Snowball Quilt Blocks
General Fabric Requirements for Each Snowball Square.
In addition to your usual quilting supplies here are the fabric requirements.
For each square you will need:
One (1) large square of fabric in contrasting color.
Four (1) squares of fabric in a different color.
There is a blog post written on how to sew the snowball quilt block with more detail to help with this block.
For the three flower blocks, you will need the following fabric pieces.
- Wildflower Floral Bunny Fabric cut 12, 6 ½” X 6 ½” Squares.
- White Fabric cut 36, 2 ½” X 2 ½” squares.
- Green Fabric cut 12, 2 ½” X 2 ½” squares.
Begin Assembly
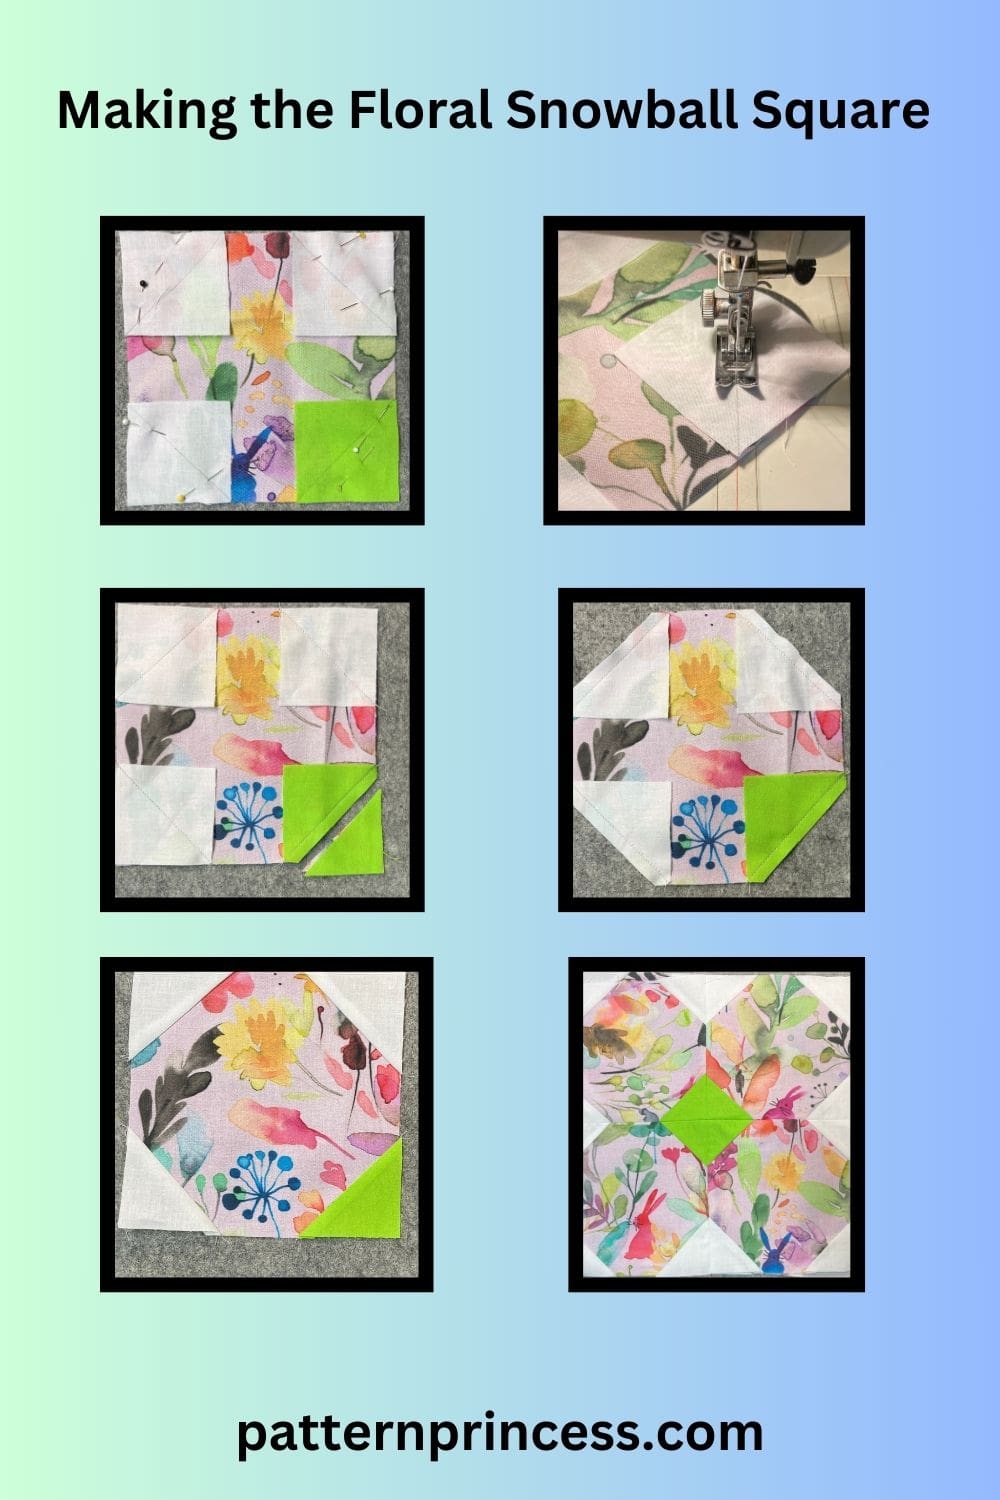
On the 2 ½” X 2 ½” white and green squares, using a ruler and a pencil or other fabric marker, draw a diagonal line on the back side of the fabric.
On each wildflower floral bunny square, with the right sides together, pin a square on each corner with the diagonal lines perpendicular to the corner of the larger square. Each larger square should have three white squares and one green square on the corners.
Tip. The green corners will be placed together to make the center of the flower. Therefore, if you have a directional fabric, check to see that the smaller squares are placed so that things will line up when they are sewn together. See the illustration for guidance.
Sew together by stitching along the diagonal line, remove pins as you come up to them.
Trim both the corner of the larger square and the corner triangle of the smaller square using ¼ inch seam allowance from the stitching line of all 4 corners.
Press all four corners open, pressing the seams open or toward the darker fabric. The smaller square now becomes the corner piece of the large block.
Use a ruler to square up/trim any uneven corners. The square should measure 6 ½” X 6 ½”.
Sewing the Snowball Quilt Block Flowers
Layout four of the squares with the green corners meeting in the middle. Place the top two squares on top of the bottom two squares with the right sides together, pin in place. Sew together using ¼” in seam allowance. Press the seams to one side or open.
Next, sew the four squares together vertically with the right sides together. Press the seam to one side or open.
Repeat this process for the other two snowball quilt block flowers.
Your quilt block should measure 12 ½” X 12 ½”. Trim as needed.
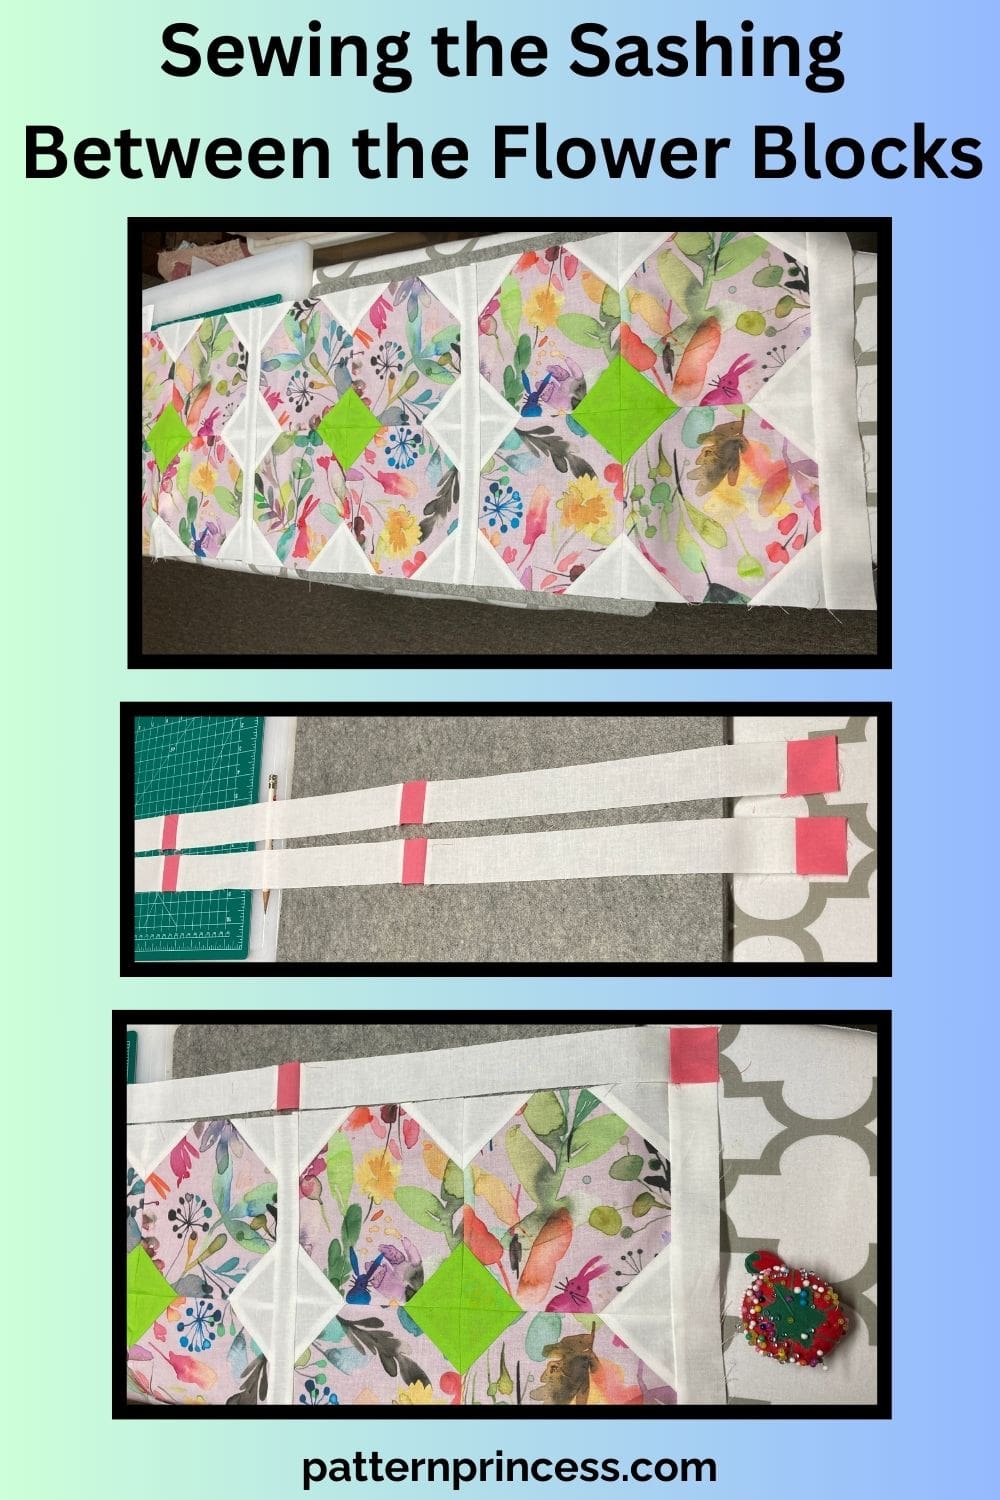
Sew on the Sashing
For this, you will need the following pieces.
- White Fabric Cut 10, 1 ½” X 12 1/2” strips.
- Pink Fabric cut 8, 1 ½” X 1 ½” squares.
Layout your three flower quilt blocks in the order you prefer. Starting on the left side, add a 1 ½” X 12 ½” white strip to the left side of the block. With right sides together, pin in place and sew together using ¼” seam allowance. Press the seam to the left. Repeat this process for the next two quilt blocks.
You now have three quilt blocks with the sashing on the left side.
Join the quilt block on the left to the white sashing side of the middle block with the right sides together using ¼” seam allowance. Press the seams to the left. Next, join the middle block to the white sashing side of the last block on the right.
Lastly, join the white sashing strip to the right side of the last block on the right with the right sides together. Press the seams to the left.
Set this aside.
Top and Bottom Sashing
Next, using the 8 pink squares and the 6 remaining white strips, we’ll make the top and bottom sashing strips.
For the top sashing strip join a pink 1 ½” X 1 ½” square to either end of a white 1 ½” X 12 1/2” strip with the right sides together using ¼” seam allowance. Next add a white 1 ½” X 12 1/2” strip, then sew on a pink 1 ½” X 1 ½” square. Finally add one more white 1 ½” X 12 1/2” strip, then sew on a pink 1 ½” X 1 ½” square. Press all the seams to the right.
Repeat this process to make the bottom sashing strip.
Sew the top and bottom sashings on. With the right sides together align the top and bottom sashing strips onto the flower blocks that you had set aside. Pin in place and make sure to align and nest the seams. Sew together using ¼” seam allowance. Press the seams to one side or open.
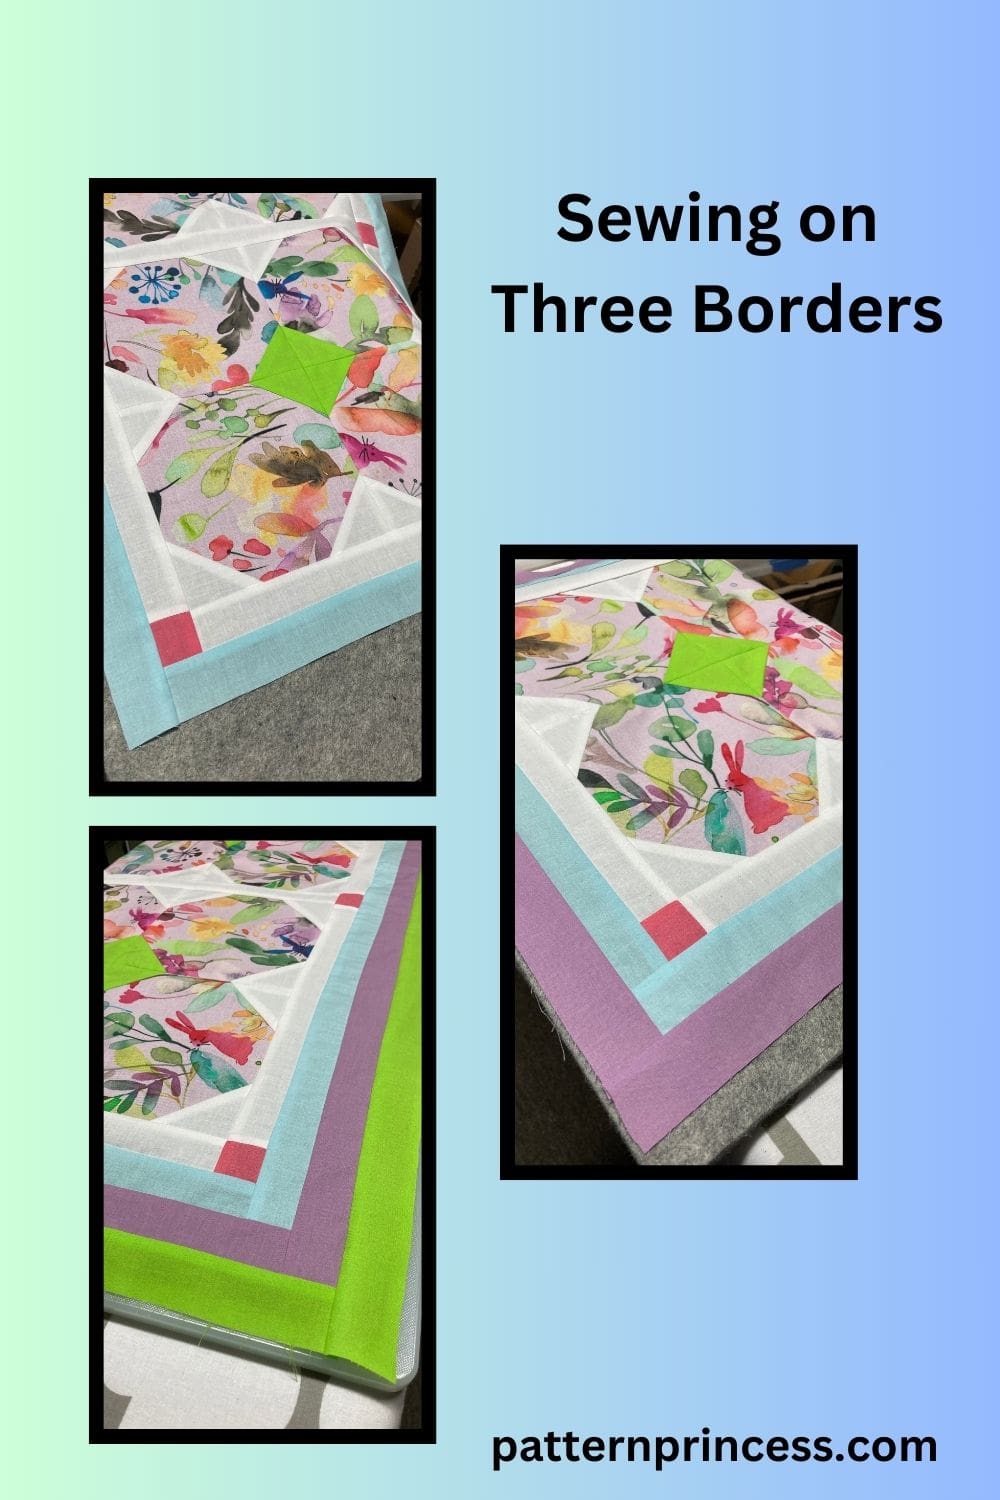
Join the first border
For this border, you will use the following pieces.
- Light Blue Fabric cut 2, 1 ½” X 14 ½” strips and 2, 1 ½” X 42 ½” strips.
With the right sides together sew the 1 ½” X 14 ½” strips on the sides. Press the seams out. Next, with the right sides together sew the 1 ½” X 42 ½” strips on the top and bottom. Press the seams out.
Second Border
For this border, you will use the following pieces.
- Lavender Fabric cut 2, 1 ½” X 16 ½” strips and 2, 1 ½” X 44 ½” strips.
With the right sides together sew the 1 ½” X 16 ½” strips on the sides. Press the seams out. Next, with the right sides together sew the 1 ½” X 44 ½” strips on the top and bottom. Press the seams out.
Third Border
For this border, you will use the following pieces.
- Green Fabric Cut 2, 1 ½” X 18 ½” strips and 2, 1 ½” X 46 ½” strips.
With the right sides together sew the 1 ½” X 18 ½” strips on the sides. Press the seams out. Next, with the right sides together sew the 1 ½” X 46 ½” strips on the top and bottom. Press the seams out.
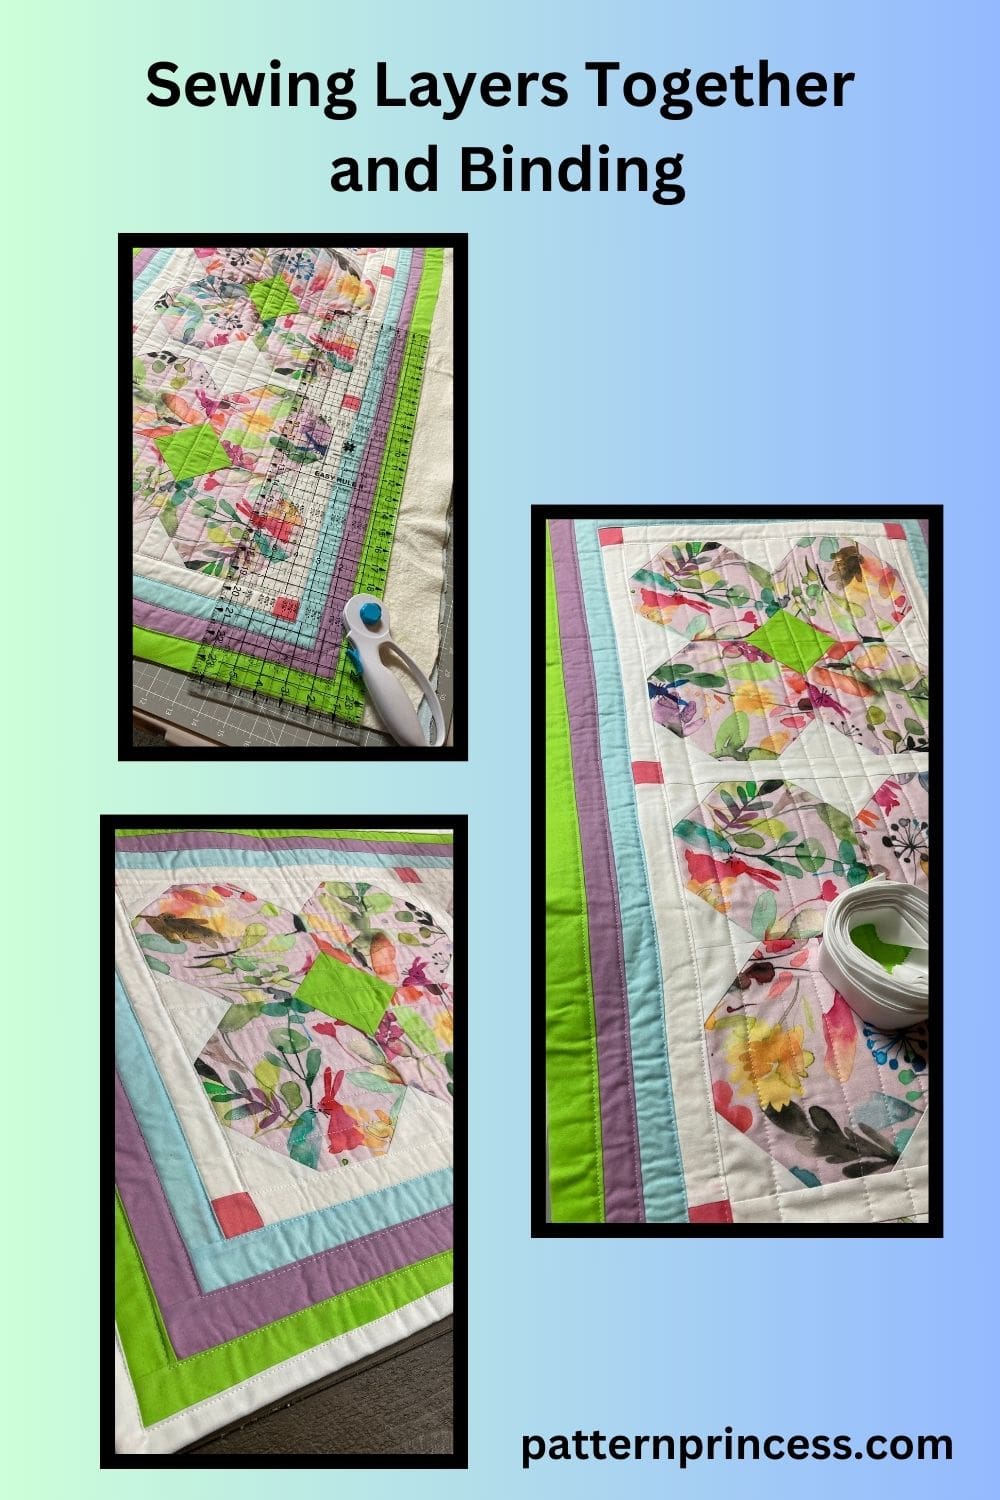
Sandwich the quilt layers
Prepare your backing and batting by cutting them to 22 X 48 inches. Working on a flat surface, lay your backing fabric face down with the batting on top, then the quilt top face up on top of the batting. Smooth out any wrinkles. Using safety pins, pin the layers together every 5 or 6 inches or so to hold the layers in place. Tip. The backing fabric and batting should be larger than the top of the table runner; about three inches on all sides.
Sewing the layers together
Using a walking foot on my sewing machine, I sewed through all three layers removing the safety pins as I went along.
I sewed next to the seam lines around each border. Then I used my ruler and a fabric marking pen that disappears with heat to make rows 1 inches apart running the length of the table runner in the 12 inch block section.
Binding the table runner
Binding 2 ½ X 147 inches. I made my own binding strip using white 4 jelly roll strips. Iron in half the length of the strip with the wrong sides together. Set this aside.
How to Make Your Own Quilt Binding Tutorial
The next step is trimming away the excess backing and batting.
To trim the backing and batting, I use a large cutting mat, a longer ruler, and a rotary cutter. Lay the table runner quilt flat. Place the ruler along the edge of the quilt and use it as a guide to run your rotary cutter against it to trim the batting and backing fabric to the size of the top fabric. Do this on all four sides.
Pin the raw edge of the binding onto raw edge of the quilt back. I generally start in the middle of a side leaving approximately a 3” tail hanging. Note: This hanging part will be used to sew to the other end of the binding strip when you have finished sewing all four sides of the binding onto the quilt.
Sew the binding onto all four sides of the easy quilt making sure to miter the corners and join the binding.
Fold the binding over the edge and use clips to hold in place. Sew along the edge to secure the binding on the quilt top.
Once all the sides and corners are stitched, you are done with your Whimsical Bunnies Table Runner Quilt Pattern.
We hope you liked this free pattern. Here are a few other free table runner patterns and quilts for you to explore.
How to Make a Quilt from Start to Finish 8 Easy Steps

You can find Victoria crocheting, quilting, and creating recipes. She has cooked in restaurants for over 20 years, including many larger parties. She learned to crochet when she was just 11 years old and has been crocheting ever since; over 50 years now. Over 40 years ago, she loved her first class in sewing and continues to hone her skills in quilting. Many have enjoyed the handmade gifts over the years. In her professional career, she has worked in management in a wide variety of businesses including higher education as a dean of a division. All the while attending college part-time to achieve her doctorate in higher education with an emphasis in e-learning.
Great fabric choice for this hop. Your instructions for the table runner are great thanks for sharing.
Thank you for stopping by and taking the time to comment. So glad you liked this table runner too.
Vicky
Your table runner is so pretty.
Thank you so much and thanks for stopping by.
Vicky
Gorgeous table runner! Thanks for sharing the pattern with us! xx
Thank you. Glad to share. Happy you enjoyed this table runner.
Vicky
This is adorable, and so wonderful that you shared the pattern with us. You are ready for spring!
Thank you, glad to share the pattern. I am ready for spring to come and decorating for spring might just help it get here sooner.
Vicky
Thanks so much for the pattern instructions. That fabric is beautiful. It looks like a watercolor.
Mary,
Yes, I saw the fabric and fell in love with it. In fact, I made another table runner that I am in the process of writing up that showcases the fabric even more. It looks like a collection of prints you’d hang on the wall behind a sofa. Thanks for stopping by.
Vicky
I love table runners, and yours is exquisite! And thanks for the tutorial – I have saved it to make later! What a beautiful project!
Joan,
Thank you so much. How fun that you will make a table runner using this pattern someday. Can’t wait to see what you come up with.
Vicky
Beautiful table runner, thanks so much for sharing!
Karrin,
Thanks for stopping by. It was fun sewing this one.
Vicky
I’m glad you said to look closely to find the bunnies! Thank you for the great tutorial.
Mary Anne,
I know, the bunnies are peeking through the colored grasses and flowers. Glad you enjoyed this one.
Vicky
This is a beautiful table runner and the fabrics are very pretty. I love how you arranged them and the tutorial was fabulous. Thank you for sharing this sweet “White Rabbit” project with us, Victoria!
Thank you Carol,
So glad you liked this one. What a fun theme to have to be creative with.
Cute table runner! Thank you for the pattern.
You are welcome. So happy you liked this.
Vicky
Very pretty table runner. Thank you also for the tutorial.
Hi Danice,
Enjoy the tutorial. Glad you liked the table runner.
Vicky