Last updated on August 19th, 2024 at 06:49 pm
This adorable plaid pumpkins table runner quilt is an easy pattern. Can you feel that chill in the air? Yep, fall is knocking on the door, and you know what that means, time to spruce up our spaces with some autumn vibes. And what better way to do that than with a touch of DIY
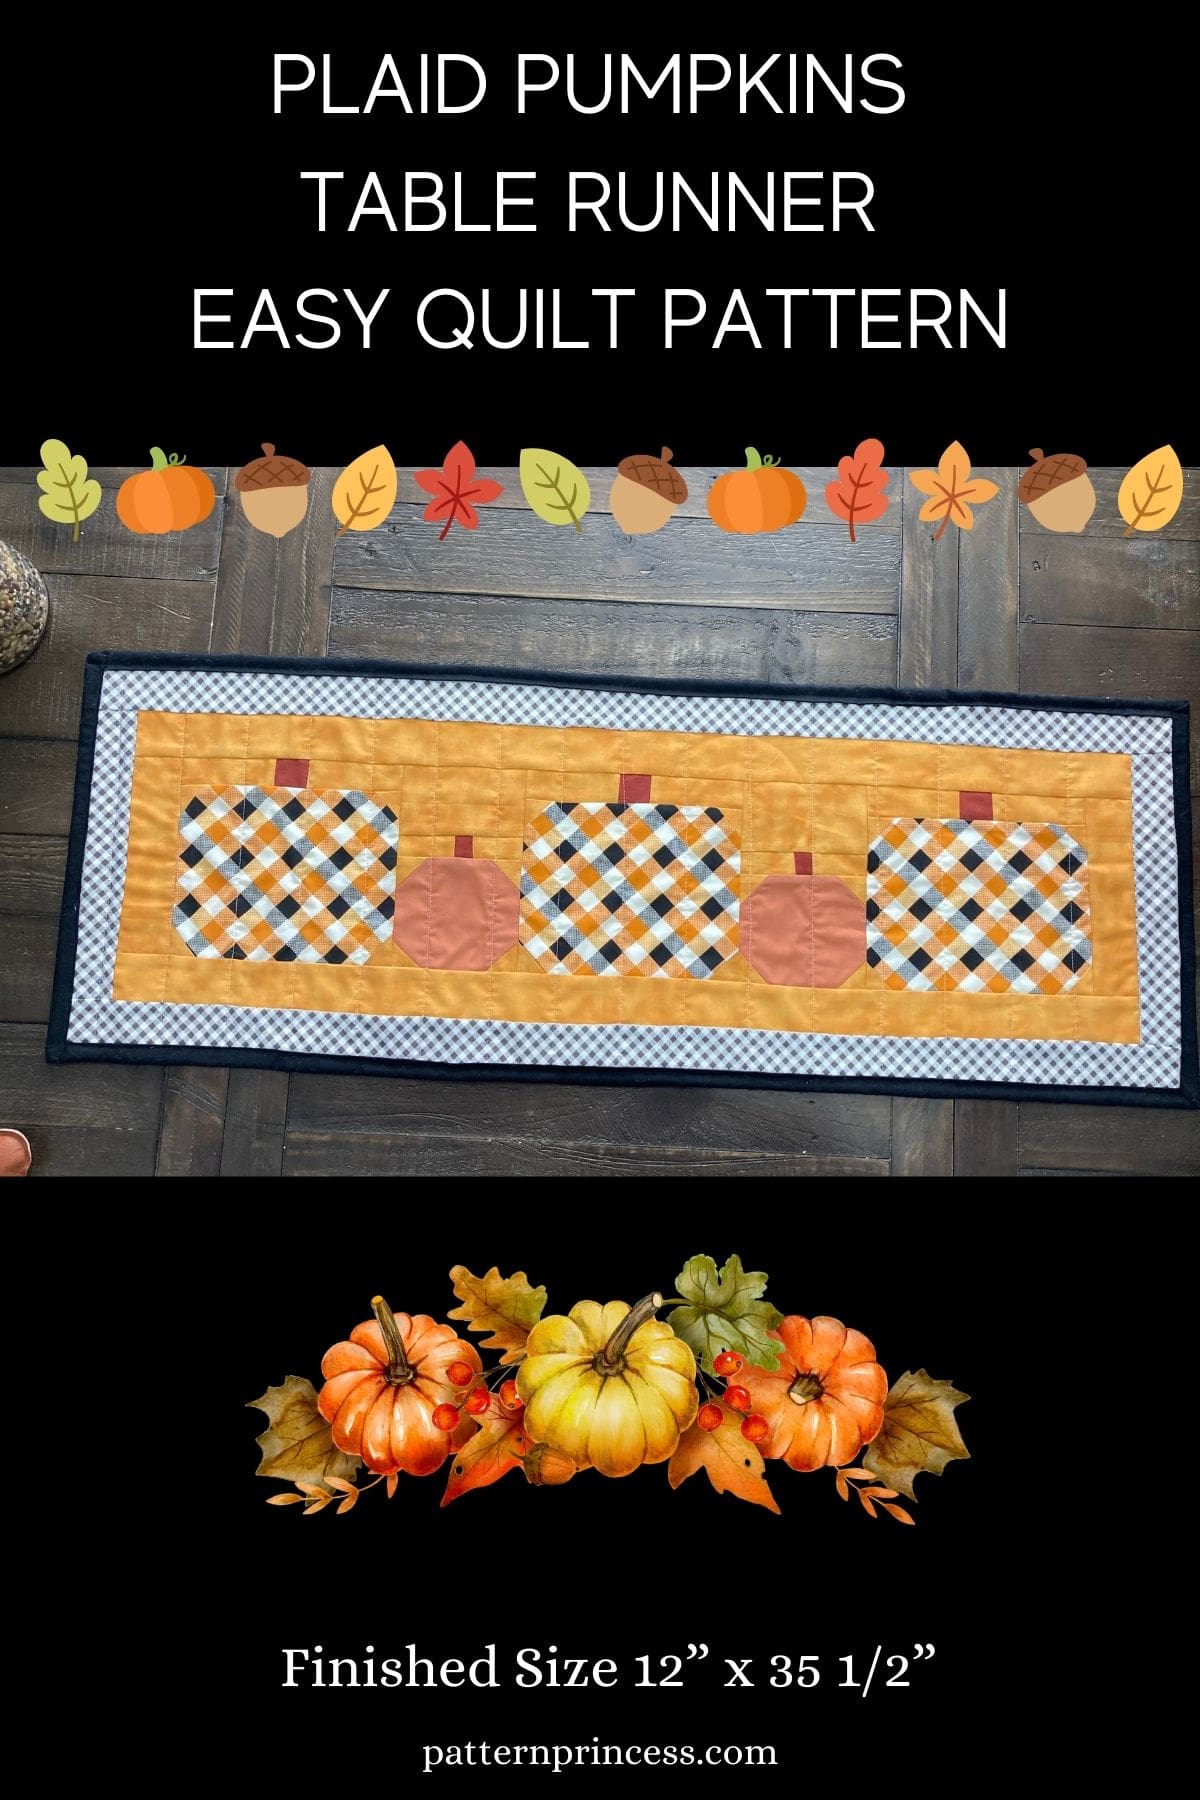
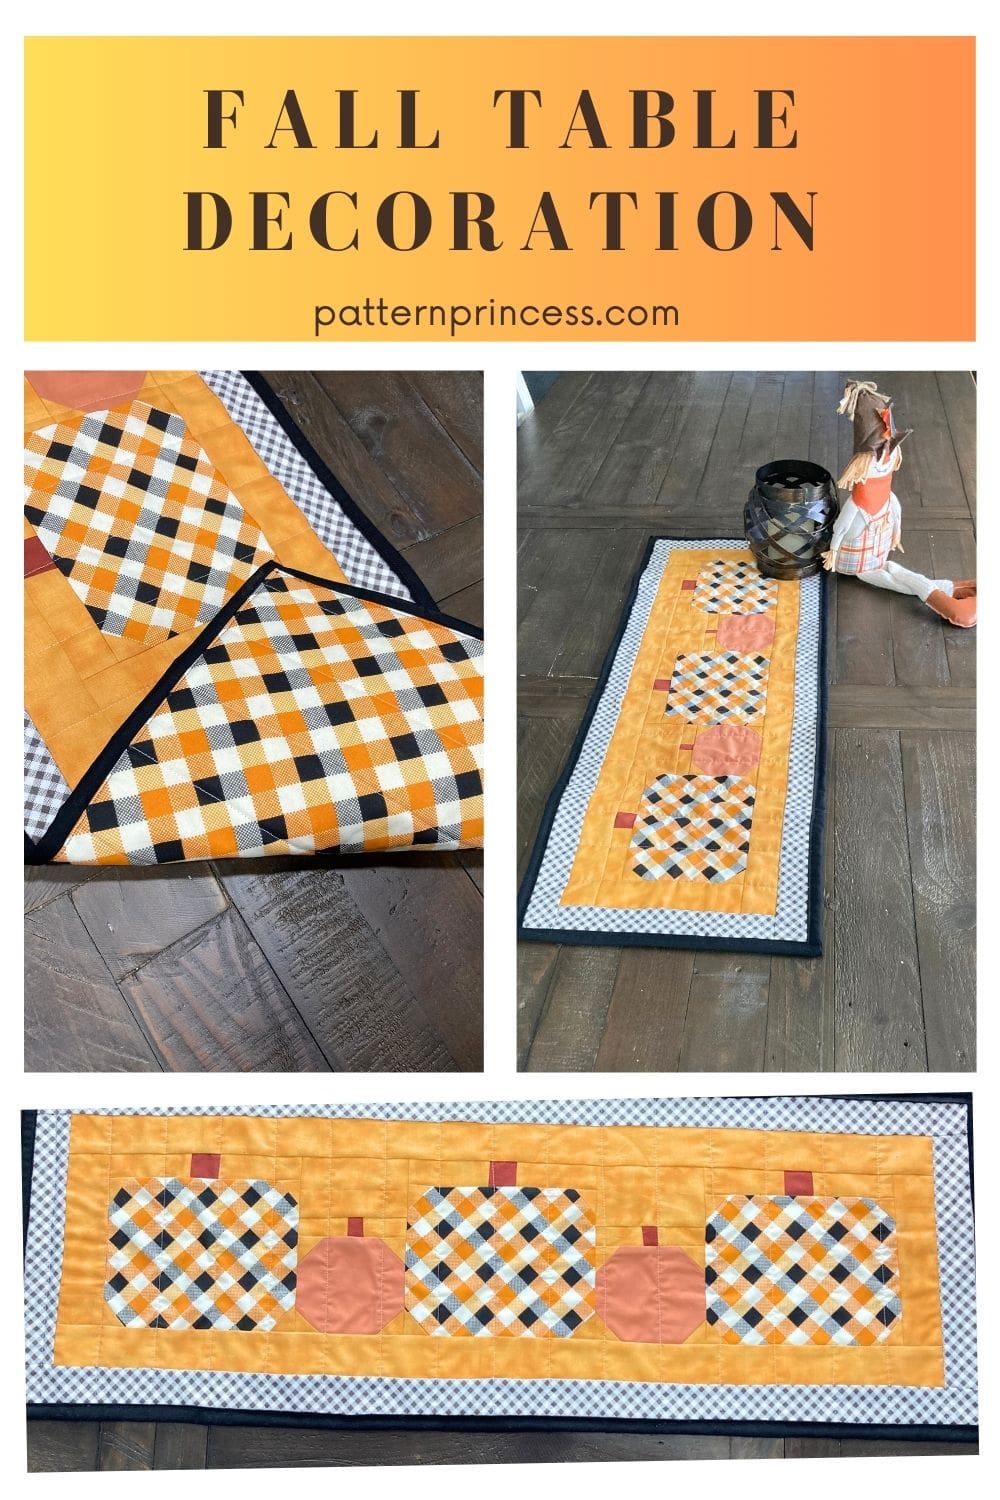
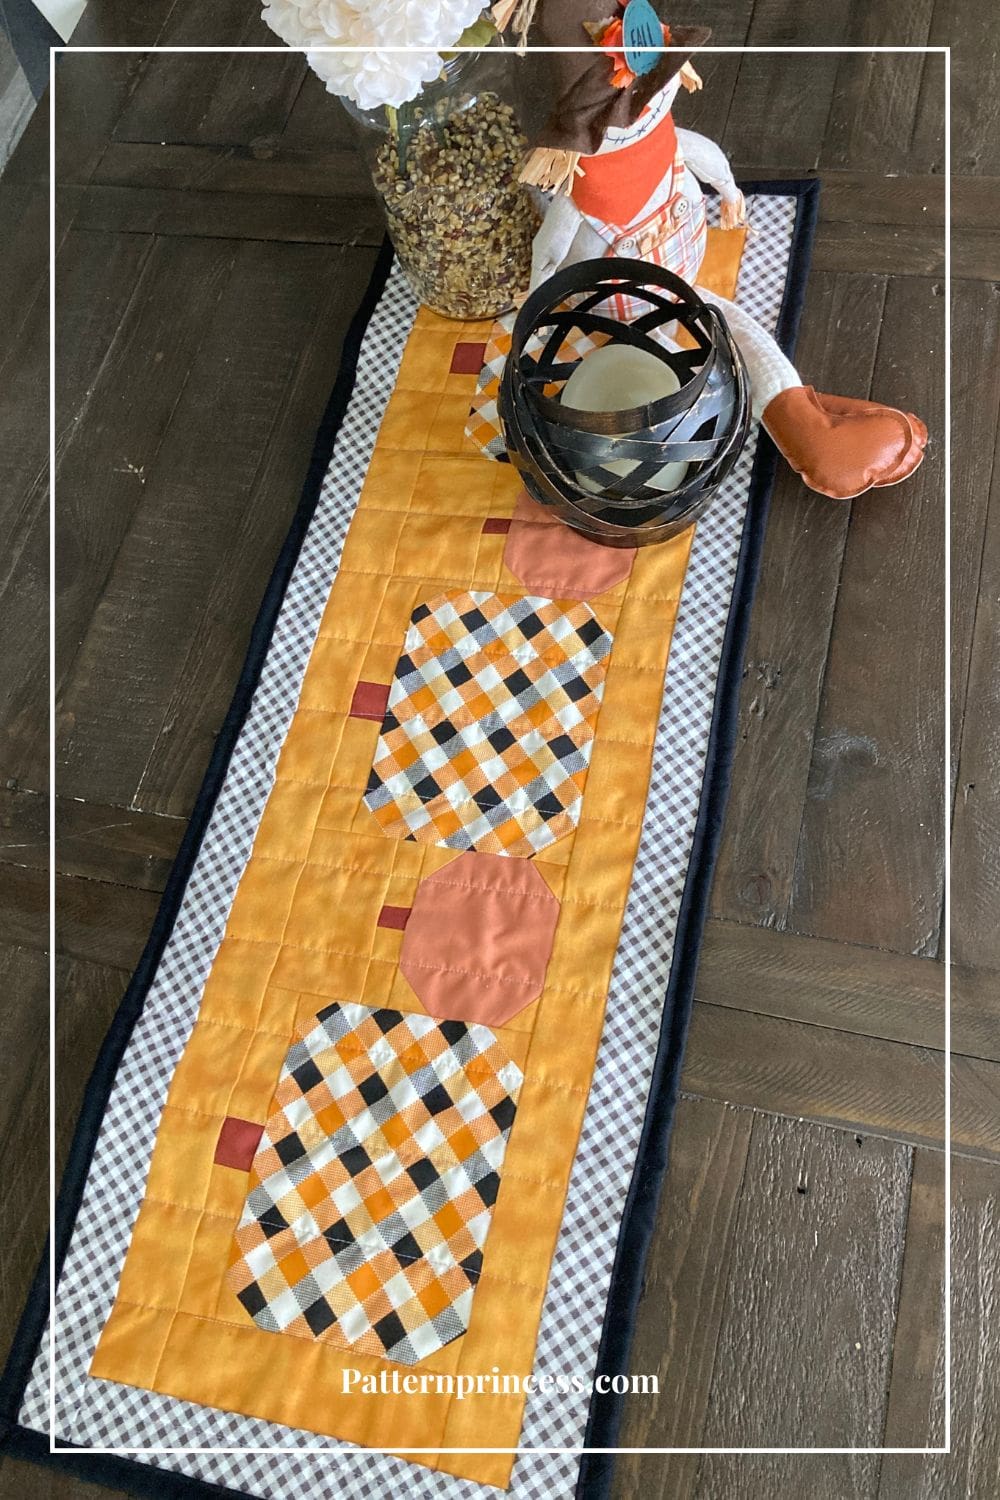
The cutest combo of plaid goodness and adorable pumpkins. Measuring 12” x 35 1/2”, this quilt is the perfect size to decorate a table. Or add a sleeve to the back of the quilt and hang this cute quilt up on a wall for your fall décor.
The pumpkins are created using gingham checked prints and orange fabric. For the background, I used a bright gold fabric to bring in the lovely fall colors. The brown and white plaid border frames the pumpkin display nicely.
However, you can have fun choosing your own color palette, there are no rules. You can coordinate your fabric or make each pumpkin in a separate fabric color for a scrappy look.
Pattern Inspiration
We have a neighbor that has a large pumpkin patch and corn maze each fall. Our farm yard is dotted with maple trees that turn gorgeous hues of yellow, orange, and red. I love the fall colors and the crisp mornings and evenings. It is so fun to capture this nostalgic feeling in a quilted fall decoration.
A quilting friend of mine made a pumpkin table runner a few years ago that I just fell in love with. It’s one of those things that once you see it, you think about it years later because you loved it so much.
I made this for my daughter’s dining room table as she was hosting her first Thanksgiving. Thank goodness this was a really quick pattern sew. I started it this past weekend and finished it the day before her guests arrived.
I hope you love this nature-inspired quilt pattern as much as I do.
Directions: Plaid Pumpkins Table Runner Easy Quilt pattern
Quilting Skill Level
Easy – Confident Beginner
Quilt Pattern Uses various sizes of fabric to create three gingham pumpkins and two solid color pumpkins. There are just two borders.
Finished Table Runner Measurements
12 X 35 1/2 inches finished.
Materials
Brown Fabric a small scrap 5 inches for the Pumpkin Stems.
Orange and Black Plaid Fabric 3/4 of a yard for Large Pumpkins.
Solid Orange Fabric 1 fat eight for Small Pumpkins.
Gold Fabric ¾ of a yard for Background.
Brown and White Plaid Fabric 1 yard for the border.
Backing Fabric 1 yard or a 14” X 37” rectangle
Batting Fabric 14” X 37” rectangle
Binding 2 ½” X 106” strip
I used 3 black jelly roll strips joined; however, you can cut your own 2 ½” strips and join them to make the binding. If you make your own, start with a piece of fabric about ¼ of a yard.
Thread
Equipment and Tools
- Rotary Cutter
- Quilting Ruler
- Cutting Mat
- Rotating Cutting Mat
- Iron
- Ironing Board or Pressing Mat
- Pins
- Clips
- Sewing Machine
- Disappearing fabric marker
- My Favorite Quilting Supplies
Plaid Pumpkins Table Runner Notes
Sew fabric together with right sides together using ¼-inch seam allowance. Unless otherwise noted. Pin or clip your pieces together before sewing them to ensure proper seam alignment.
The directions for this quilt are for rotary cutting, machine piecing, machine quilting, and machine sewing on the binding.
Trim any overhanging fabric as needed throughout project.
Begin by cutting fabric.

Fabric Cutting Instructions
Pumpkin Stems using the Brown Fabric
Cut (2) 1” X 1 ¼” pieces for the small pumpkin stems.
Cut (3) 1 ½” X 1 ½” pieces for the large pumpkin stems.
Large Pumpkins using the Orange and Black Plaid Fabric
Cut (3) 7 ½” X 6” pieces for the large pumpkins.
Small Pumpkins using the Solid Orange Fabric
Cut (2) 4” X 4 ½” pieces for the small pumpkins.
Background using the Gold Fabric (You may want to label these to make assembly easier).
A = Cut (6) 1 ½” X 3 ½” pieces.
B = Cut (20) 1 ½” X 1 ½” pieces.
C = Cut (2) 2 ¾” X 4 ½” pieces.
D = Cut (4) 1 ¼” 2 ¼” pieces.
Border 1
Using the same gold background fabric.
Cut (2) 2” X 7” strip for the sides.
Cut (2) 2” X 32 1/2” strip for the top and bottom.
Border 2
Second Border using the Brown and White Plaid Fabric.
Cut (2) 2” X 10” strip for the sides.
Cut (2) 2” X 35 ½” strip for the top and bottom.
Diagram for assembling both the large and small pumpkin units.
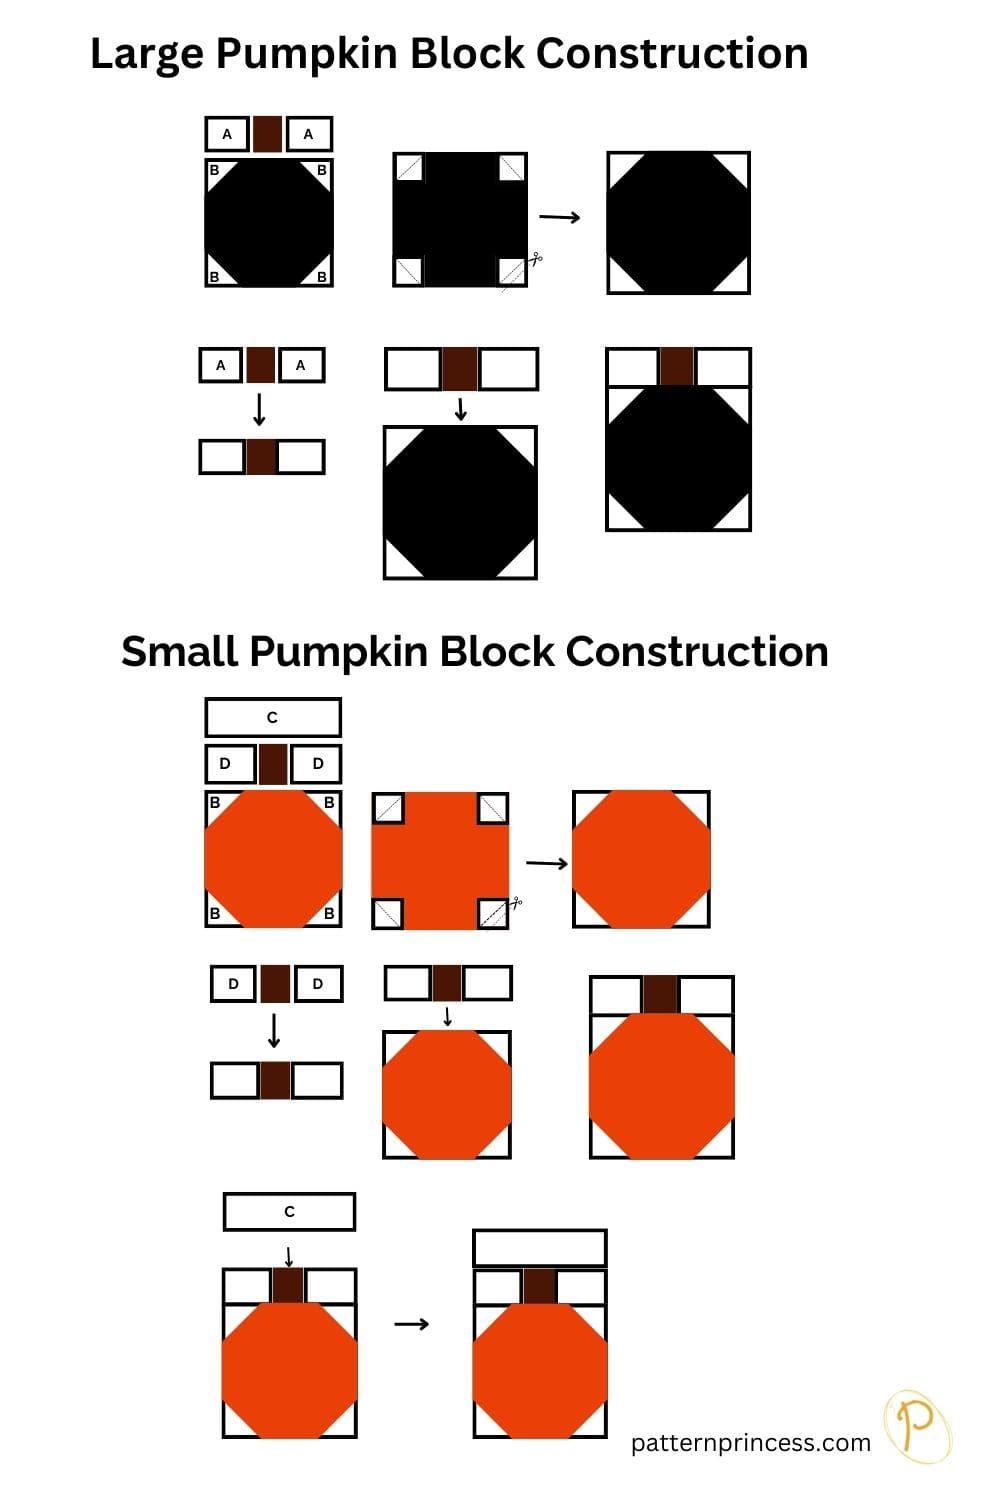
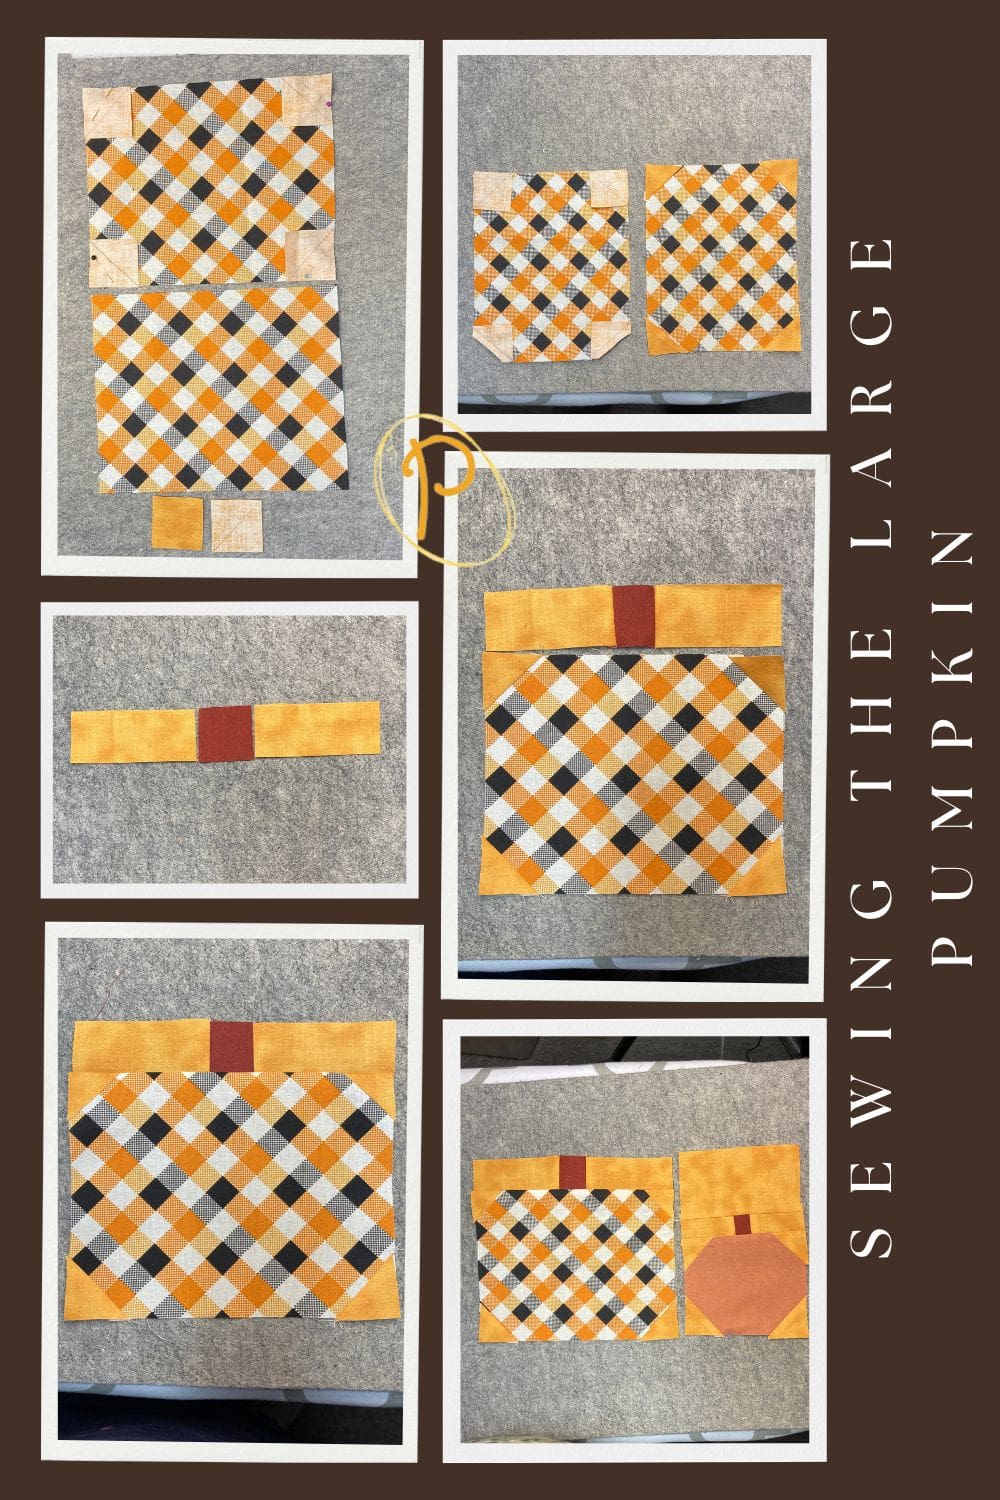
Large Pumpkin Block Assembly
For the large pumpkin block, use the following pieces. Refer to the diagram to help with the assembly.
- (3) 1 ½” X 1 ½” pieces in brown for the large pumpkin stems.
- (3) 7 ½” X 6” pieces for the large pumpkins.
- A = (6) 1 ½” X 3 ½” pieces in gold fabric.
- B = (12) 1 ½” X 1 ½” pieces in gold fabric.
Begin by marking a line on each B piece on the wrong side along the diagonal from corner to corner. Pin the squares to each corner of the 7 ½” X 6” fabric pieces right sides together with the diagonal line at a diagonal in each corner. Sew on the line.
Trim the corners. Press seams open.
Sew the background pieces A on either side of the stem piece B using ¼” inch seams allowance with the right sides together. Press the seams open.
Then sew this on the top of the pumpkin. Press the seam toward the pumpkin unit. The large pumpkin unit should measure 7” X 7 ½”.
Repeat the steps for the other two large pumpkins.
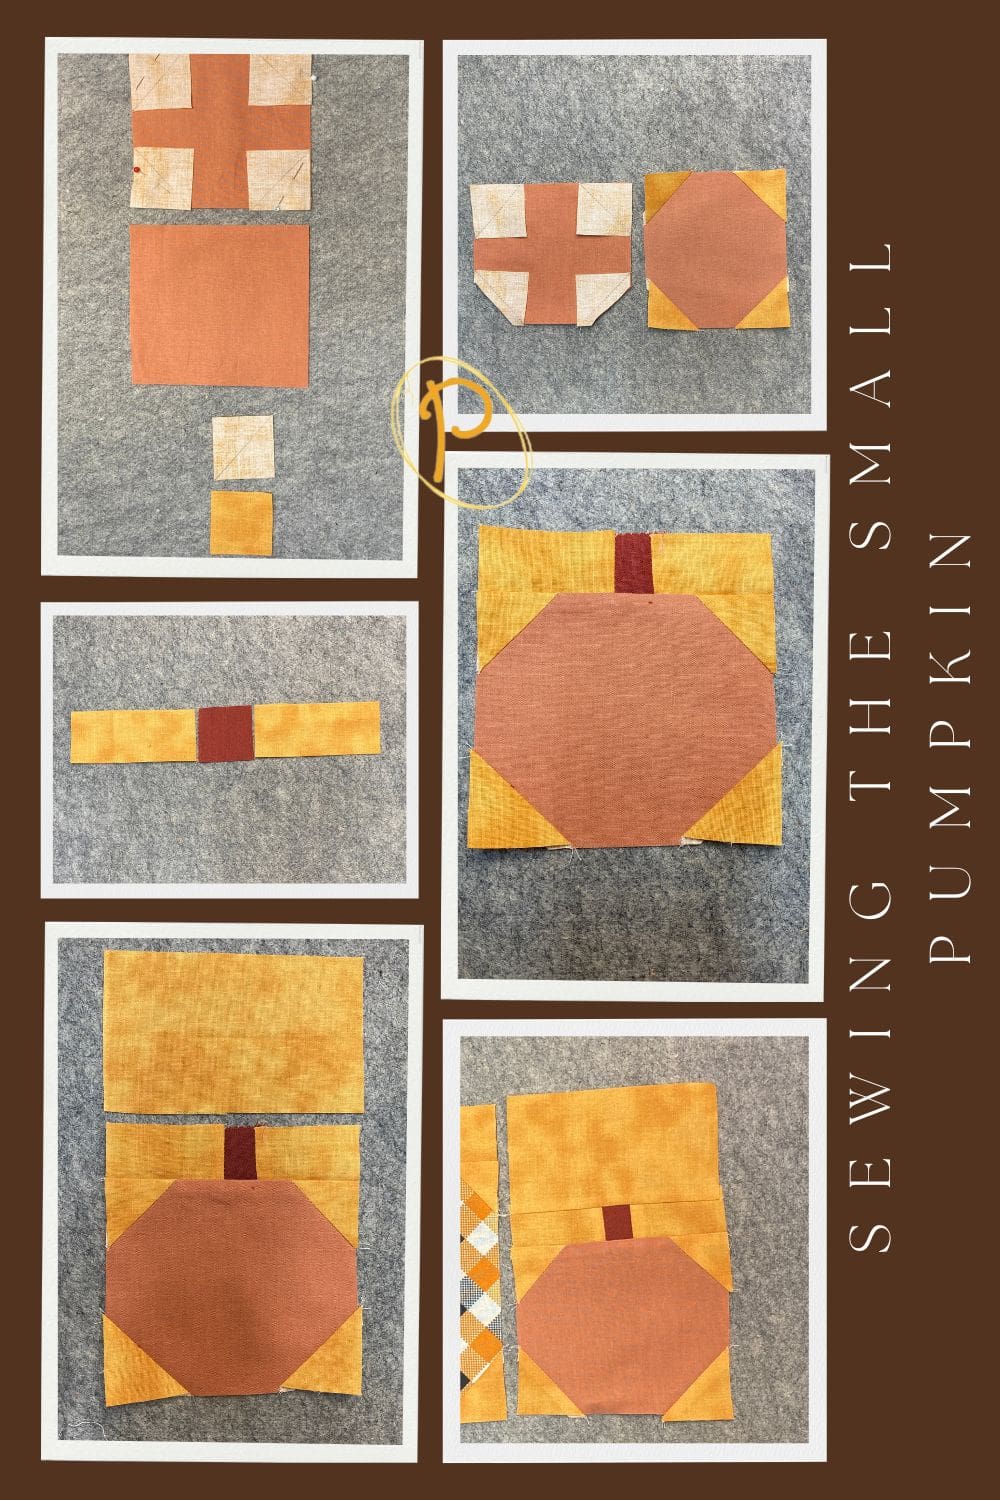
Small Pumpkin Block Assembly
For the small pumpkin block, use the following pieces. Refer to the diagram to help with the assembly.
- (2) 1” X 1 ¼” pieces in brown fabric for the small pumpkin stems.
- (2) 4” X 4 ½” pieces for the small pumpkins.
- B = (8) 1 ½” X 1 ½” pieces in gold fabric.
- C = (2) 2 ¾” X 4 ½” pieces in gold fabric.
- D = (4) 1 ¼” 2 ¼” pieces in gold fabric.
Begin by marking a line on each B piece on the wrong side along the diagonal from corner to corner. Pin the squares to each corner of the 4” X 4 ½” fabric pieces with the diagonal line at a diagonal in each corner. Sew on the line.
Trim the corners. Press seams open.
Sew the background pieces D on either side of the stem piece B using ¼” inch seams allowance with the right sides together. Press the seams open.
Then sew this on the top of the pumpkin. Press the seam toward the pumpkin unit.
Next sew piece C on top of the stem unit. Press the seam towards the C piece.
The small pumpkin unit should measure 4 ½” X 7”.
Repeat the steps for the other small pumpkin.
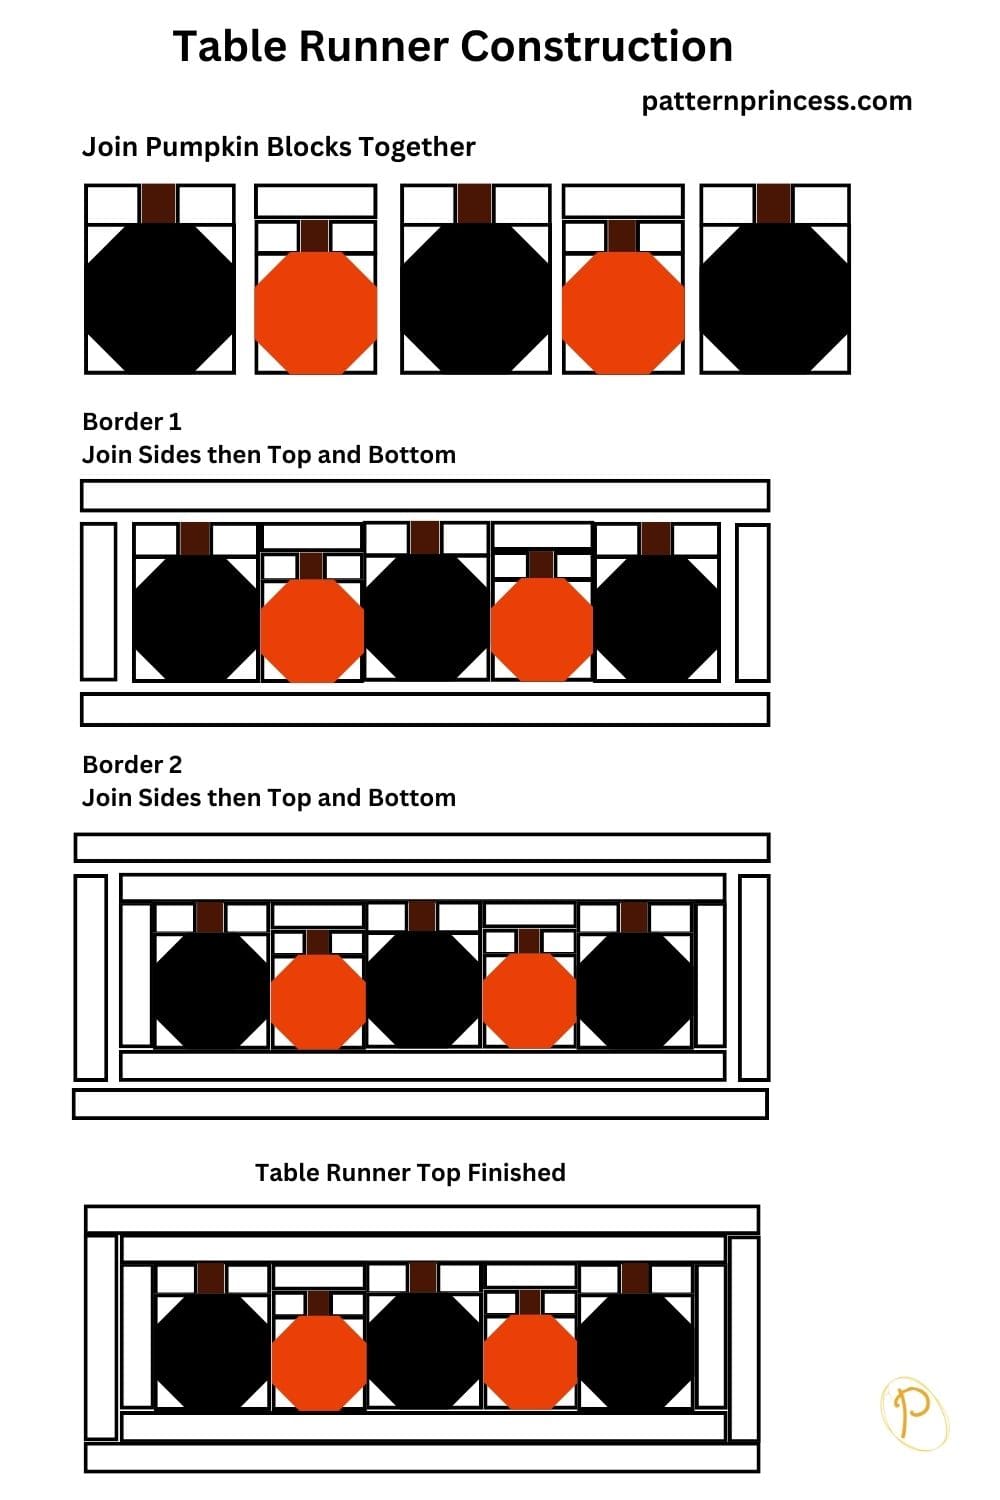
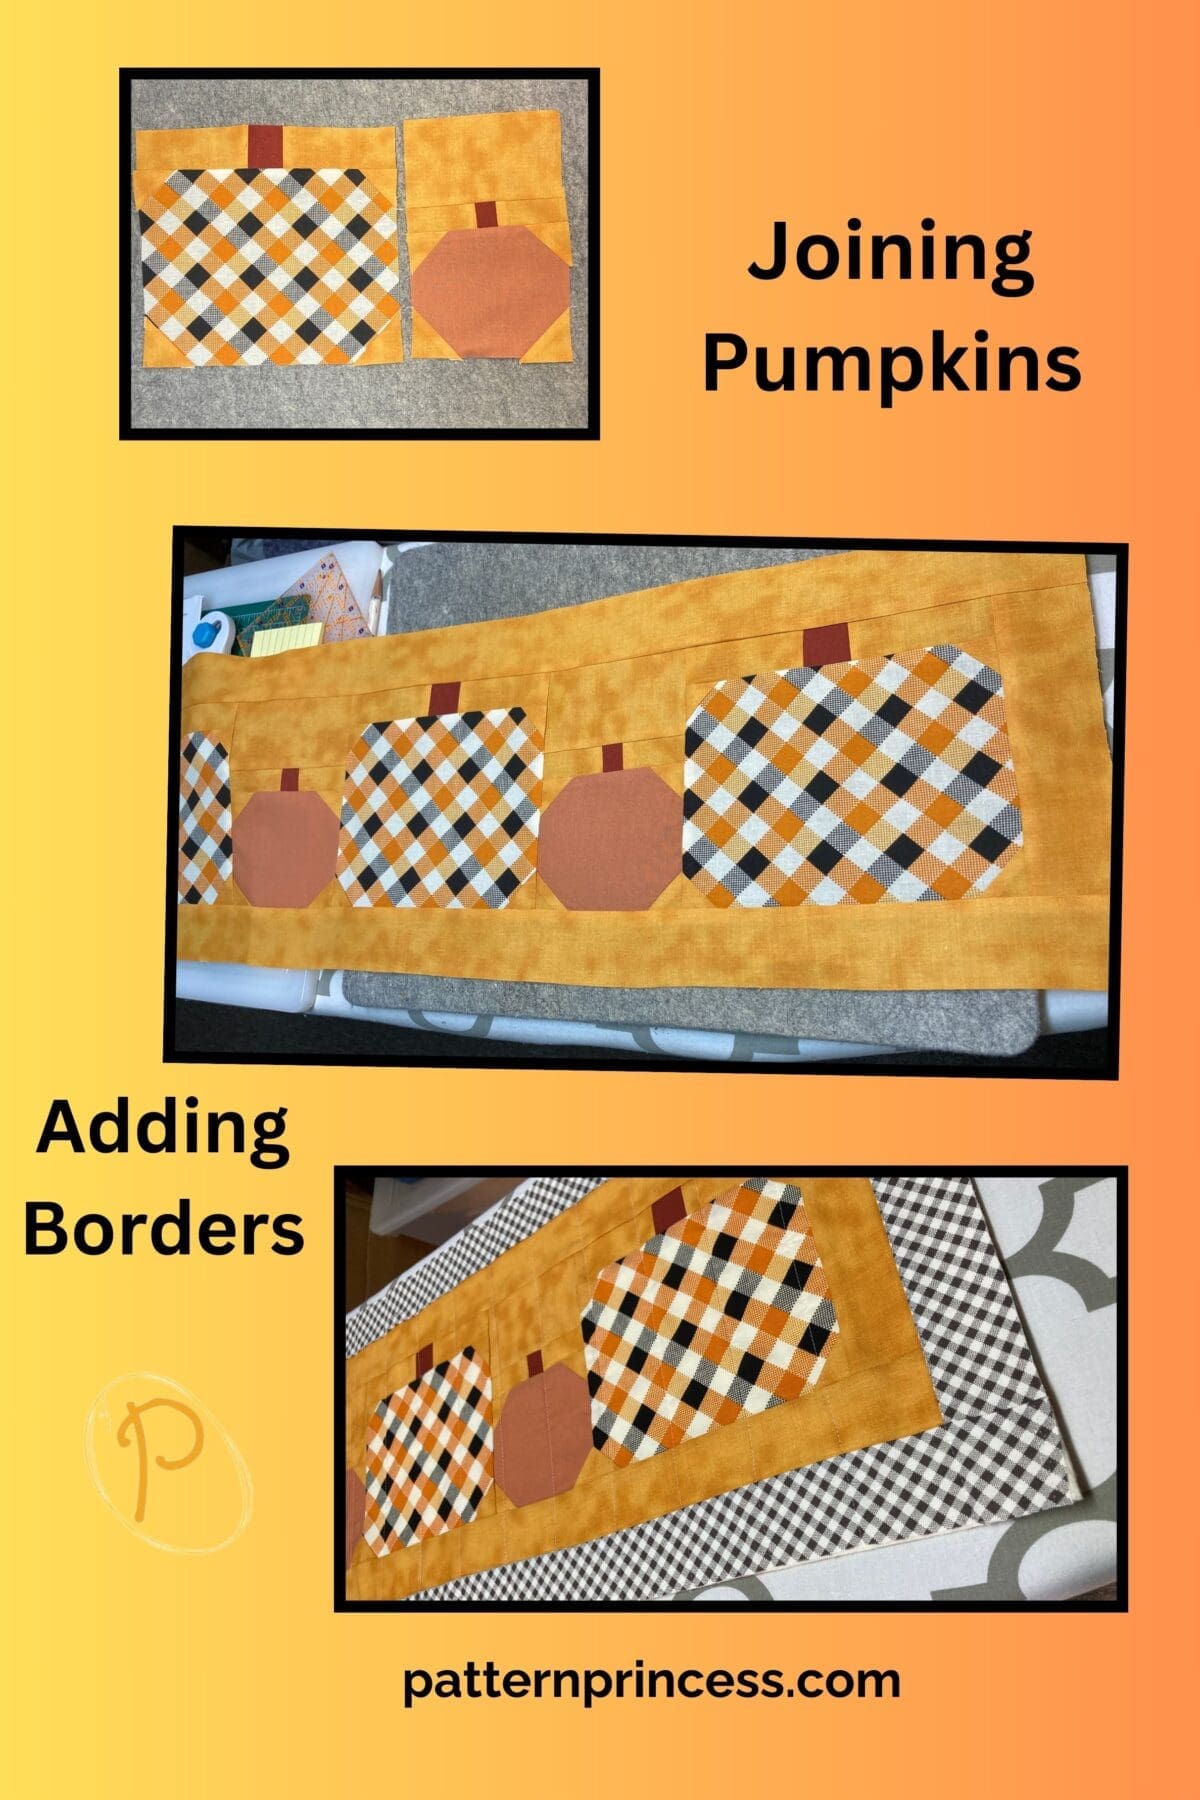
Table Runner Assembly
Begin by sewing the pumpkins together in a row. Sew the blocks together side-by-side using ¼” seam allowance. Alternate between the large pumpkins and small pumpkins. Press the seams open or to one side.
Adding the Two Borders
Border 1
Using the same gold background fabric.
Cut (2) 2” X 7” strip for the sides.
Cut (2) 2” X 32 1/2” strip for the top and bottom.
Sew the 2” X 7” strip to the sides of the pumpkins unit. Press the seams toward the strip.
Next, using the 2” X 32 1/2” strip, sew it on the top and bottom of the pumpkins unit. Press the seams toward the strip.
Border 2
Second Border using the Brown and White Plaid Fabric.
Cut (2) 2” X 10” strip for the sides.
Cut (2) 2” X 35 ½” strip for the top and bottom.
Sew the 2” X 10” strip to the sides of the table runner. Press the seams toward the strip.
Lastly, sew the 2” X 35 ½” strip, on the top and bottom of the table runner. Press the seams toward the strip.
Finishing the Plaid Pumpkins Table Runner Quilt
It’s time to make the quilt sandwich with the backing, batting, and the mini quilt top. For this you will be using the following fabric pieces.
- The quilt top you just finished creating.
- Backing Fabric 1 yard or a 14” X 37” rectangle
- Batting Fabric 14” X 37” rectangle
The backing fabric and the batting should be a few inches larger all the way around than the quilt top.
Lay the backing fabric on a flat solid surface with the right side down facing out. Smooth out any wrinkles. Use painters’ tape or masking tape to secure the edges of the fabric down. This will help hold it in place and reduce the chance of a wrinkle developing as you place the next two layers.
Next, center the batting on top of the backing fabric smoothing out any wrinkles.
Finally, place the table runner top on the batting, centering it with the right side up. Smooth out any wrinkles.
Pinning the Layers Together
Once you have the top fabric all smoothed out, baste all three layers together using large safety pins. Use a good quality 1 ½” stainless steel pin for this.
Put a pin in each corner and around the entire quilt about every 5-6 inches or so through all three layers.
This holds things in place, so they don’t move around while you are sewing the layers together using a quilting design of your choice.
Alternatively, you could use fabric spray glue to baste the layers together rather than pinning.
Sew the layers together in your desired pattern. I sewed strips every 2” inches apart. To make things easier, I marked the sewing lines with a fabric marker that disappears with the heat of the iron.
Trim the Batting and Backing Fabric Before Binding the Edges
The next step is trimming away the excess backing and batting. Then adding binding on the edges.
To trim the backing and batting, I use a large cutting mat, a longer ruler, and a rotary cutter. Lay the table runner quilt flat. Place the ruler along the edge of the quilt and use it as a guide to run your rotary cutter against it to trim the batting and backing fabric to the size of the top fabric. Do this on all four sides.
It’s now time for the binding. You will need a 2 ½” X 106” strip. I used 3 black jelly roll strips joined. If you are newer to quilting, we have a tutorial on how to make your own binding.
Sew the binding onto the back of the table runner with the raw edge to the raw edge of the table runner. Miter each corner.
Finally, sew the binding onto the front. Bring the folded side of the binding to the front of the quilt top. Sew the binding to the top mitering each corner.
We hope you loved making your own plain pumpkins table runner. Here are a few other free quilt patterns for you to make.

You can find Victoria crocheting, quilting, and creating recipes. She has cooked in restaurants for over 20 years, including many larger parties. She learned to crochet when she was just 11 years old and has been crocheting ever since; over 50 years now. Over 40 years ago, she loved her first class in sewing and continues to hone her skills in quilting. Many have enjoyed the handmade gifts over the years. In her professional career, she has worked in management in a wide variety of businesses including higher education as a dean of a division. All the while attending college part-time to achieve her doctorate in higher education with an emphasis in e-learning.