Last updated on July 4th, 2024 at 11:30 pm
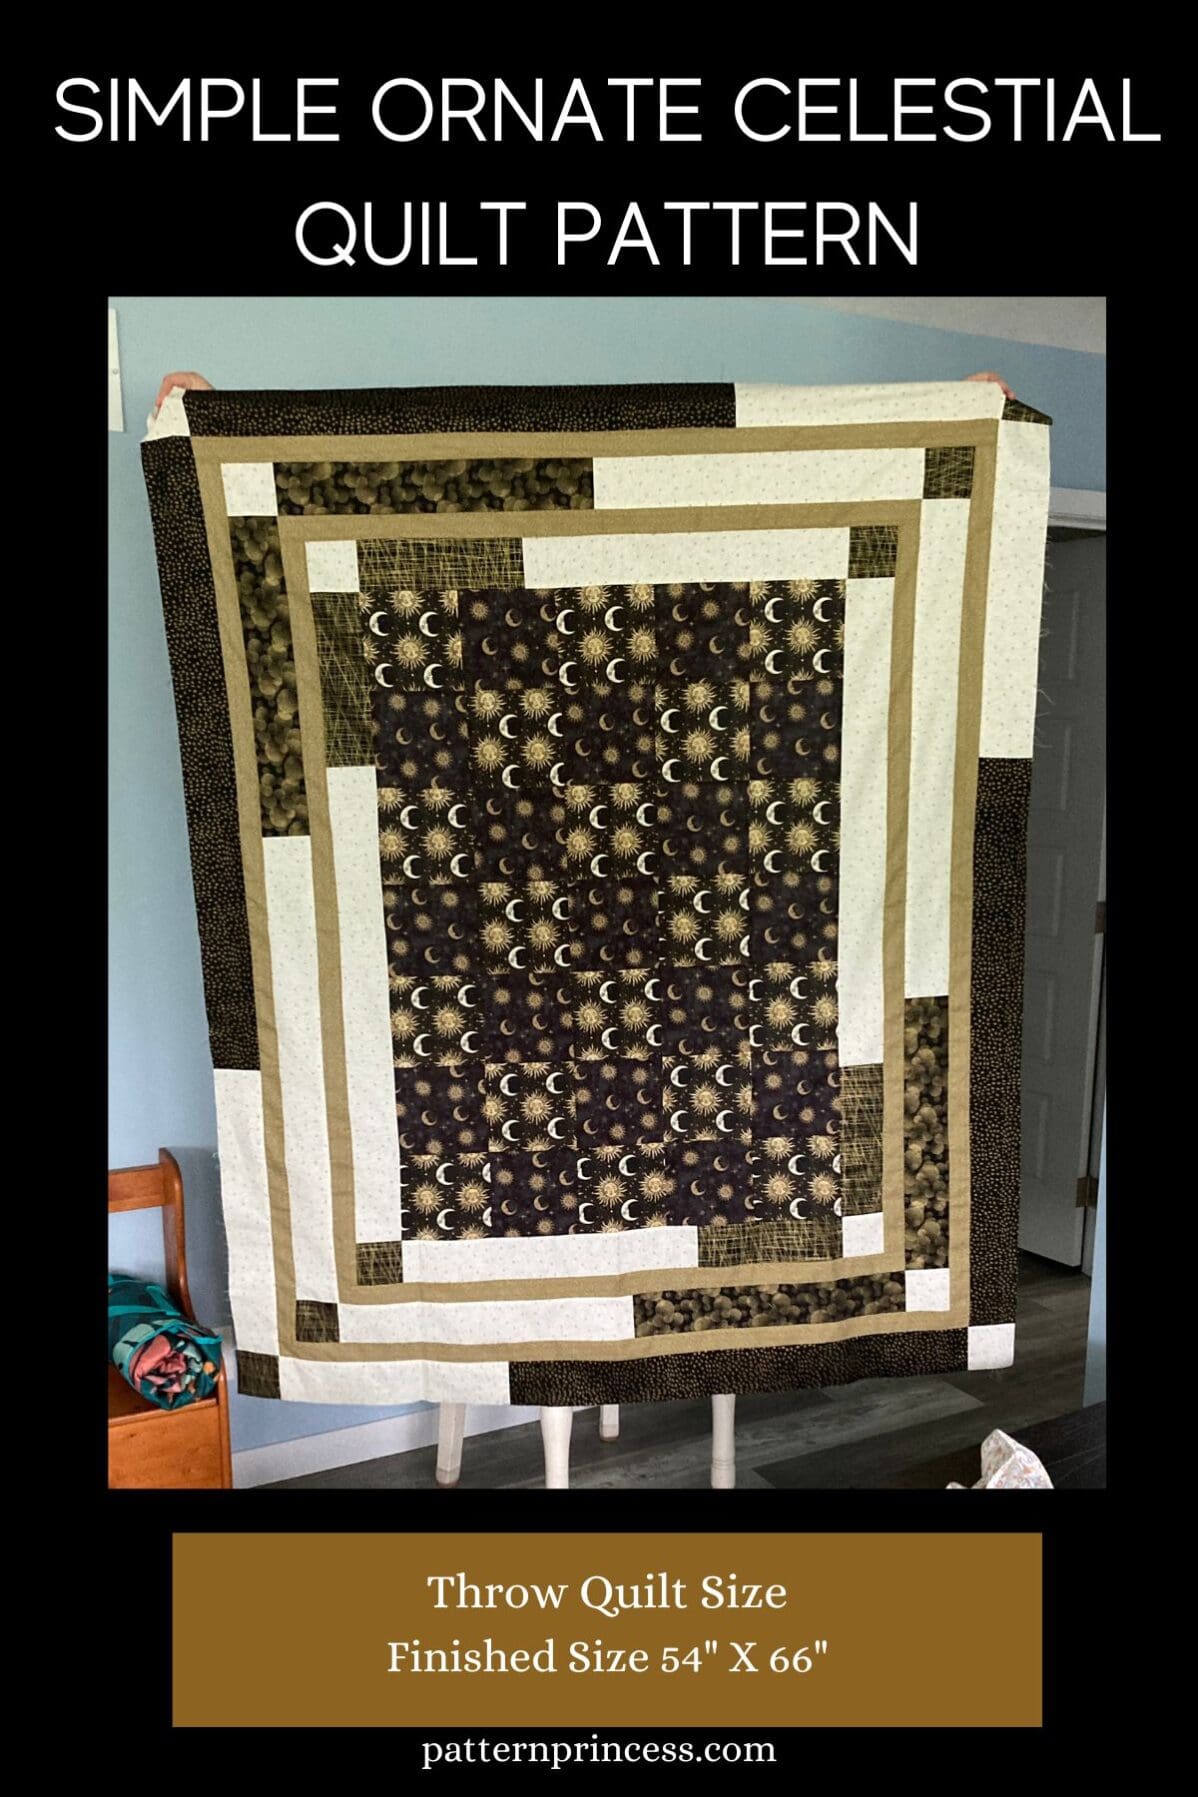
Introducing the Simple Ornate Celestial Quilt Pattern, a delightful quilting project that strikes the perfect balance between simplicity and elegance.
Are you ever in the mood for a project that’s both beautiful and blissfully simple? This is a project that allows you to create something stunning without the complexities and intricate designs.
Elegance Meets Effortlessness
Whether you’re a seasoned quilter with years of experience under your belt or just beginning your quilting journey, this pattern is designed to cater to your creative needs. The beauty of this quilt lies in its simplicity, making it a perfect choice for those moments when you want to sew something pretty without having to overthink the process.
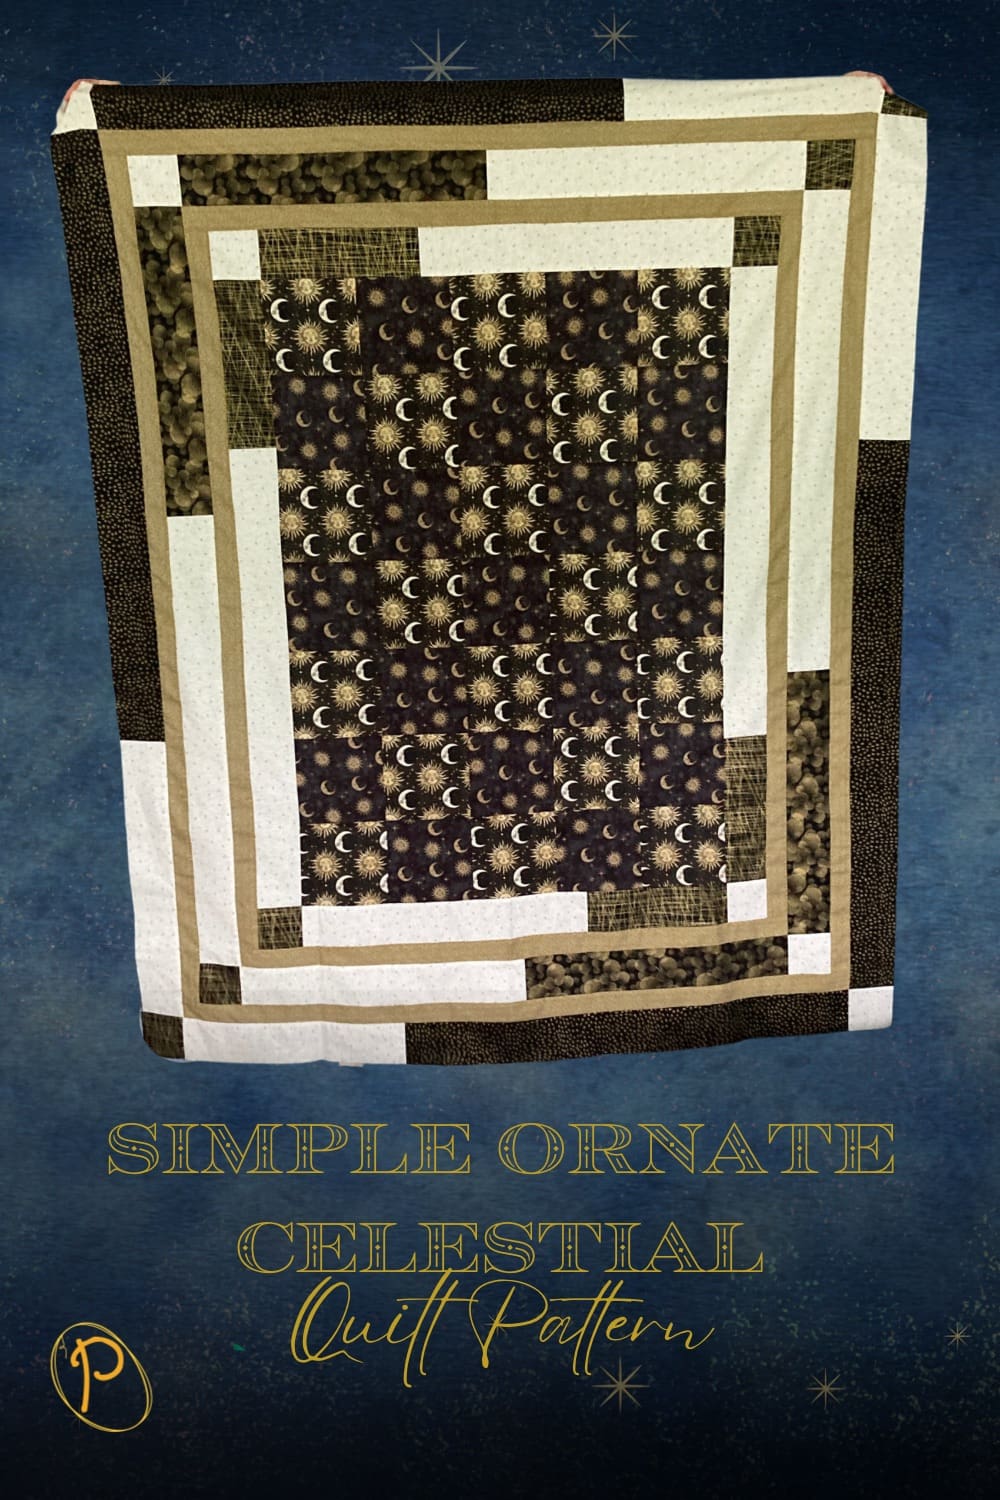
The heart of this quilt is crafted using 6-inch quilt blocks, stitched together in two celestial themed printed fabrics. The result is a captivating center that effortlessly combines the charm of tradition with the allure of the modern aesthetic.
However, what truly sets the Simple Ornate Celestial Quilt Pattern apart from the rest are the magnificent and uncomplicated borders. These borders add a touch of ornate beauty to your creation while ensuring that the quilting process remains hassle-free and enjoyable.
Post contains affiliate links, and we earn commissions if you shop through the links on this page. For more information, please read the disclosure section under the About Us page.
Quilt Pattern Inspiration
Have you ever been standing in a fabric store with the goal of purchasing fabric and supplies for a different project when you see fabric that seems to speak to you? I had this happen a few times already with yarn, where I walked past yarn, stopped in my tracks, and stood there with the vision of the finished crochet project in my head.
Well, this happened to me for quilting now. I was in a fabric store to get fabric that was on sale, and only the sale fabric. That obviously didn’t happen.
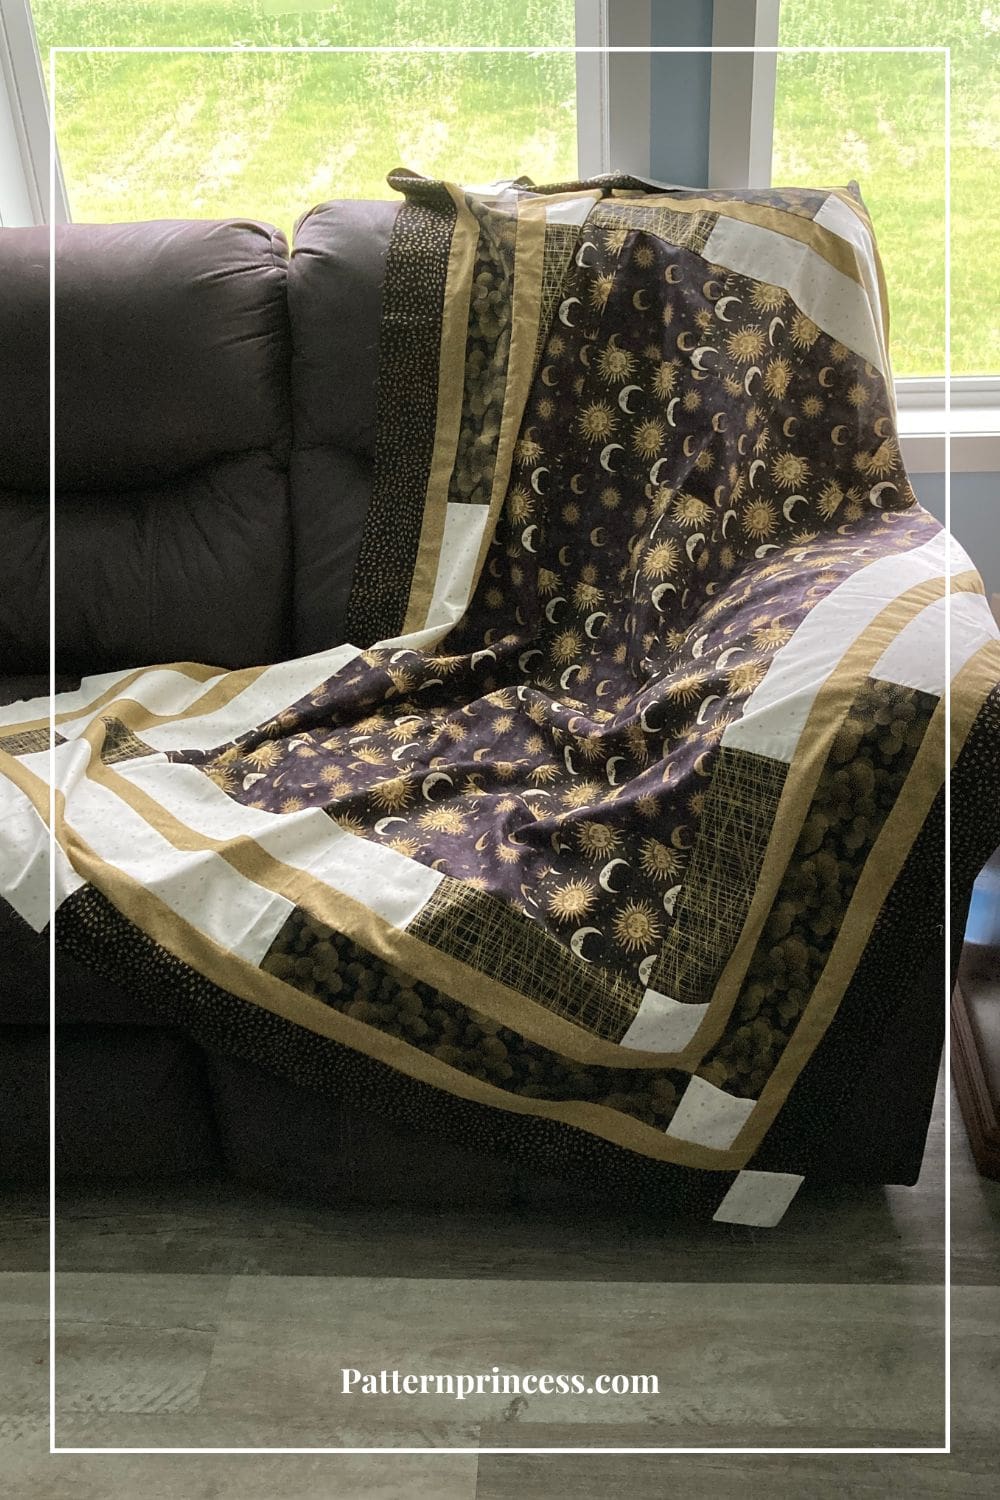
As I was standing in line to check out, I saw this celestial themed fabric from Jason Yenter for In the Beginning Fabrics©. The longer I stood there, the more I couldn’t resist. I could see all the fabrics that I would use and even pictured the design in my head.
So, the fabric for this quilt wasn’t on sale, but I just love how it turned out. It was quick to make too. With just a few simple steps, you can create the center and add the borders for a celestial-inspired blanket.
Easy Quilt Block Layout for Beginners
Sometimes I’m just in the mood for a super simple squares quilt pattern. I don’t want to have to think too hard, I just want to sew something pretty. This quilt pattern is sure to give you exactly what you are looking for whether you’re a seasoned quilter or a person just starting out.
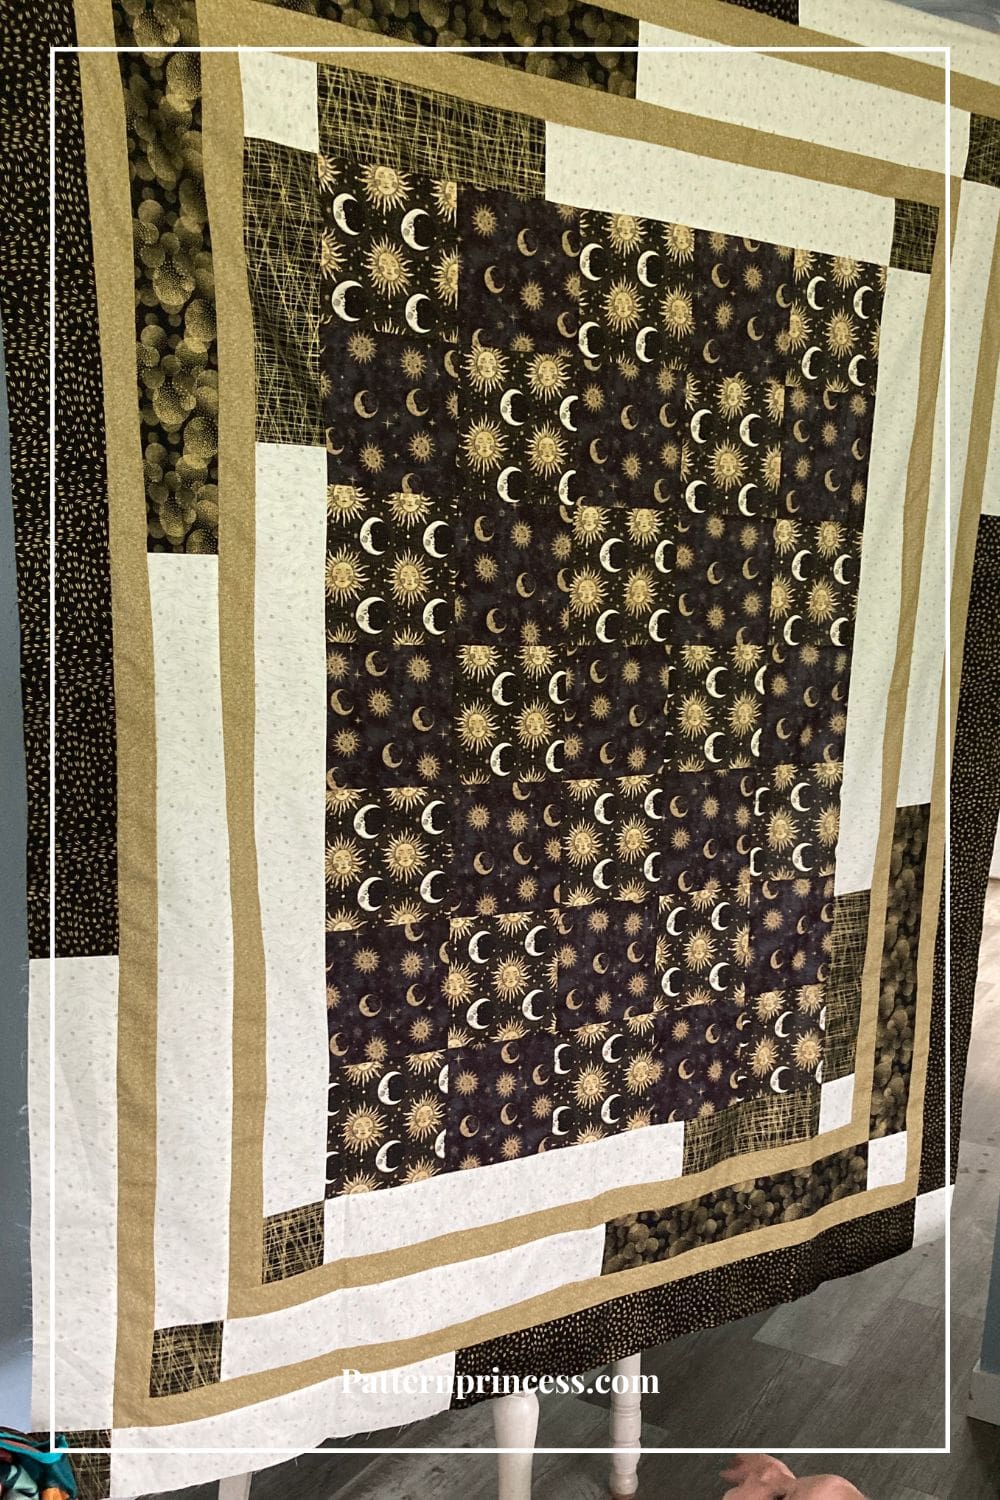
This pattern uses 6 inch quilt blocks joined together to make the center of this quilt in two printed fabrics. Just layout the fabric squares in an alternating pattern.
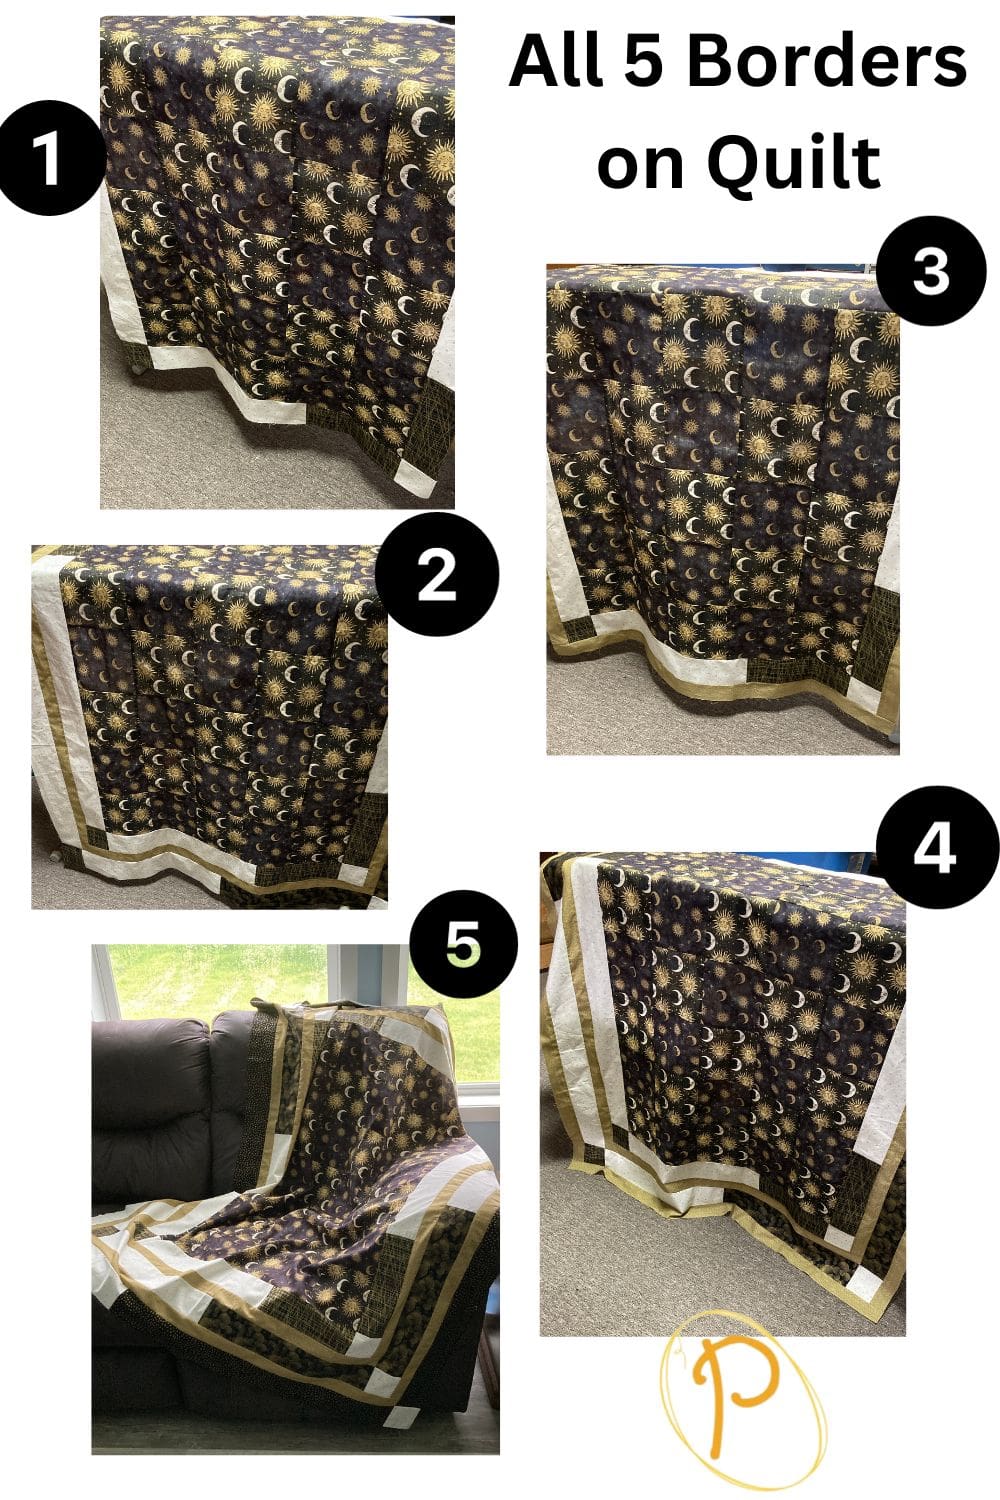
There are five borders that frame the center rectangle. Using complimentary dark and light fabrics along with a solid gold fabric, this quilt top transforms from plain squares being joined together to an eye-catching work of art.
Directions: Simple Ornate Celestial Quilt Pattern
Quilting Skill Level
Easy – Confident Beginner
Finished Quilt Measurements
54 X 66 Inches
Materials and Equipment/Tools
The fabric requirements for the quilt tip, backing, binding, and the batting needed are noted below.
Materials
Fabric
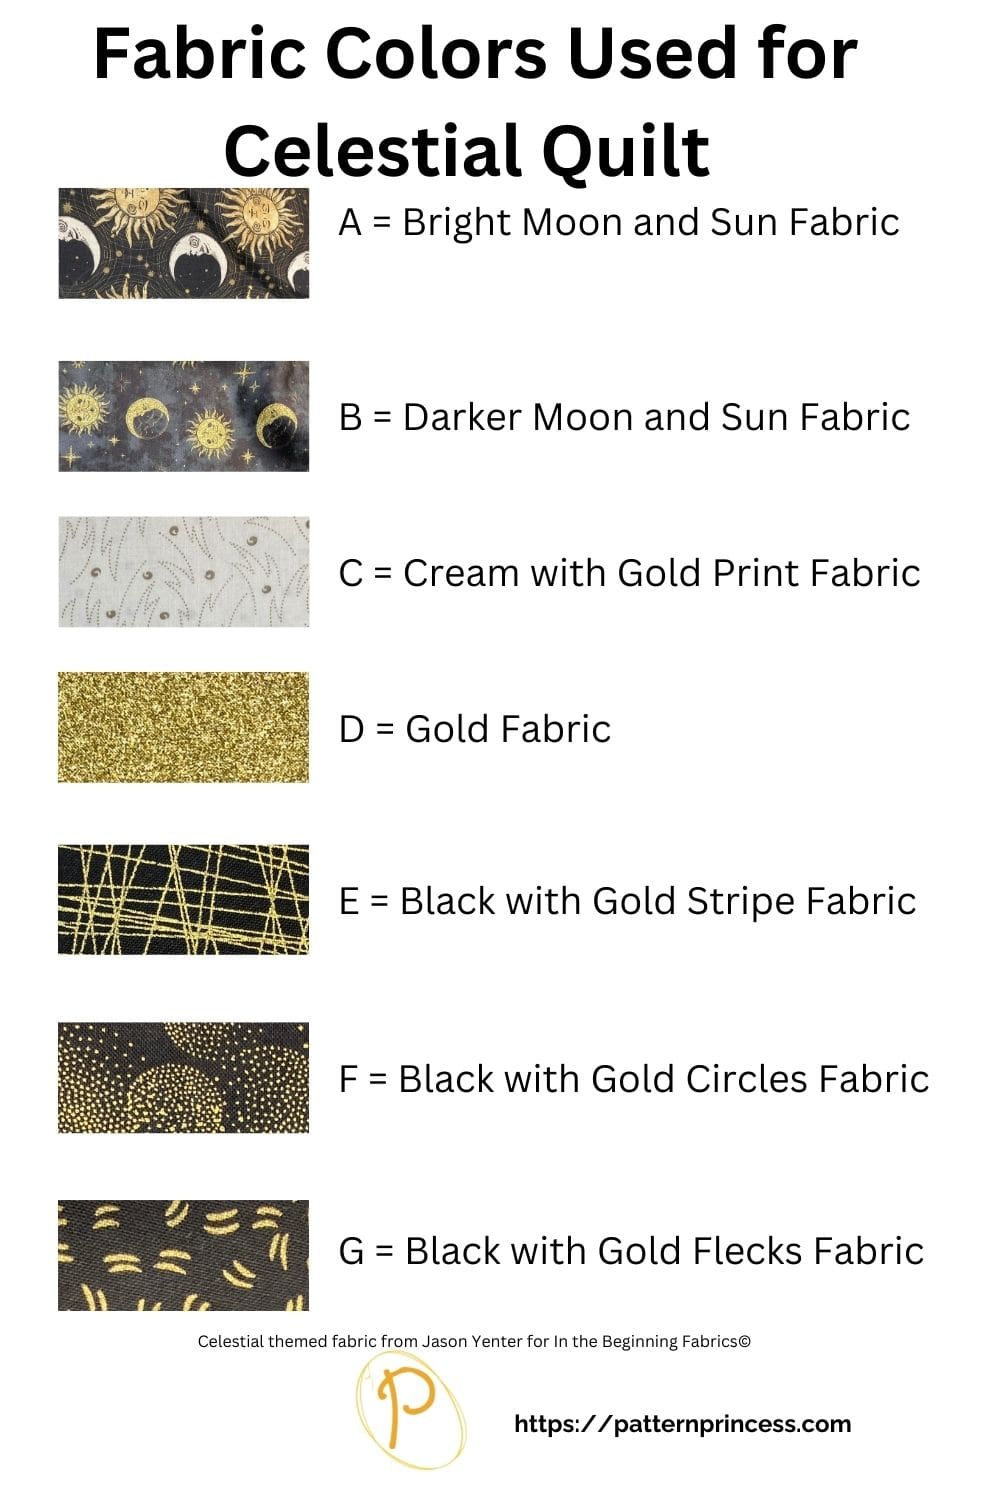
A = Bright Moon and Sun Fabric, 3/4 yard
B = Darker Moon and Sun Fabric, 3/4 yard
C = Cream with Gold Print Fabric, 7/8 yard
D = Gold Fabric, 3/4 yard
E = Black with Gold Stripe Fabric, ½ yard
F = Black with Gold Circles Fabric, ½ yard
G = Black with Gold Flecks Fabric, ½ yard
Backing
A piece 58 inches x 70 inches. 2 yards of 108 inch wide fabric or 4 yards sewn together of 42 or 44 inch fabric.
Batting
A piece 58 inches x 70 inches.
Binding
¾ yard cut into strips of fabric and joined. 2 1/2” X 258”. Jelly rolls work nicely joined for making your own binding too.
Equipment and Tools
- Thread
- Rotary Cutter
- Quilting Ruler
- Cutting Mat
- Rotating Cutting Mat
- Iron
- Ironing Board or Pressing Mat
- Pins
- Clips
- Sewing Machine
- My Favorite Quilting Supplies
General Cutting and Sewing
The directions for this quilt are for rotary cutting, machine piecing, machine quilting, and the binding is hand-stitched to the quilt back.
Accurate cutting and sewing helps ensure that seams line up for a beautiful quilt top. Pin your pieces together before sewing them to ensure proper seam alignment.
Pattern Notes
Choose any contrasting or complimenting colors of fabric.
All sewing in this tutorial uses ¼” seam allowance.
All fabric is sewn right sides together unless otherwise noted.
There are both colored photos and charts to help with the construction of the blanket.
Time Saving Tip: There are two borders 2 and 4 of the gold fabric. Rather than measure each side, top, and bottom separately and join the strips and cut to size ahead of time. I cut 2” strips the width of fabric. I made 10 of these. Then join each together as you would for making a long strip of binding. Next sew the strip of gold fabric to the sides and trim. Continue using the long strip as you sew to the top and bottom, trimming after each.
Fabric Cutting Directions
Center block Fabric
A = Cut 18, 6 ½” X 6 ½”. Bright Moon and Sun Fabric.
B = Cut 17, 6 ½” X 6 ½”. Darker Moon and Sun Fabric.
The center is made up of 35,6-inch finished size quilt block size in middle 5 blocks wide 7 blocks long. Alternatively, you could use 1 piece of fabric. 30 1/2” wide X 42 1/2” long.
Corner Squares Fabric for Borders 1, 3, 5
C = Cut 6, 3 ½” X 3 ½” squares. Cream with Gold Print Fabric.
E = Cut 6, 3 ½” X 3 ½” squares. Black with Gold Stripe Fabric.
Border 1 Fabric
Use the 2 pieces of C 3 ½” X 3 ½” squares for two corners.
Use the 2 pieces of E fabric 3 ½” X 3 ½” squares for two corners.
Sides
Cut 2 pieces of C Fabric 3 ½” X 32” Cream with Gold Print Fabric.
Cut 2 pieces of E fabric 3 ½” X 11” Black with Gold Stripe Fabric.
Top and Bottom
Cut 2 pieces of C Fabric 3 ½” X 20 1/2” Cream with Gold Print Fabric.
Cut 2 pieces of E Fabric 3 ½” X 10 1/2” Black with Gold Stripe Fabric.
Border 2 Fabric
Sides
Cut 2 pieces of D Fabric 2” X 48 ½”. Gold Fabric.
Top and Bottom
Cut 2 pieces of D Fabric 2” X 39 ½”. Gold Fabric.
Border 3 Fabric
Use the 2 pieces of C 3 ½” X 3 ½” squares for two corners.
Use the 2 pieces of E fabric 3 ½” X 3 ½” squares for two corners.
Sides
Cut 2 pieces of C Fabric 3 ½” X 31 3/4” Cream with Gold Print Fabric.
Cut 2 pieces of F Fabric 3 1/2” X 19 ½” Black with Gold Circles Fabric.
Top and Bottom
Cut 2 pieces of C Fabric 3 ½” X 20 1/2” Cream with Gold Print Fabric.
Cut 2 pieces of F Fabric 3 1/2” X 19 ½” Black with Gold Circles Fabric.
Border 4 Fabric
Sides
Cut 2 pieces of D Fabric 2” X 57 ½”. Gold Fabric.
Top and Bottom
Cut 2 pieces of D Fabric 2” X 48 ½”. Gold Fabric.
Border 5 Fabric
Use the 2 pieces of C 3 ½” X 3 ½” squares for two corners.
Use the 2 pieces of E fabric 3 ½” X 3 ½” squares for two corners.
Sides
Cut 2 pieces of C Fabric 3 ½” X 20 1/2” Cream with Gold Print Fabric.
Cut 2 pieces of G Fabric 3 1/2” X 40 ½” Black with Gold Flecks Fabric.
Top and Bottom
Cut 2 pieces of C Fabric 3 ½” X 16 1/2” Cream with Gold Print Fabric.
Cut 2 pieces of G Fabric 3 1/2” X 32 ½” Black with Gold Flecks Fabric.
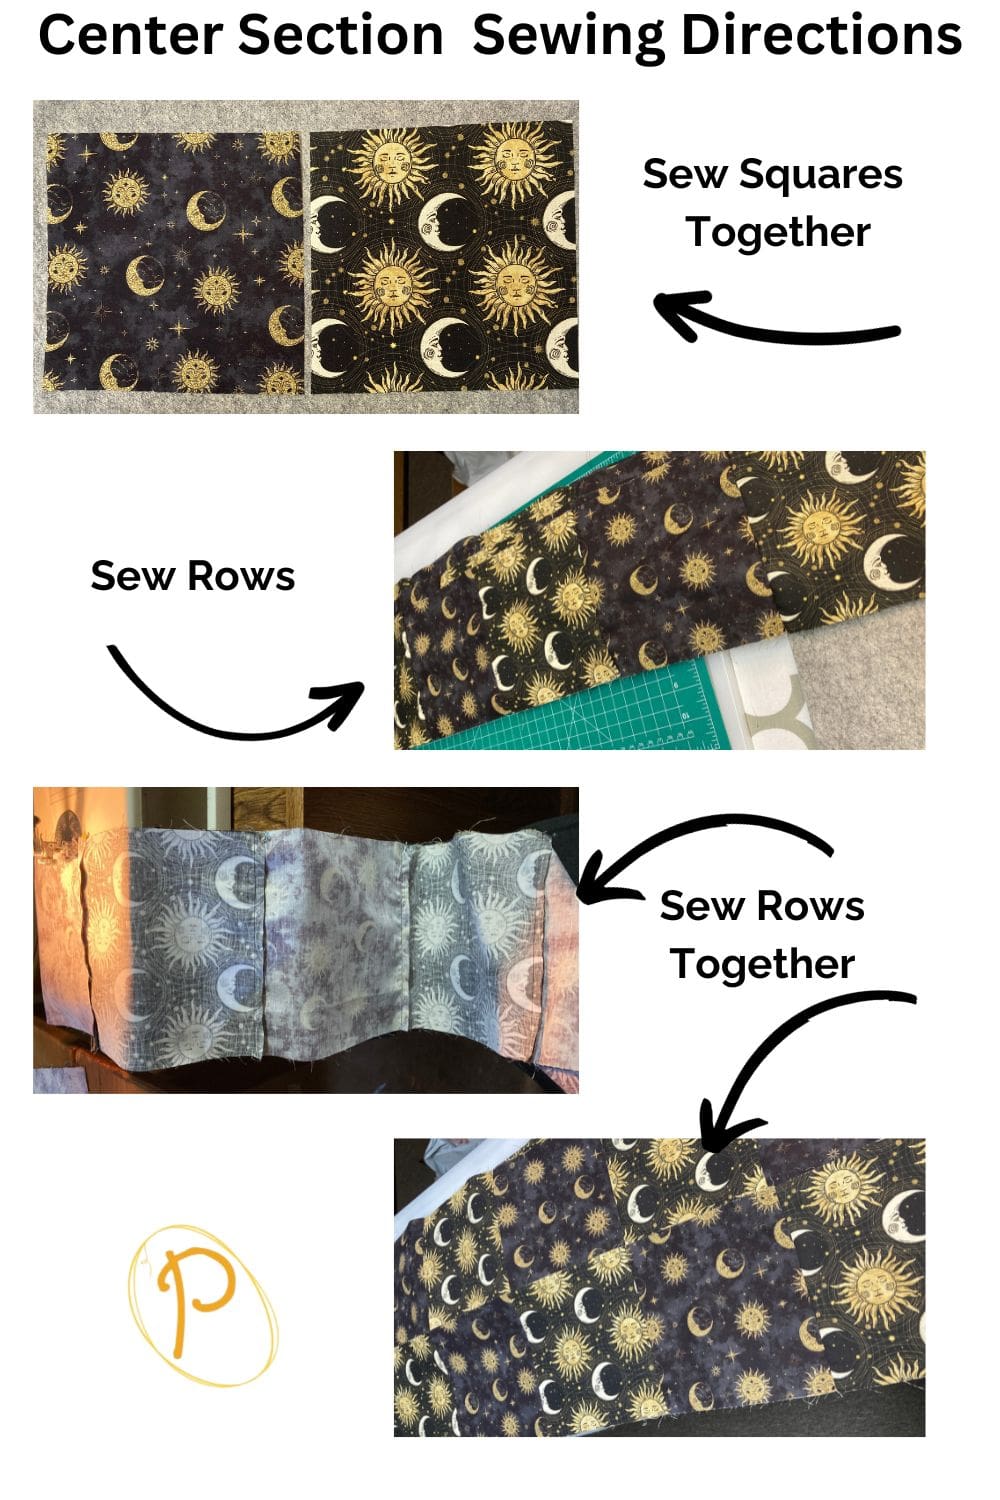
Center Section Sewing Directions
Begin with the 35, 6 ½” X 6 ½” squares of the A and B fabric.
There are a total of 7 rows with 5 squares in each row.
Begin sewing the first row of squares together alternating the squares A, B, A, B, A. See the diagram for fabric placement. Place squares right sides together and use ¼” seam.
Press seams to the right.
Layout the squares for row 2 according to the chart: B, A, B, A, B. Place squares right sides together and use ¼” seam.
Press seams to the left.
Continue alternating the squares for each row according to the chart for rows 3 through 7. Also, alternate which way you press the seams. This will help when you sew the rows together as it is easier to next the seams together.
Once all the rows are sewn, it is time to sew the rows together.
Once all the rows are sewn, join each row. Place row 2 on top of row 1 with the right sides together. Align and nest the seams securing with a pin.
Sew together using ¼” seam allowance removing the pins as you sew up to them.
Continue sewing the rows together making sure to align and nest the seams. Press the seams to one side or open.
Trim if needed to 30 1/2” wide X 42 1/2” long.
Begin Sewing on the Borders
Sewing Directions for Border 1
Using the pieces previously cut out for the first border.
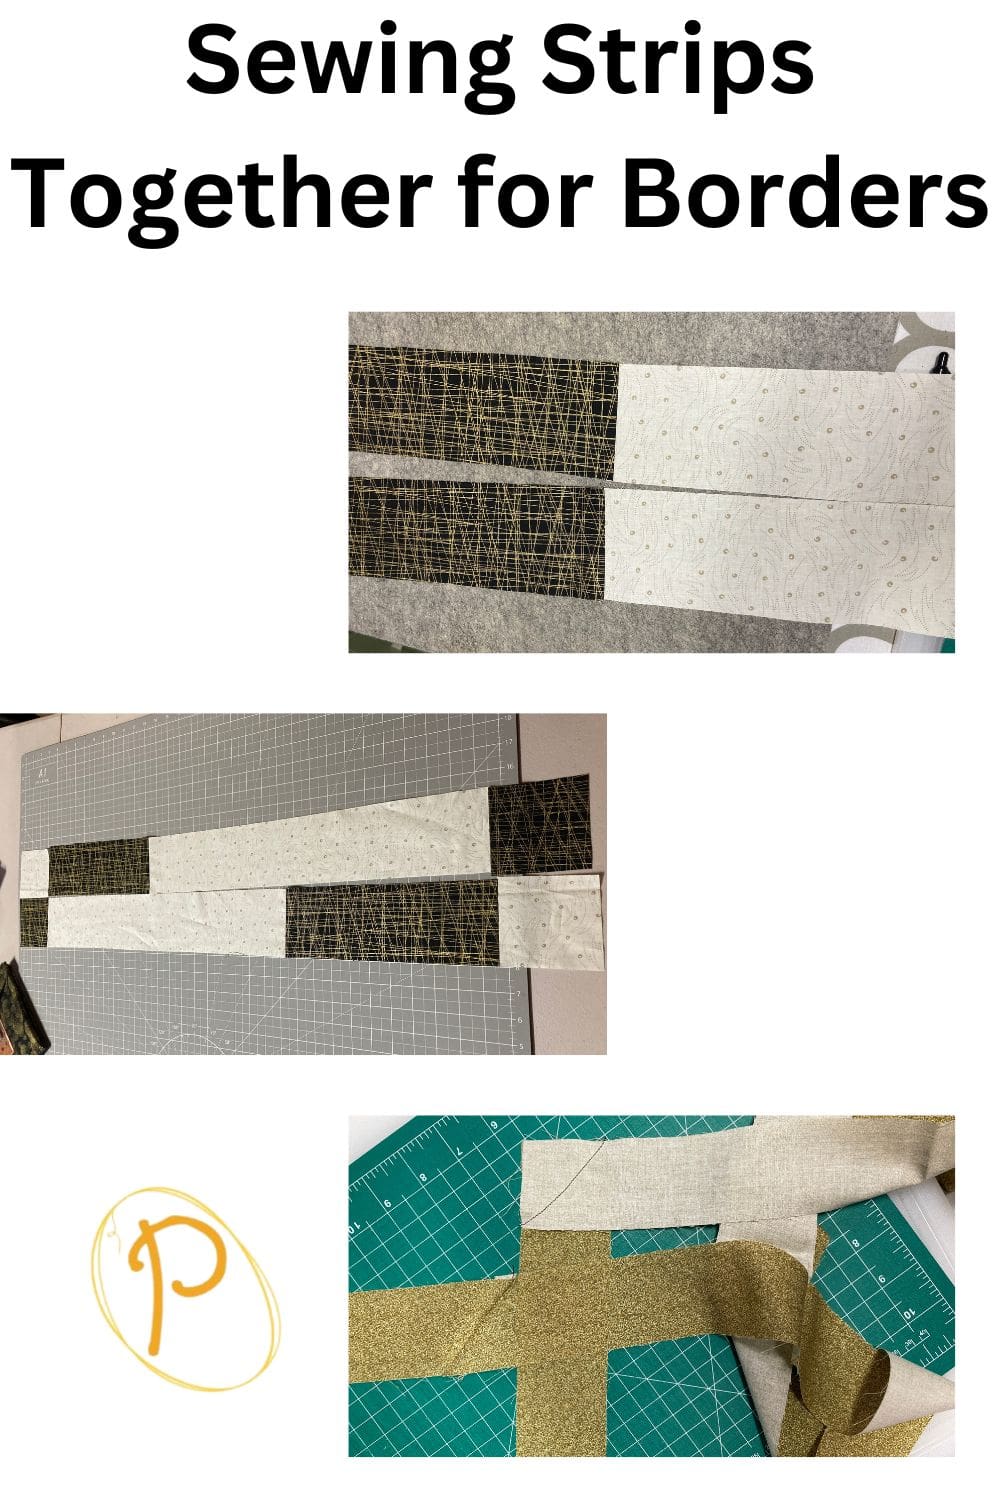
Sewing the Side Strips Together
With the right sides together using ¼” seam allowance, sew aC, Fabric 3 ½” X 32” Cream with Gold Print Fabric to the E, 3 ½” X 11” Black with Gold Stripe Fabric. Repeat the process for the other C and E fabric strips.
Press the seams to the darker fabric or open.
Using ¼” seam allowance and the right sides together. Sew the side strips onto the center quilt rectangle that is 30 1/2” wide X 42 1/2” long. Press the seams to the outside or open. (Use the diagrams to help with fabric placement. On the Right side, the black with gold stripe should be on the bottom and the cream with gold print should be on the top. On the left side, the black with gold strip should be on the top and the cream with gold print should be on the bottom).
Next Sew the Top and Bottom Strips Together with the Corner Squares
Begin by sewing one C, 3 ½” X 20 1/2” Cream with Gold Print Fabric strip to one E, 3 ½” X 10 1/2” Black with Gold Stripe Fabric strip. Just like you did for the side strips. Right sides together using ¼” seam allowance. Repeat the process for the other two strips.
Press the seams to the darker fabric or open.
Next Sew a 3 ½” X 3 ½” square onto each end of the strips. Align the lighter fabric squares, C with the darker fabric strips, E and the darker fabric squares, E with the lighter fabric strips, C. Refer to the diagrams for square placement. Press the seams to the inside, this will help nest seams when you sew the strip on.
Sew on the top strip with the right sides together using ¼” seam. Align any seams and pin in place to sew. The light cream square should be in the top left, then a dark strip, then light strip, and finishing with a dark square.
Press the seams to the outside or open.
Repeat the process for the bottom strip. The dark square should be on the bottom left, then a light strip, dark strip, and finishing with a light square.
Press the seams to the outside or open.
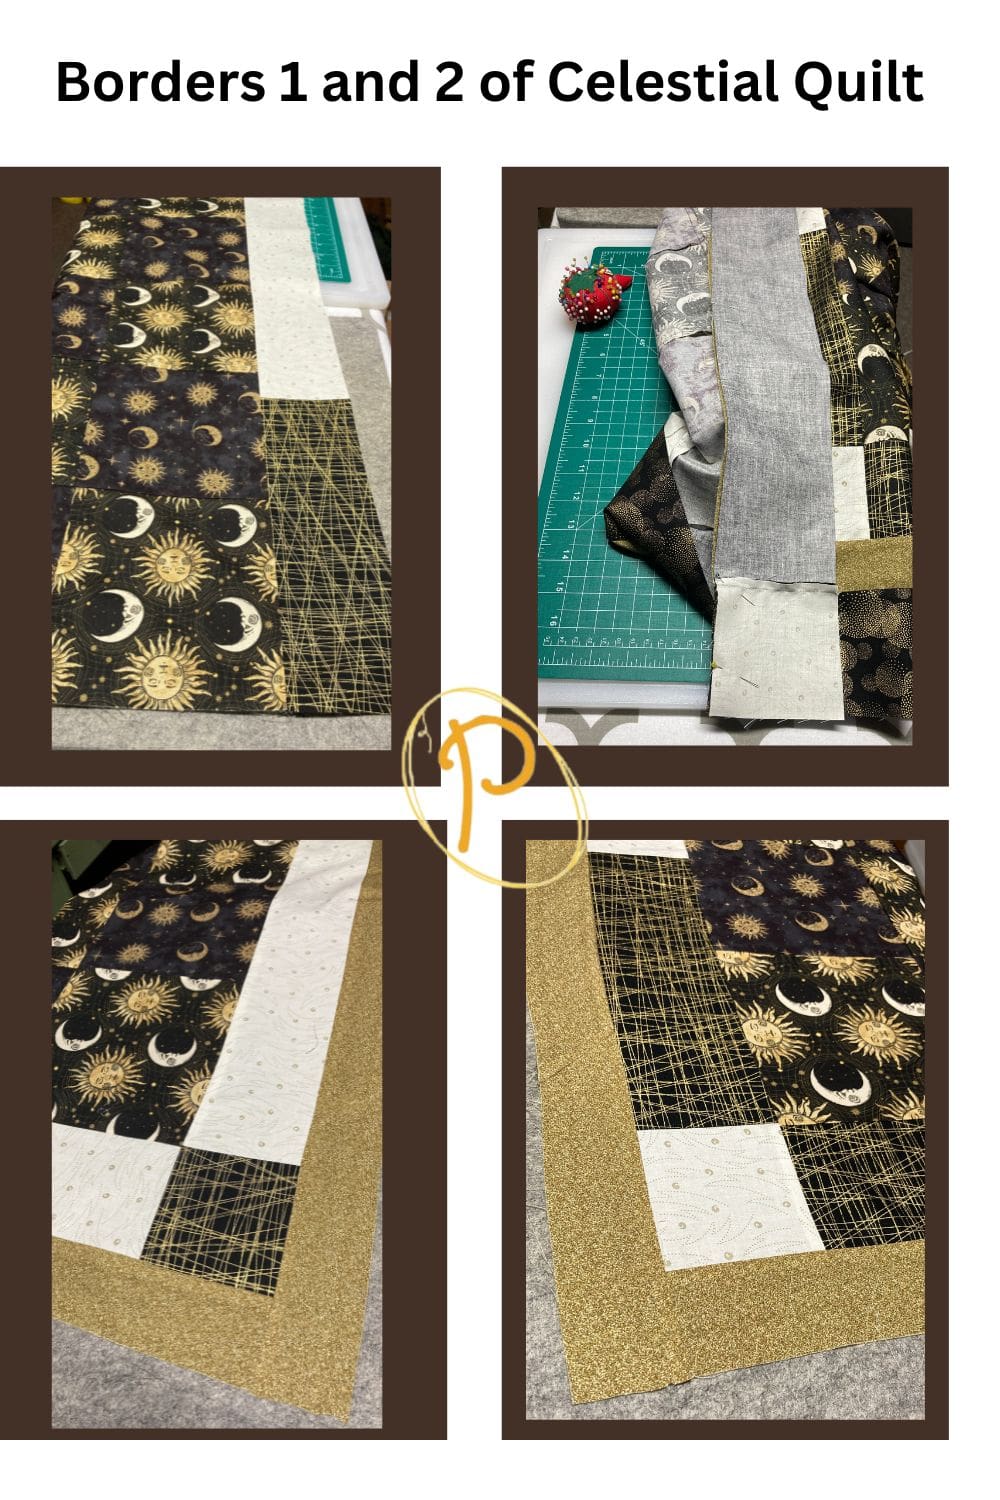
Border 2 Sewing Directions
Using the pieces previously cut out for the second border.
Gold Fabric D. Cut 2 pieces 2” X 48 ½”. Cut 2 pieces 2” X 39 ½”.
While this is mentioned in the pattern notes, I think it is worth repeating and making sure you see this. You can cut the fabric strips for borders 2 and 4, the gold fabric to the measurements indicated. However, you can also make one long strip and sew on the strip trimming even as you go along.
With the right sides together using ¼” seam, sew on the side strips. Press seams to the outside or open.
Continue the process and sew on the top and bottom strips and press the seams to the outside or open.
Sewing Directions for Border 3
Using the pieces previously cut out for the third border.
Sewing the Side Strips Together
With the right sides together using ¼” seam allowance, sew aC, Fabric 3 ½” X 31 3/4” Cream with Gold Print Fabric to the F, 3 1/2” X 19 ½” Black with Gold Circles Fabric. Repeat the process for the other C and F fabric strips.
Press the seams to the darker fabric or open.
Using ¼” seam allowance and the right sides together. Sew on the side strips. Press the seams to the outside or open. (Use the diagrams to help with fabric placement. On the Right side, the black with gold circles should be on the bottom and the cream with gold print should be on the top. On the left side, the black with circles strip should be on the top and the cream with gold print should be on the bottom).
Next Sew the Top and Bottom Strips Together with the Corner Squares
Begin by sewing one C, 3 ½” X 20 1/2” Cream with Gold Print Fabric strip to one F, 3 1/2” X 19 ½” Black with Gold Circles Fabric strip. Right sides together using ¼” seam allowance. Repeat the process for the other two strips.
Press the seams to the darker fabric or open.
Next Sew a 3 ½” X 3 ½” square onto each end of the strips. Align the lighter fabric squares, C with the darker fabric strips, F and the darker fabric squares, F with the lighter fabric strips, C. Refer to the diagrams for square placement. Press the seams to the inside, this will help nest seams when you sew the strip on.
Sew on the top strip with the right sides together using ¼” seam. Align any seams and pin in place to sew. The light cream square should be in the top left, then a dark strip, then light strip, and finishing with a dark square.
Press the seams to the outside or open.
Repeat the process for the bottom strip. The dark square should be on the bottom left, then a light strip, dark strip, and finishing with a light square.
Press the seams to the outside or open.
Border 4 Sewing Directions
Using the pieces previously cut out for the fourth border.
Gold Fabric D. Cut 2 pieces 2” X 57 ½”. Cut 2 pieces 2” X 48 ½”.
With the right sides together using ¼” seam, sew on the side strips. Press the seams to the outside or open.
Continue the process and sew on the top and bottom strips and press the seams to the outside or open.
Sewing Directions for Border 5
Using the pieces previously cut out for the fifth border.
Sewing the Side Strips Together
With the right sides together using ¼” seam allowance, sew aC, Fabric 3 ½” X 20 1/2” Cream with Gold Print Fabric to the G, 3 1/2” X 40 ½” Black with Gold Flecks Fabric. Repeat the process for the other C and G fabric strips.
Press the seams to the darker fabric or open.
Using ¼” seam allowance and the right sides together. Sew on the side strips. Press the seams to the outside or open. (Use the diagrams to help with fabric placement. On the Right side, the black with gold flecks should be on the bottom and the cream with gold print should be on the top. On the left side, the black with gold flecks should be on the top and the cream with gold print should be on the bottom).
Next Sew the Top and Bottom Strips Together with the Corner Squares
Begin by sewing one C, 3 ½” X 16 1/2” Cream with Gold Print Fabric strip to one G, 3 1/2” X 32 ½” Black with Gold Flecks Fabric strip. Right sides together using ¼” seam allowance. Repeat the process for the other two strips.
Press the seams to the darker fabric or open.
Next Sew a 3 ½” X 3 ½” square onto each end of the strips. Align the lighter fabric squares, C with the darker fabric strips, G and the darker fabric squares, G with the lighter fabric strips, C. Refer to the diagrams for square placement. Press the seams to the inside, this will help nest seams when you sew the strip on.
Sew on the top strip with the right sides together using ¼” seam. Align any seams and pin in place to sew. The light cream square should be in the top left, then a dark strip, then light strip, and finishing with a dark square.
Press the seams to the outside or open.
Repeat the process for the bottom strip. The dark square should be on the bottom left, then a light strip, dark strip, and finishing with a light square.
Press the seams to the outside or open.
Finishing the Quilt
Now that the quilt top is complete, it is time to Layer the Quilt Top, Batting, and Backing Fabric
The backing fabric and the batting should be a few inches larger all the way around than the quilt top.
Backing and Batting should be approximately 58 inches x 70 inches.
This helps ensure that there is coverage all the way around the quilt top.
Make the quilt sandwich by placing the backing fabric right side down on a flat solid surface. Smooth out any wrinkles and use painters’ tape to secure the edges of the fabric down. This will help hold it in place and reduce the chance of a wrinkle developing as you place the next two layers.
Next, center the batting on top of the backing fabric smoothing out any wrinkles.
Finally, place the quilt top on the batting, centering it with the right side up. Smooth out any wrinkles.
Secure the Quilt Layers Together
All three layers can be secured using 1 ½” stainless steel pins. You can also spray with a basting spray if preferred.
If you use safety pins, put a pin in each corner and around the entire quilt about every 5-6 inches or so through all three layers.
This holds things in place, so they don’t move around while you are sewing the layers together using a quilting design of your choice.
Trimming the Batting and Backing Fabric
Once you have completed quilting the layers together. Trim the backing and batting. I like to use a large cutting mat, longer ruler, and a rotary cutter for this.
If I have a larger quilt than my work surface, I lay as much of the quilt as I can on a flat surface over my rotary cutting mat. Place the ruler along the edge of the quilt and use it as a guide to run your rotary cutter against to trim the quilt batting and backing to the size of the quilt top.
Continue moving the quilt as needed to get all four sides trimmed.
Sewing The Binding Strips
Sew together the long binding strips that will be used to cover the raw edge of the quilt.
Make a strip 2 1/2” X 258”.
Either use Jelly Roll Strips or cut 2 ½ inch width of fabric strips (WOF) and join them together to make the length needed for the quilt. I cut 7, 2 ½” WOF fabric strips and joined them together.
You can find a tutorial for making binding on the website.
Once the strips are sewn together, fold in half lengthwise with wrong sides together and press.
Pin the raw edge of the binding onto raw edge of the quilt top. I generally start in the middle of a side leaving approximately a 3-5” tail hanging. Fold over about 1-inch to the wrong side. This will be used to cover the ending tail.
Using a walking foot, sew the binding onto all four sides making sure to miter the corners and join the binding.
Join the end of the binding to the beginning of the binding strip. Trim the end so it will tuck into the folded beginning tail about 1-inch. Continue sewing the binding.
When you have finished sewing all four sides of the binding onto the quilt.
You can use your sewing machine to sew the binding on the back of the quilt. However, I hand-stitched the folded edge of the binding onto the back.
Other free quilt patterns you may enjoy making.

You can find Victoria crocheting, quilting, and creating recipes. She has cooked in restaurants for over 20 years, including many larger parties. She learned to crochet when she was just 11 years old and has been crocheting ever since; over 50 years now. Over 40 years ago, she loved her first class in sewing and continues to hone her skills in quilting. Many have enjoyed the handmade gifts over the years. In her professional career, she has worked in management in a wide variety of businesses including higher education as a dean of a division. All the while attending college part-time to achieve her doctorate in higher education with an emphasis in e-learning.